Capturing the sound and nuance of the human voice can be a challenge. With so many different variables to consider, you may think the best way is to book a studio and let someone else take care of it.
Then you check the price of hiring a studio… Bother.
Although we can all dream of standing on the steps of Abbey Road studios, gearing up to sing into a microphone that costs the same as your car, as expected, the experience comes with a gargantuan price-tag.
This is why so many musicians have started to record in the comfort of their own home. And it’s easy to see why! The convenience of recording at home is much cheaper, more relaxing, and interestingly can be much more rewarding. The best way to learn is with hands-on experience, right?
What’s more, it actually costs much less to get started than you may think. Just because you want professional results doesn’t mean you have to pay thousands to make it happen.
Here are the 5 steps to record vocals at home so you can get started sooner rather than later. From picking the right equipment to ensuring it’s set up correctly, we’ll take you through step by step.
So let’s get started!
5 Steps to Record Vocals at Home Like a Pro [on a Low Budget]
Here are the 5 steps you need to know to crush it recording vocals at home.
1. Getting correctly setup to Record

So you’ve now got all the equipment and you’re eager to go. But if you set something up incorrectly, then you’re going to have a hard time fixing this in post…
Here are a few hints and techniques for ensuring that your recording process is as smooth as possible.
Microphone Placement
This is an easy one. You want the microphone as close to your mouth as possible, right?
WRONG.
It’s all too common seeing people record when they’re far too close to a microphone. If your lips are touching the mic, then you’re going to suffer from a whole host of problems, such as the proximity effect. You really, really want to avoid this.
Ideally, the microphone needs to be three hands away from your mouth.
No, we’ve not started measuring microphone distance the same way as measuring a horse. We literally mean three hand widths from your mouth. It’s also good to note that it needs to be the singers’ hands. This is really important. If you need to record again on another day, then you need the setup to be precisely the same; otherwise, the recordings will be noticeably different.
This distance provides a lot of clarity while also avoiding the dreaded boomy proximity effect.
So remember… Three hands.
Pop Filter Placement
This is an easy one.
The pop filter needs to be anywhere between your mouth and the microphone. Most pop filters come with a clamp at one end so you can easily connect them to your microphone stand.
It’s important to note that the pop filter needs to be clamped to the stand, and not the microphone itself.
Getting The Right Mic Level
Ensuring that you’re vocal recording at the correct gain level is essential for professional-sounding recordings. Thanks to the digital world that we live in, correctly gaining your microphone isn’t as important as it was in the analog days. But this doesn’t mean that it should be ignored.
If you go too close to the red, then the signal level will clip which will ruin your singing recording. Likewise, if you go too far under, then your signal-to-noise ratio will be too high.
On your DAW, you need to aim for the yellow area of the meter. This way, you still have plenty of headroom for more dynamic range. If you start going into the red, then it’s time to dial it back.
Prepare To Take Your Time
Good things come to those who wait. Recording a track is a fantastic example of this.
A sign of a bad sound engineer is someone who rushes their work. When you’re recording, you need to be prepared to take your time and be realistic about how long it takes to record one track.
When recording vocals, you should aim for a minimum of four different takes for the lead line. Why? So you can double track, find the sweet spots from each take, and do some cool effects in post production.
If you do a perfect take on your first recording, remember to do it again, then again, then again, and then again… You’ll thank us later!
2. The Vocal Mix Chain

Ok, so this isn’t strictly to do with recording your vocals. But if you want professional sounding audio, then you’re going to have to do some basic mixing/production.
When mixing vocals, it’s important that your processing chain is in a specific order. If the chain goes out of order, then you risk the track being unusable.
Corrective EQ
As you may have guessed by the title, corrective EQ is used to remove bad/resonant frequencies. It’s important that you use corrective EQ before any compression, otherwise you will be boosting the bad frequencies which will make your vocal sound unnatural and poor.
The easiest way to do this is with a parametric EQ. With a really narrow boosted band, sweep the whole frequency range until you hear a nasty resonance. As soon as you hear it, attenuate it and cut it out of the mix, keeping the narrow band. The point of corrective EQ is to surgically remove these resonant frequencies to save you from a headache later down the chain.
Compression
Compression is the key to making your vocals smoother – not louder. By controlling the vocal dynamic range, you will find mixing the whole track a lot easier.
Although compressors often look like something from the space shuttle, they’re actually very easy to use. You will find that starting with a 4:1 ratio, medium-fast attack, alongside a medium release is a good place to start with your vocal. From here, you can experiment with different settings to find your perfect sound.
Creative EQ
As the name states, this is where you get to become a little creative. You’ve removed any resonant frequencies, shaped the tone to your liking via compression, and must now add some sparkle to your track.
We recommend using a vocal EQ preset as a good starting point. From here, you can then fine-tune the bands to perfectly match your vocals.
Generally, you’ll want to add a small boost around the 5-6 kHz range. This gentle boost will brighten your vocal line and help it to naturally stand out. Next, you’ll most likely want to remove some mid-range – around the 1 to 2 kHz area. By removing this muddy range, it will tighten everything up and smooth out the tone.
Reverb/Delay
The main purpose of reverb and delay is to add an environment to your vocal. The addition of reverb will add a natural acoustic to your track and will help your singer sound more natural. But don’t go too far… Too much reverb is a fast way to ruin your vocals, and potentially even your entire mix! By using an appropriate amount, reverb will assist you in mixing and will help your track “glue” together.
3. Preparing Your Room

Acoustics can be a real deal-breaker when recording vocals. Choosing a room to record in is one of the most important decisions for recording vocals. You need to avoid picking a room with lots of reflective surfaces (mostly windows) as you will capture unwanted sounds in the recording process. Ideally, you want a room with lots of “stuff” in it.
This is why bedrooms are ideal to record in.
The combination of your mattress, duvet, curtains, rugs, and clothes offer a fantastic starting point for recording at home. If your bedroom’s acoustics sound a little bright, then try building a vocal booth out of pillows and duvets.
Likewise, you could also purchase an inexpensive vocal booth which would solve a lot of issues if you have a boomy room. They will provide you with that tight vocal sound that everyone loves.
4. Choosing Your Microphone

Finding a ‘one-size-fits-all’ microphone is tricky. Different microphones complement different vocal techniques, singing styles, and genres, so finding the right microphone for you is important.
There are two types of vocal mics: condenser and dynamic mics. You want to be concentrating on condenser mics, more specifically, those with a large diaphragm.
Condenser mics capture an insanely delicate sound. The use of a diaphragm enables them to record much more nuance in your voice, resulting in a more personal recording (compared to dynamic mics). You have to look after them though… The delicate electronics inside of a condenser microphone aren’t as durable as those in a dynamic. But if you treat them correctly, they will last you a lifetime.
That being said, a dynamic mic is also a fantastic choice in a wide range of situations.
Sure, in the perfect room with the perfect acoustics, a condenser will provide a fuller, more subtle range to your vocals.
But a lot of people use dynamic microphones in live vocal settings because they’re just easier to control.
If you have an excellent studio room, go with a condenser. But if your room is a bit wonky, or if you tend to deal with ‘extra noise,’ then a dynamic mic can actually help you to focus-in on the vocals and ignore outside sound.
When it comes to choosing your microphone, it’s easy to become overwhelmed by the choice!
The easiest way to find a microphone that suits you is to read through one of our microphone review articles. Alternatively, we’ve listed two of our favorites below!
Aston Origin – Surprising Results for the Investment
The Aston Origin is a masterclass in functional design. This British microphone company has only been in the business since 2015, but they have certainly hit the ground running!

At the heart of the Origin microphone is a 1” gold evaporated diaphragm. This capsule was chosen by a panel of 33 of the UK’s top artists, engineers, and producers. So you know it’s got to be good.
When using this microphone to record singing, you will immediately notice the sparkling harmonics and overall transparent sound. This is due to Aston’s clever use of electronics. By only using market-leading electronic components and combining them with their own custom designs, the Origin delivers a truly fantastic sound.
The Origin isn’t a $50 mic, but it’s not pricey either. When buying a microphone like this, it’s definitely better to think of it as a long term investment. You’re dropping a couple hundos on a piece of gear that will literally last you a lifetime… and that is nothing to scoff at!
In case you hadn’t noticed already, we really like this mic – it even looks fantastic!
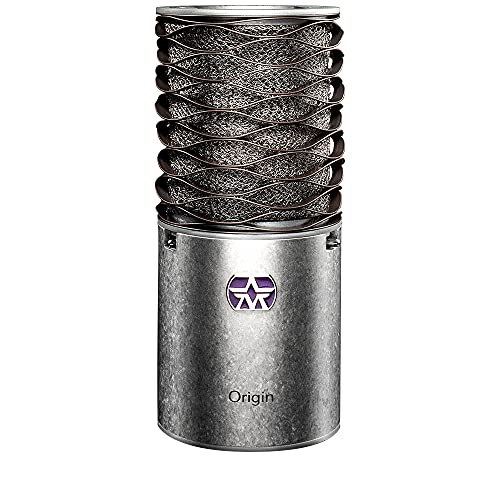
It’s safe to say that the Origin mic will make a fine addition to any recording home studio and will deliver professional results.
An All Tube Condenser Mic for Way Less than a Grand: The Avantone CV-12
This is one of the most ‘delicious’ microphones you can grab right now for under $1,000. It has been labeled as a ‘do it all’ workhorse… but where the Avantone CV-12 really shines is with vocals.
It is spectacular for vocals. If you’re looking for a fantastic vocal mic for recording vocals at home, this mic comes with a strong list of supporters. Taylor Swift, in fact, is said to only use the Avantone CV-12 in the studio… because of how amazing it makes her sound!
Regardless of what you think of her, that’s quite a compliment coming from one of the best-selling stars of the day!
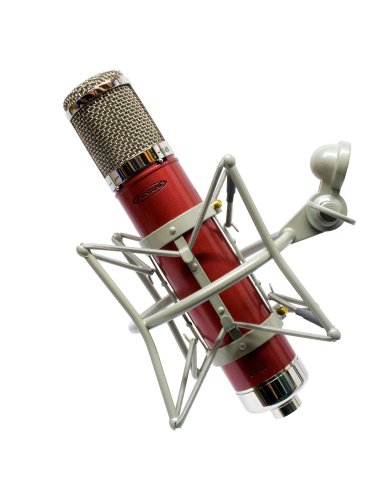
If you think the CV-12 looks familiar, you would be right. It was modeled after the original vintage Sony C800. But what really shines about this mic can be located on the inside.
Dissembling the CV-12, you’ll find a 12AY7 tube. It is swappable, though, and you can use a few different tubes in this bad-boy to try to get different sounds out of it.
One thing that most people don’t know about this mic is that it requires its own power supply… which it ships with. You get the power supply, a special cord, a beautiful wooden storage box, and a rugged carrying case to protect everything.
If you’re looking for a serious vocal mic upgrade, this mic is pure magic!
5. What Else Do You Need To Record Vocals At Home?

You now own your ideal microphone, so you can start recording straight away, right?
Although having a good microphone is the most important part of recording vocals at home, you will still need some other equipment.
But don’t worry, this part doesn’t have to be expensive. In fact, you can even get creative in this section and make some of the equipment at home!
Choosing An Audio Interface
You may be wondering how to turn your voice into a digital signal. This is where the audio interface becomes important.
By using some clever electronics, an interface is able to convert your analog sound (voice, guitar, drums etc.) and turn it into a digital signal. This way you can record directly into your computer (more on this later) and start editing your music.
Do bear in mind that audio interfaces can get pretty complicated, and equally expensive. But luckily for you, they don’t have to be. We recommend anything with one or two inputs, two outputs, and that can support phantom power (48V). The standard in the industry right now is the Focusrite Scarlett 2i2, but you can save $100 bucks and get a more than worthy starter, the Behringer Audio Interface.
Cables
The whole world relies on cables. They play a large role in almost everything we do. Without any cables, you probably wouldn’t be able to read this amazing guide, would you?
In all seriousness, you will require a few cables at some point during the recording process. Easily the most frequently used cable is the glorious XLR cable. Why is it glorious? The XLR cable has dominated the professional audio industry for over half a century and for good reason.
XLR cables are mostly associated with balanced audio (a signal with no interference) applications. Each cable has a male and female connector so they can easily be daisy-chained together to create one long cable. Thanks to their robust design, an XLR cable will easily last you a lifetime. And if anything were to happen, they’re super easy to fix!
All you need to do is plug one end into your microphone and the other into your interface. As long as your interface is connected to your computer then you should start seeing a signal. They’re pretty cheap as well, so there’s no need to buy expensive cables! This XLR cable offers a fantastic starting point.
(As a bit of fun, try asking anyone in the audio industry what XLR stands for – there’s a high chance they won’t get it! When the cable was originally manufactured 70+ years ago, it was called the Cannon X series. Not long after this, they added a latching mechanism and was henceforth known as the Cannon XL. A few years later they added rubber insulation, and the illustrious XLR cable was born.)
Pop Filter and Microphone Stand

A pop filter, or pop shield, is a basic piece of equipment that is essential for vocal recording if you want a good sound.
Place your hand a few inches in front of your mouth and say “Peter Piper picked a peck of pickled peppers”. Those burst of air that hit your hand are bad news for a microphone. This fast-moving air can cause the signal to peak, and potentially even ruin your track!
Pop filters serve to eliminate, or at least reduce this fast-moving air. They’re made of a semi-transparent material such as nylon, stretched over a circular frame.
Because of their basic construction, it’s not uncommon to find “bedroom engineers” with a homemade pop filter. Simply stretch some old tights over a bent clothes hanger or kitchen sieve and you have a pop filter!*
When it comes to buying a microphone stand, you really don’t need anything too special. It won’t impact the sound, unless it falls over!
You’d be right in thinking not to get the cheapest stand you can find, but if you’re recording at home then you’ll have no issue with an inexpensive stand. The AmazonBasics Tripod Boom stand will do the job for you!
*Ask for permission first. Microphone Basics accepts no responsibility for kitchen appliance induced arguments.
Choosing a DAW
Recording at home is science. After all, audio technicians are called engineers. Where it becomes a little subjective though is when introducing a DAW.
A DAW (Digital Audio Workstation) is a program used for recording, editing, and producing audio. They vary in levels of complexity and functionality. But at the core, they all do the same thing.
If you’re working with macOS, then we recommend starting with Garageband – it’s free! And once you learn how to use it, you can upgrade to Logic Pro X and enjoy near endless functionality.
If you’re working with Windows then we recommend starting with either Cubase Elements or Ableton Live (Intro). They both provide all the essentials needed for recording and producing music at home, while also having manageable price tags.
It’s worth noting that learning to use a DAW to its full potential takes a very long time. We suggest that once you’ve chosen your DAW, stick with it, learn all the shortcuts, and you’ll soon find yourself editing and producing music at a lightning speed.
Headphones

There’s a good chance that you already own a pair of headphones. But making sure that they’re the right kind is very important. You will need a good pair of headphones for two reasons: monitoring and mixing.
When your singer is vocal recording they will need to hear a beat of some sort. This can either be a backing track, or just a metronome, but they definitely need something to sing along to. This is where the type of headphone becomes very important.
If your singer uses open-back headphones, then the microphone will capture the sound they’re listening to and ruin your track. Ideally, you need a pair of closed-back headphones. They offer a more solid design and will enable you to pump the volume while also isolating themselves.
Having a pair of headphones is also really important for mixing your track once you’re finished. Although we recommend mixing with a pair of studio monitors, this isn’t always financially doable. If you mix through headphones then you can cut off the sounds coming from the rest of the world, and just listen to the sounds your creation.
Conclusion
There’s a lot that goes into singer recording at home, but that’s why it’s so exciting!
The most important part of this setup is the microphone. Although it is the largest expense, a quality microphone will make your vocals stand out and give you a great acoustic sound level.
You really don’t need to spend a serious amount of money on the rest of your setup though. As hard as it can be to get your singer to sound awesome, it really just takes practice to level-up your skills.
If you record a quality singer with the correct mic placement, and do some appropriate processing in post production, then your vocals will sound top dollar!