After starting your podcast, the hustle begins…
- Publish
- Publish
- Publish!!
Ready to get your podcast recordings sounding like a pro fast and free using GarageBand?
It’s a fairly simple process on your Mac and today you will learn all of the steps.
From recording tips, to eq, mixing, editing and more it’s all in this guide.
Can you make a podcast in GarageBand?
Let’s dive in.
Step 1 – Create a Template for Your Episodes
To save yourself from having to mess with the settings in a new GarageBand session every time you sit down to record, and to speed up your workflows, it’s best to create a custom template for your podcast show.
Open GarageBand, select Empty Project, and hit the Choose button.

You may be tempted to use one of the Project Templates, in particular the Voice template.
Resist that urge: it’s a trap.
The Empty Project option is perfect for podcasting.

The Voice template adds a bunch of unwanted sound effects like reverb to your vocal track, and you don’t want that. You just want to start from a blank, empty project session.
Step 2 – Add a New Audio Track
As soon as you open the software, you’ll be greeted with this pop-up window. Select the image with the microphone in it, and hit Create. This will create a new audio track in your session.

Awesome, now you’re getting somewhere!
Before you get all excited though, we still have a little more admin to do.
By default, GarageBand still adds some sound effects to your audio track.

None of them are actually doing anything yet, but it’s a good idea to turn them all off anyway, as you don’t want to accidentally add any EQ or Echo that you don’t want.
Untick the button next to Master Echo and Master Reverb, and turn off the Channel EQ plug-in.

Step 3 – Set Up Your Audio Preferences
Depending on your recording setup, your audio preferences may be set automatically by your Mac. Regardless, it’s good to jump in and make sure everything is looking how you want it to.
Head up to the GarageBand menu at the top left corner of your screen, and hit Preferences.

Navigate to the Audio/MIDI tab in the Preferences window, and make sure your audio interface or USB microphone is showing up as the Input and Output (or input only if you are using a USB microphone that doesn’t have a headphone output).
Note:
If you want the best podcast mic ideas, check out this guide.

Lastly, make sure the track you’re recording to is set to the correct input. It’s probably going to be input one, but make sure it’s set to the same channel that you have your microphone plugged into on your interface.

Step 4 – Track Naming Conventions
For the sake of fast workflows and easy navigation, it’s a good idea to come up with a naming convention for your audio tracks. That means you won’t end up with a bunch of tracks called “Audio 1”, “Left Track 37”, and “Final Edit 14”.
You might choose to call your audio tracks Voice 1, 2, etc., or even use the names of your hosts. It ultimately depends on what is going to work best for you, but it’s a smart idea to come up with something and stick to it.

Now, go ahead and save your GarageBand session as a template. I like to create a master folder for all of my files, and then save these sessions clearly labeled as your TEMPLATE.

Here’s the important part:
When it comes time to record each of your podcasts, make sure you open GarageBand and then click SAVE AS to save this as a different project, keeping your template file clean for future podcasts.
Step 5 – How To Record in GarageBand
Recording in GarageBand is super easy, though you’ll need to approach things slightly differently for single-host podcasts than multi-host shows.
Single-Track Recording
If you’re the only person speaking on your podcast, or you’re simply recording an intro or voiceover section featuring just you, then you’ll be using GarageBand for single-track recording, which basically means you’re only recording on one audio track at a time.
To record, just hit the little red button in the transport bar:

GarageBand will give you a one bar count-in, which you can turn off if you want to, though it’s nice to have a little run-in time before you start recording. If you’re a fan of keyboard shortcuts in GarageBand, then you can simply use the R key to start recording.
You’ll notice that while recording, an audio region will appear in red, and the playhead will turn red also:

Hit spacebar to finish recording, and the region will turn blue, meaning you’re no longer recording:

Multi-Track Recording
Multi-track recording is something you’ll want to use when you have multiple hosts or guests on board, and you need to record everyone’s voices at the same time (assuming you have them on different microphones).
The first step to take is to check that you have the audio tracks sent to different inputs. Remember how you set up the track input when you created a template?
Well, make sure your second track is set to input 2, your third to input 3, and so on.
Now, by default, GarageBand will only let you record onto one track at a time (the one that’s selected). Thanks, Apple. That’s why there’s an extra step to multi-track recording.
To enable multi-track recording in GarageBand, head up to the Track menu and select Configure Track Header.
In the menu that opens, check the button next to Record Enable.

You’ll now see a new little button with a circle in it appear in each track header. Select the box on each track you want to enable for recording, and when you hit Record, both tracks will record audio at the same time:

Step 6 – Tips for Optimal Microphone Use
It’s important to note that while GarageBand is an incredibly capable software, it can’t make up for poor microphone technique, and editing can only help you so much.
You want your podcast to have professional sound quality, right? Otherwise, you’re probably not going to impress many listeners.
So, here are a few tips for optimal mic use.
Distance & Consistency
The distance between your microphone and your mouth determines the level of your voice recording, as does how loud your actual voice is!
If you’re using a dynamic mic like the Shure SM7B (a favorite among podcasters), then your distance from the mic capsule really matters, as the volume drops off significantly as you move further away.
So, there are two things to remember when recording a podcast:
- Try to keep your voice at relatively the same volume. Aim to not speak too loud or too quiet, as this will make your audio levels inconsistent.
- Keep a consistent distance between your mouth and the microphone. An ideal distance to aim for is around 6-12 inches, meaning you don’t have to be right up close to get the perfect audio quality.
Following these tips will mean less work when it comes to the editing stage.
Plosives & Pop Filters
A natural part of human speech (especially in English), is the existence of plosive sounds.
Plosives are percussive sounds like P and B, which tend to be over-pronounced in a recording setting.
The reason for this is that the shape your mouth makes when forming those sounds causes a strong burst of air to hit the mic capsule, which when recorded in GarageBand, sounds way louder than it does in real life.
And it’s not a great sound.
The best way to avoid plosives, other than trying not to be too percussive with your voice, as well as keeping a consistent distance from the mic, is to use a pop filter.
A pop filter is a small shield of mesh material that helps to reduce the airflow from plosive sounds reaching the mic capsule, and essentially keeps them from being recorded (or at least lowers their volume to a point where it isn’t such a big deal).
Some mics have internal pop filters, others come with slip-on windscreens, and for others, you’ll have to purchase an external pop filter.
Luckily, these are pretty affordable.
So, you’ve got your GarageBand session set up, you’ve nailed your mic technique, and you’ve recorded your first podcast episode.
The next question to answer is this:
Can you edit a podcast in GarageBand?
Step 7 – GarageBand Trim Tool
The short answer here is yes: editing a podcast in GarageBand is super easy.
It’s likely that throughout your recording, there may be some noises you want to get rid of (like coughs and breaks in speech to grab a drink of water). You can simply and quickly use GarageBand’s editing tools to clean up your audio tracks.
There are a couple of ways to edit in GarageBand:
The first is to use GarageBand’s trim tool. Simply move your cursor over the botto=m right-hand or left-hand corner of an audio region, click, and drag to trim an audio region down to your desired length.

To move entire regions around in the timeline, click and drag from anywhere in the middle of the audio region.
Step 8 – Splitting Audio Regions
The second way to edit audio regions is to use the Split at Playhead function.
To use this in GarageBand, simply grab the playhead and drag it to where you want to splice your audio region. Then, right click the region and select Split at Playhead. Or use the key command: Command+T.

Step 9 – Adding Music
Now you’ve got your podcast recorded and all of your audio nicely edited. It’s time to add some music to your project.
Whether you’re looking to simply add some intro and outro music, throw in some effects, or even create an entire music bed for your podcast, adding music to GarageBand is easy.
Importing Audio Tracks
Want to import a music bed or audio file you have into GarageBand?
The easiest way is to just drag the file from Finder into your GarageBand session!

Using Apple Loops
One of the best parts about using Garageband to record a podcast is that you have access to a massive library of professional audio loops. These are great for using as music beds, or to find a sting for your podcast intro.
Hit O to bring up the Loop Browser on your screen, select your Instrument, Genre, and Descriptors at the top of the screen, and choose an audio clip that you like the sound of.

When you find a sound you like, simply click and drag it into your timeline, anywhere on the screen and you’ve got the audio ready to go!
Step 10 – Arranging Audio Tracks in GarageBand
Now that you’ve got all the audio you need in your session, it’s time to do some arranging.
This is a pretty simple process: just drag the audio regions around so that they flow nicely between each other, and use the edit tools you learned about earlier to make any additional cuts to your tracks.

Step 11 – Mixing Your Tracks
You’ve probably noticed by now, especially if you’re using a bunch of different pieces of music and audio recordings, that some tracks sound louder or more pronounced than others.
It’s time to fix that by doing a little mixing.
The two most basic elements of mixing are level (volume of each track), and pan (left to right).
Both of these controls are available on each track.
For most podcasts, you probably won’t be doing much panning, and so you should simply rely on the volume controls to make sure every voice on your episode is at the same volume, nobody sounds too loud or quiet, and you can hear every voice above the music bed (if you have one).
It can take a little time to get the levels just right, but it’s absolutely vital to a great sounding show.

Step 12 – How To Use EQ To Maximize Audio Quality
The next big tip when mixing a podcast episode is to use EQ.
EQ (equalization) is a tool that audio engineers use to manipulate the frequency range of an audio track. It can make voices sound brighter, darker, more or less nasal, and can help remove boominess. It also affects perceived volume, so be careful when using EQ effects.
Double click on a track to bring up the Smart Controls section, and open up the Channel EQ plug-in.
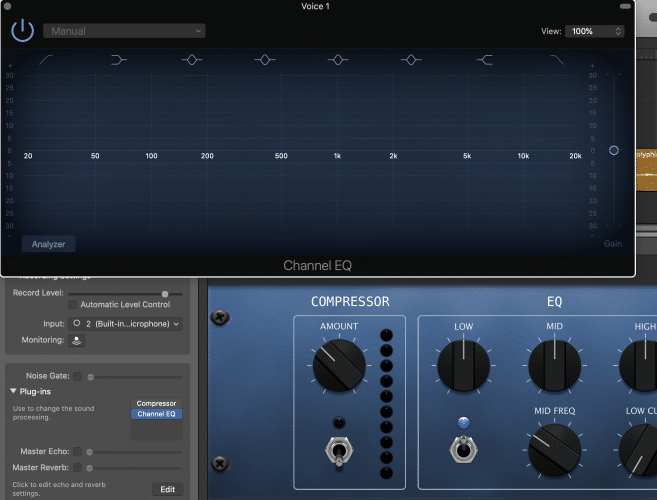
There are no hard and fast rules when it comes to EQing, it really depends on the content of your track.
However, there are a few good tips for mixing voices:
- Cut out anything below 80Hz – this takes out any unwanted low-end
- Subtle dips in the 100-350Hz range can remove boominess and excessive weight in the voice
- If your voice sounds a little nasal and honkey, try making cuts between 1-4kHz
- 5kHz and above is where the presence and breathiness exists in the voice – you can boost this slightly if the recording is lacking
Bonus EQ Tip: Making Space for Voice Tracks
If you’re using a music bed on your podcast, you may find the frequency range of the track conflicts slightly with your voice records.
An easy way to get around this is to make a sharp cut in the 1-3kHz range on the music bed, and boost this same range slightly in the voice track.
This creates a nice little ‘tongue and groove’ effect, essentially creating space in the music bed for the voice track to shine, and is one of the most subtle yet effective effects that you can create in the free software.

Step 13 – Using Automation in GarageBand
You might notice while mixing that certain parts of a voice recording are louder than others, and so a single level just doesn’t work.
Enter Automation.
Hit the A key to bring up the automation data on each track, and you’ll see pale yellow lines on each track. Click anywhere to create a node, drag it to the required level, and let it sit.
GarageBand will then automatically push the level of the track up and down according to the automation you’ve written.

Step 14 – Setting a Master Limiter
Here’s another sneaky little bonus tip for you podcast enthusiasts.
To make sure we don’t have any digital overages (ugly digital distortion), let’s set a limiter on the master output.
Open up the Smart Controls by double clicking any track header, and at the top left of the window that opens up, switch over to the Master tab by clicking the button.

Open up a Limiter in one of the plug-in modules, and simply dial down the output level to -0.2dB. This will ensure that if your master output approaches 0.0dB (the digital ceiling where ugly clicks and pops happen), the limiter will catch and compress the track slightly, keeping the resulting audio nice and clean.

Step 15 – Exporting Your Tracks
It’s finally time to export your finished file!
Navigate to the Share tab at the top of your Mac, and click Export Song to Disk…

In the window that opens up, make sure to rename your audio file, again using a file naming structure that makes sense for you (NOT final episode 42).
Though you want your resulting audio files to be high-quality, you should also bear in mind that podcast hosting platforms often charge based on the amount of space you’re using on their server.
For a good middle ground, choose MP3 at 128kBit/s.

How Do I Record a Podcast on My iPhone Using GarageBand?
The iOS version of GarageBand is almost every bit as good as Apple’s desktop version for podcasting, and it’s also free!
To record podcasts on your iPhone or iPad, simply open up the GarageBand app and click on the microphone symbol in the top right hand corner.

This will open up a new project without any unwanted sound effects on the track, and it should look like this:

Often when you open the app, it will take you straight to the last session you were working on. To create a new project, choose the dropdown menu at the top left corner of your screen, and select My Songs. Then you’ll be able to create a new project.
You can toggle between different views using the third button from the left, which changes between an arrange window symbol and a mic symbol depending on which mode you’re in.
All you need to do from here is hit the record button at the top of your screen, and you’re set!

If you want to access Apple Loops, hit the Loop button at the top right of your device. To mix the levels of each track, drag from the left side of the screen to show the track headers, and adjust the volume from there.
Editing in the iOS version of GarageBand is pretty simple too: double click on a region and select Split to split at playhead, or you can edit by dragging the region in from either end.
Once you’re done editing, it’s time to export your audio file.
The app doesn’t really let you save an audio file directly to your phone, but it does let you share it quickly and easily via email, AirDrop, or messenger apps.
Head back to the My Songs menu, and tap and hold the project you want to export:

Choose the Song option to share your podcast as an audio file:

Is GarageBand Good for Podcasting?
There are definitely more in-depth DAWs, but for most users, GarageBand is ideal for podcasting, offering the perfect middle ground between features and ease of use. Plus, it’s free!
You can create an entire high-caliber podcast show – from creating an intro sting to recording multiple hosts to using Apple Loops to add a little extra creative flair in the editing process – with GarageBand for Mac OS or the iOS version.
And that’s all the help you should need: 15 simple steps for using GarageBand for podcasting.
Go create!