This GarageBand tutorial is going to give you the exact ten-step process to make your tracks sound amazing.
Here’s exactly what you’re going to learn:
- Opening a new session and navigating GarageBand
- Using Apple Loops
- Using software instruments
- Editing MIDI data
- Making beats
- Using GarageBand’s drummer
- Recording and editing audio
- Applying plugins
- Exporting your song
- Working with video
Ready?
Let’s dive in.
Starting A New Project
First thing’s first, click on the GarageBand icon to fire up the software.
You’ll be greeted with a dialogue box that looks like this:

GarageBand has some pretty cool templates to use which you can find under Project Templates. These can be a great way to get into making music quickly, and are awesome for learning your way around the software. For now, open up an Empty Project.

The next step is to choose a track type. Don’t worry, this doesn’t affect the way your session will operate. You can (and will) have many different tracks and types. This is just about choosing your first one.
There are 4 types of tracks in GarageBand:
- Software Instrument – for writing music on virtual instruments like synths, piano, drum kits, mallets etc. You can use a MIDI keyboard to play this instrument, or simply use the keys on your Mac (more on that soon).
- Audio (mic) – this is for recording with a microphone, typically for vocals.
- Audio (guitar) – for if you want to record guitars or bass direct (no amp), and use GarageBand’s virtual amp modelling and effects.
- Drummer – a special type of track that literally drums for you! Just set the parameters and let GarageBand do it’s magic.
Let’s start with a Software Instrument track.
Learning How To Get Around In GarageBand
The GarageBand GUI is pretty straightforward, and most of what you’ll need to access is on one screen:

Learning About The Key Controls in GarageBand
- Track name – software instruments default to their instrument type, but you can change this
- Track mute and solo buttons
- Track volume and pan controls
- Add new track
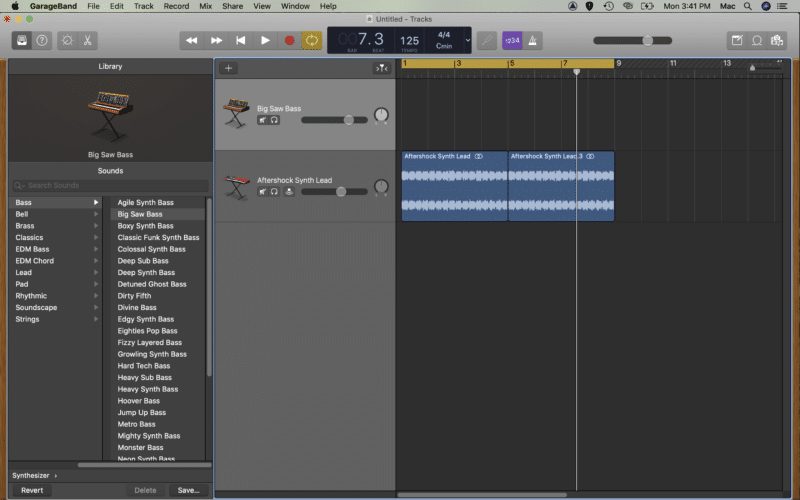
- Library – browse the Library to select and experiment with different software instruments
- Transport controls – play, pause, loop etc
- Project time info – BPM, time signature
- Loop on/off – turn this on and GarageBand will continuously loop the selection
- Metronome (click) on/off
- Timeline – recorded audio, Apple Loops and programmed parts display here
- Master volume control
- Display zoom in/out
- Notepad, Loop Browser, Media Browser – toggles between three views
Learn Your Keyboard Shortcuts in GarageBand
Though you can do virtually anything you need with a click of the mouse, it’s good for your workflow (and your mouse hand), to memorize a few shortcuts. Here are some you’ll use often:
- Play/Pause – Space
- Show/Hide Library – Y
- Show/Hide Smart Controls – B
- Show/Hide Editor – E
- Show/Hide Loop Browser – O
- Show/Hide Media Browser – F
- Solo Track – S
- Mute Track – M
- Loop On/Off – C
- Record – R
- Show/Hide Video Track – Shift + Command + O
Learning To Use Apple Loops In GarageBand
One of the quickest ways to get started learning how to work with GarageBand is by making use of the included library of Apple Loops.
These are a selection of high quality audio loops that feature everything from drum beats to synth melodies to vocal chops.

You can narrow down the selection by choosing instrument and genre types, and picking some descriptors.

Click a loop in the browser to audition it, and once you’ve found one you like, simply drag it into the timeline. You might find that certain loops have more than one version.
This can be a great way to spice up your song… for example, using one version for the chorus, and a different version in the bridge.

It will then appear on your timeline as an audio file, and you can manipulate it just like any other kind of audio track (you’ll learn about this soon).
Hit L to loop the audio to the end of your project, or Option-drag the region to copy it over if you want more than one repeat.

Thanks to Apple Loops, you have hours of inspiration for new music ideas, or for creating music beds for your video content production.
Making Music With GarageBand’s Software Instruments
Software instruments are basically the music producer’s dream. They’re essentially digital versions of all our favorite instruments!
Sure, there are plenty of great synths, but GarageBand also borrows some sweet pianos, organs, mallets, and guitars from it’s big brother Logic Pro X.

Once you’ve seen an instrument you like, double click on the instrument name and GarageBand will automatically create a new instrument track.
Playing Software Instruments
If you’ve got an external MIDI keyboard plugged into a set up, you’ll now be able to control this instrument with it!
If you don’t have one, fear not. GarageBand has a sweet little trick up its sleeve for that. Head up to Window in the top bar, and click Show Keyboard.

You’ll see a window like this pop up, and you can use the mouse to click on different notes on the keyboard.

For a more interactive approach, toggle over to the computer keyboard mode.
You’ll see that GarageBand has turned your Mac keyboard into a piano style keyboard, giving you access to over an octave’s worth of notes, and the ability to manipulate velocity, modulation, and octave at the push of a key.

Hit R to record and start jamming!
Editing Performance Information
Once you’ve recorded some sweet melodies, you might want to go back in and make some subtle changes. Maybe your timing was a little off, or perhaps you hit the wrong note.
Either hit E, or double click on the region in question, to bring up the Editor. This will display all of your MIDI info on the piano roll.

You can then drag MIDI events forward and back to adjust timing, or up and down to edit the pitch of each note. The velocity slider even gives you control over how soft or hard each of the notes are played.
Try not to go overboard with editing though, as it can dehumanize your productions. Learning when to edit and when to leave things be will be key to making your productions stand out.
Learning How To Make Beats In GarageBand
Software instruments aren’t just about writing beautiful melodies though. Garage Band has a sweet suite of drum instruments too.
With access to both live and electronic drum kits, making beats in GarageBand is a pretty straightforward affair. Simply fire up a kit as you would any other software instrument, and use your keyboard or MIDI controller to drum in a groove.
Alternatively, you can write drum beats using the piano roll.

Depending on your genre, you might want to use GarageBand’s quantize function to bring all the drum hits in line with the tempo grid.
Again, spend some time learning about when quantizing adds, and when it detracts from your productions.
Making beats doesn’t come naturally to all of us. But thankfully, GarageBand has our back there too!
Learning To Use GarageBand’s Drummer
This is probably one of Apple’s greatest inventions when it comes to audio software: the GarageBand drummer track.
Drummer tracks are essentially a virtual drum player, that you can control via a set of sliders, knobs, and matrices. Just set up the controls and they’ll write something for you. Yep, you heard that right. They WRITE DRUM BEATS FOR YOU.
Goodbye years spent learning how to play complex drum patterns, just use GarageBand!
GarageBand comes with a bunch of different drummer profiles, that all have slightly different playing styles, kits, and chops. Spend some time learning what each of them have to offer.
You start by selecting the genre that most suits your song, and then choose a drummer.
GarageBand has even given each of the drummers a name and a little bio, to help give you an idea of the kind of vibe they’ll bring to your track.

You can change the drum kit they are playing under Sounds, though you’ll probably get the best results leaving it on the default kit.

From there, it’s simply a case of looping a section of your track and dialling in your preferences.

You’ll see the audio region change too as you make adjustments in the Editor.

Changes in the Editor are region specific.
That is, you aren’t changing the way the drummer plays for the whole track, only for that specific region or beat. This means you can set up a fairly soft, minimalist beat for the verse, and then raise the complexity and velocity when the beat drops.
Learning To Use Audio Tracks In GarageBand
Let’s be honest, you could probably get away with simply using software instruments and Apple Loops. But you’ll do so at the risk of sounding just like every other bedroom music producer out there.
If you really want to stand out, you’ll need to get out of the loop library and get a mic in front of something, or start learning how to sample.
How To Record Audio In GarageBand
You’ll want to start by creating a new audio track.

If you haven’t already set up your recording device, head to GarageBand>Preferences, and select change the input to your audio interface or USB mic.


Once this is all set up, simply select the track you want to record, and hit the little red dot (or press R).
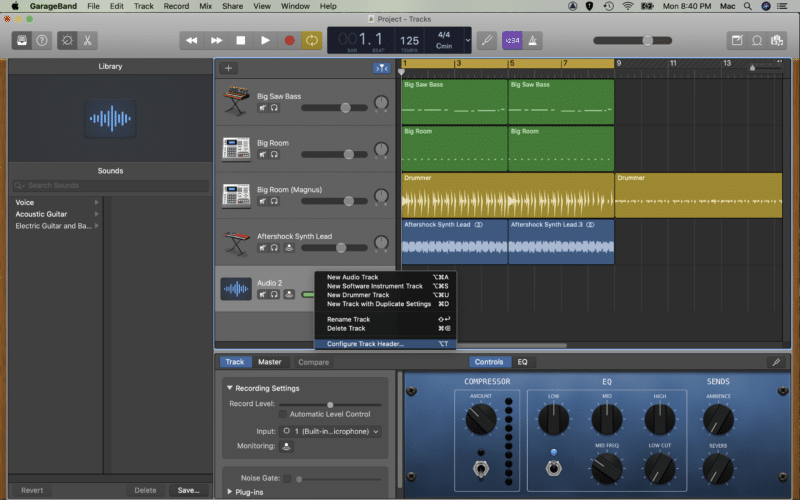
If you’re wanting to record more than one track at a time in GarageBand, you’ll first need to enable the record arm functionality. To do this, right click any track and select Configure Track Header.
Not Content With Your Recordings? – Learn To Use GarageBand’s Editing Functions
One of the greatest privileges of making music in the digital age is the ability to endlessly edit audio. Go back not even 50 years, and sound engineers were cutting up little bits of magnetic tape and sticking them together. Command-Z didn’t save sh*t back then.
Learning how to use GarageBand’s editing tools is one of the best ways to make any song you produce sound like a professional production.
There’s a couple different ways you can do this:
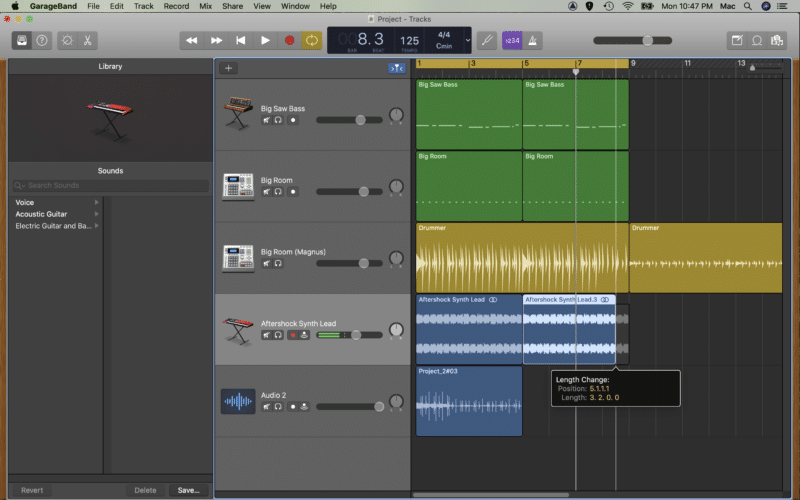
Using the ‘Length Change’ tool
You can use GarageBand’s built-in smart-editing tool to make some quick edits to your audio tracks. Simply click and drag from the bottom half (either side) of the audio region.
Splitting At The Playhead
The other option you have for editing in Garageband is to scrub the playhead to the point where you want to cut, and hit Command-T. This will split the audio region right at the point where your playhead is set, and you can delete or trim regions from here.

Learning About GarageBand’s Plugins
Plugins are what make an average song sound amazing.
You can think of them as different types of audio effects or manipulators, that you ‘plug in’ to a software instrument or audio recording.
There are a few different types, the main ones you’ll want to learn about are:
- EQ
- Compression
- Reverb
We won’t go into too much detail here, that’s a topic for another GarageBand tutorial. But here’s what you need to learn first to get started using plugins.
Learning About EQ
EQ (equalization) is about manipulating the frequency spectrum of your GarageBand tracks. Using EQ can make an instrument sound darker or brighter, with more presence or less low end – whatever your song requires!

Learning About Compression
Compressors are all about taming dynamic range. Tracks that have too much dynamic range can sound quiet at some points and loud at others. This makes it really hard to balance out their level, and make them sound good in the context of a song.
Use compression in GarageBand to even out dynamic vocal performances, or to apply some interesting new effects to software instruments.

Learning About Reverb
Ahhh reverb, everyone’s favorite effect. Reverb is all about space. Think of being in a large empty hallway and clapping, hear that sound? That’s reverb. Not just the first echo back, but also the sound of the echos decaying into silence.
GarageBand has some epic reverb plugins, try them out on a vocal hook or a guitar melody, but be careful not to apply too much as it can detract from the actual music. You’ll get the hang of it.

You’ve Finished Your First Song – Now What?
It’s time to export your song so you can upload it and show everybody the new music you’ve been working on, and the sweet new production techniques you’ve been learning.
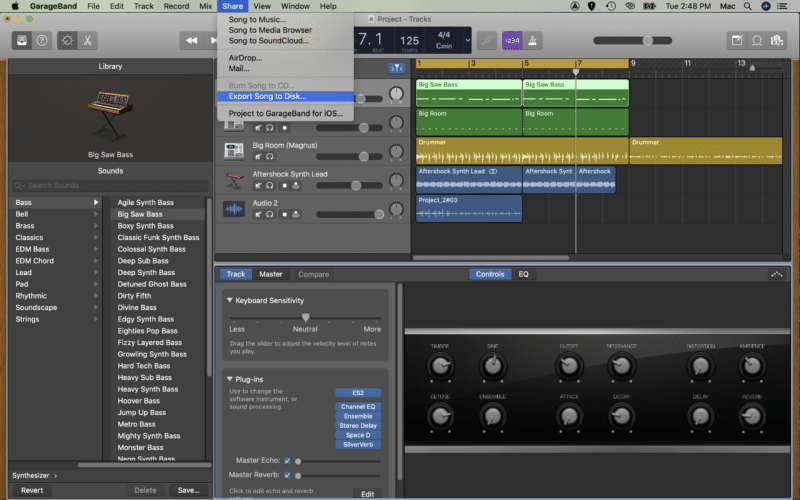
Luckily, GarageBand makes this super easy. Just head up to Share at the top of your Mac screen, and click on Export Song To Disk… This window will appear:

Then just select your desired file type, where you want it saved to on your Mac, and click export!
Interested In Learning More? Some FAQs…
What Can You Do With GarageBand?
There’s very little you can do in other DAWs like ProTools and Ableton that you can’t do in GarageBand. Sure, some might offer more in-depth editing capabilities, or have a deeper production suite, but all in all, you can pretty much do anything you need in GarageBand.
You can record audio such as guitar and vocals, use software instruments like synths and piano, program drum beats, edit and pitch correct audio recordings, and even use the included Apple Loops to create some sick tunes.
And the best thing? GarageBand is available on both macOS and iOS, so you can produce on the go from your iPad, or in the comfort of your own home.
We’ve been using the macOS version for this tutorial, but the principles are all the same for the iOS version.
Is GarageBand Good For Beginners?
One of the best things about GarageBand is that the software is free for all Mac users! Thanks Apple!
That means it’s an easy way to get started learning about the world of music production, with low barriers to entry. All you have to do is invest a little time learning how to use the software.
And thanks to this GarageBand tutorial you don’t have to spend too much time learning the ropes. You can jump straight into it and make your first song!
Not only is GarageBand a great, free DAW, it also comes with a fantastic library of Apple Loops, software instruments, and virtual drummers.
The latest version even comes with some sweet video content for learning to play instruments such as guitar!
All of these features make GarageBand a great choice for beginners, for anyone wanting to learn how to produce music, create content for their YouTube channel, and even play around a little with video!
Plus, if you find yourself needing a little something more later on, it’s not a very steep learning curve to move over to Logic Pro X, or Final Cut Pro X for our friends working with video.
I Need To Produce Some Music For A Video, Does GarageBand Support Video Tracks?
Thanks to Apple’s forward thinking team, if you’re producing content from YouTube, or maybe just working on some promotional material for your band, then you can do this using GarageBand’s video tracks.
It’s pretty straightforward, no steep learning curve here.
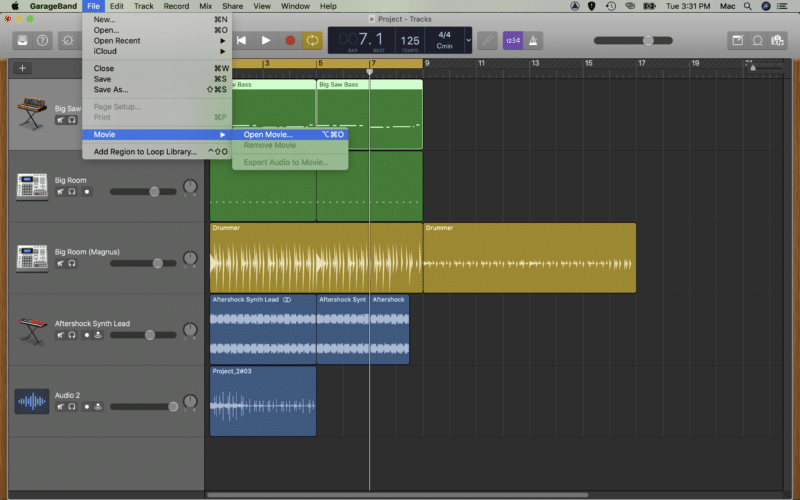
Simply head up to File>Movie and click Open Movie. Depending on your version of GarageBand, you might see the term Video instead of Movie. Then, select your video and load it into your session.
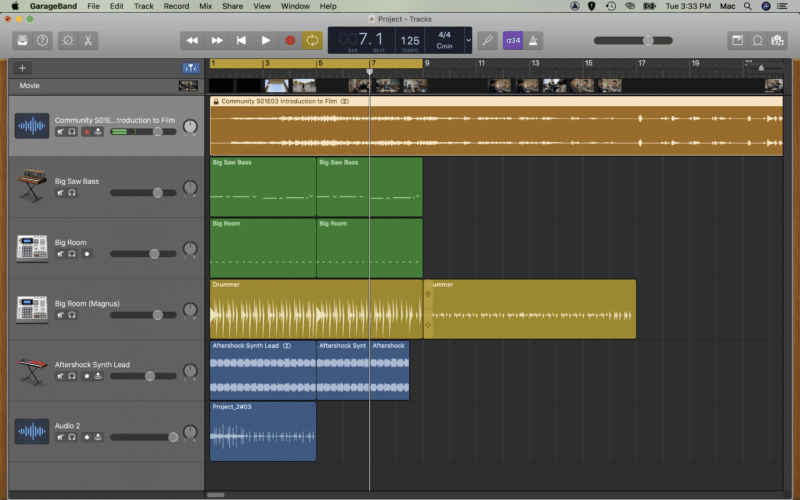
Then, thanks to the magic of modern media processing, you’ll see the video appear in GarageBand, split into an audio track and a Video or Movie track.
Conclusion – The Best Method Of Learning Is Doing
As with anything in music and arts, what matters the most is what you get out of doing it. This GarageBand tutorial has shared with you everything you need to know to get started on some new music.
From Apple Loops to software instruments, to editing audio and adding plugins, we’ve pretty much covered it all. There’s not much left for you to do now but to download the latest version of GarageBand and start making some music or video content.