Go back 20 or 30 years.
Knowing how to eq a mix was a closely guarded secret, known only by those exclusive (those lucky and good) enough to work in a big time recording studio for vocals or instruments.
Now, thanks to ongoing technological advancements in digital audio, plus our friend the internet, learning how to mix like a pro is easy.
But, you need to know all your options.
It is so easy, in fact, that you can download a DAW (digital audio workstation) for free, and get started yourself. That said, it helps to have a few tips under your belt before you do…
One of the key tenets of mixing is understanding how to use equalization (EQ) to manipulate sounds within a mix til it sounds good to you. Whether it’s your vocal or instrument or audio track, this will make it sound good to you.
As a concept, mixing is about allowing each of the instruments or vocals within a song to have its own sense of space, eliminating clashes, and helping glue the individual tracks together into one good chart-topping release.
As you’ll see shortly, EQ can be used to subtract offending frequencies from recordings, or to boost favorable ones, as well as add color and interest to your tracks. You need that range to make it cohesive and distinct.
If you want to learn to mix like a pro, you have to master the ins and outs of EQ. And if you want to master the use of EQ, there’s a few things you need to know…
First, What Is Equalization?
Every single instrument or sound in audio is made up of thousands of different frequencies that give it a certain texture, sound or timbre.
Understanding Timbre
This typically involves a fundamental frequency (in pitched instruments this relates to the note being played), as well as harmonics of that fundamental, and a number of other related frequencies that vary in volume and contribute toward the timbre of an instrument.
For example, if both a piano and a guitar play a C3 note, you’ll instantly be able to identify that one instrument is a guitar, and one a piano.
Both sounds include the same fundamental frequency as well as a number of similar harmonics, but it is the complex sound waves that differ between the two instruments that makes up their timbre.
A helpful visual way to understand this is in the simple activity of mixing colored paints. You take a tube of blue paint and squirt two blobs on your mixing palette. This is the fundamental frequency, and shared harmonics of the note C3.
To one blob, you add a small amount of white paint, and to the other, a tiny amount of red.
You now have two colors that side by side are distinct, however are still considered ‘blue’, or C3. The difference in the two is what makes one timbre recognizable as a guitar, and one as a piano.
How Equalizers Work
It follows then, that certain instruments and their sound, or performances thereof, may feature certain desirable or undesirable frequencies, or ranges.
Common examples are a vocal that sounds overly nasal, cymbals that are too harsh, or guitars that lack clarity.
We use equalization to cut or boost in the range that is attributed to that desired or undesired sound.
Mastering equalization involves not only learning how to use the different types of equalizers (EQ) at your disposal, but also understanding range in each instrument, and where certain types of sounds lie.
For example, knowing the range where attack lies on a kick drum, or where sibilance is common in a vocal performance.
Lucky for you, you’re going to learn a bit about both today! But first…
Different Types Of Equalizers
Much like there are different types of cars, computers, guitars, vocal sounds, and microphones, there are a number of different types of EQ, and you’ll use them for different purposes in a mix.
Filters
As the name implies, filters are used to “filter out” frequencies at the top or bottom end of the frequency spectrum.
Two types of filters exist: low cut filters and high cut filters. These are also known as high pass and low pass filters, respectively (a low cut filter cuts lows, which can also be looked at as allowing highs to pass, therefore: high pass filters).
Filters do not simply cut everything below or above a certain point, as this would sound unnatural. Instead, it slowly filters more and more above or below the range that is defined by you in your mix.
In some filter EQs, you have the ability to define the ratio at which the filter operates past the defined cut-off point, measured in dB/Oct.
The higher the dB/Oct, the steeper the cut-off curve. In many filter EQs though, this is fixed, giving you access to change the frequency at which the filter kicks in.
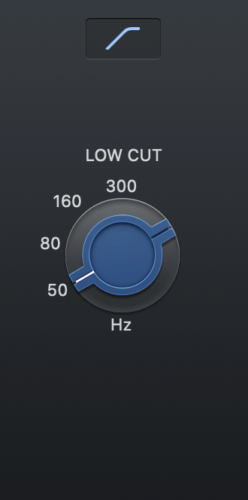
In some EQs you don’t even have this ability, and you simply have the choice to engage or disengage a filter with a set ratio.
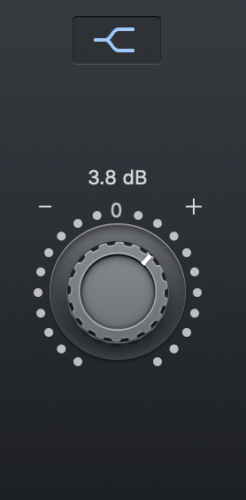
Shelving EQ
Another common approach to dealing with high and low end in a mix is using shelving EQs. These work similarly to high and low pass filters, except you have the choice to cut or boost with a shelf, and the shape of the EQ contour looks different.
The difference here is best represented visually.


Shelving EQs allow you to manipulate not only the frequency at which the shelf kicks in, but also the degree to which the shelf boosts or cuts, measured in dB.
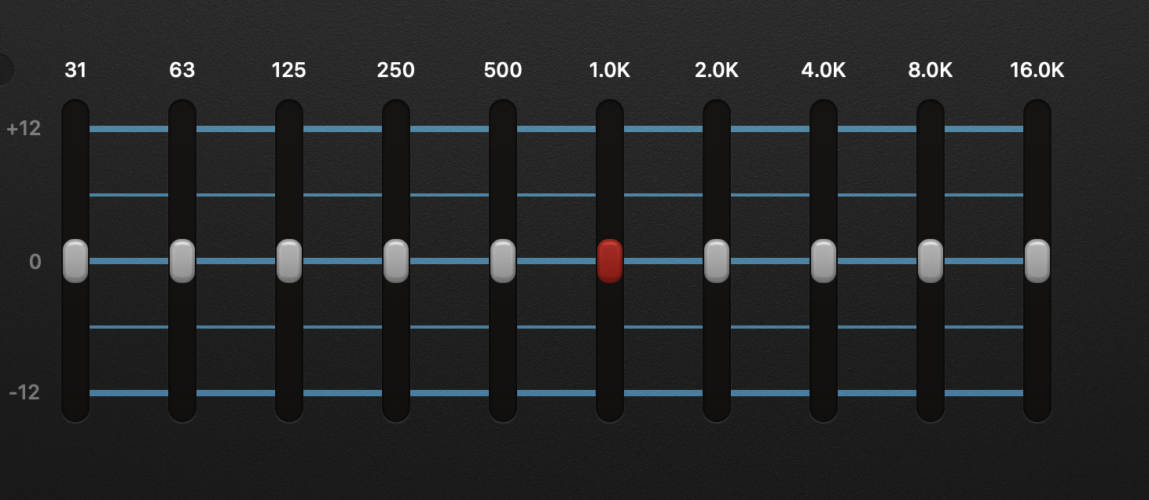
Graphic EQ
Graphic EQs are most commonly used in the live sound industry, but can have applications when it comes to audio mixing as well.
Graphic EQs give you access to a finite number of bands (10 band, 31 band etc), where it is set, and you have the ability to either boost or cut.
Given this, they are pretty inflexible, but you might enjoy this level of simplicity and find it works well for your mixing style! That simplicity may just be a good thing to happen for your mixes!
Parametric EQ
Probably the most widely used type of equalization is the parametric EQ. This is because they give you the greatest flexibility and can be used to make gentle, wide boosts, or narrow, tight, defined cuts.
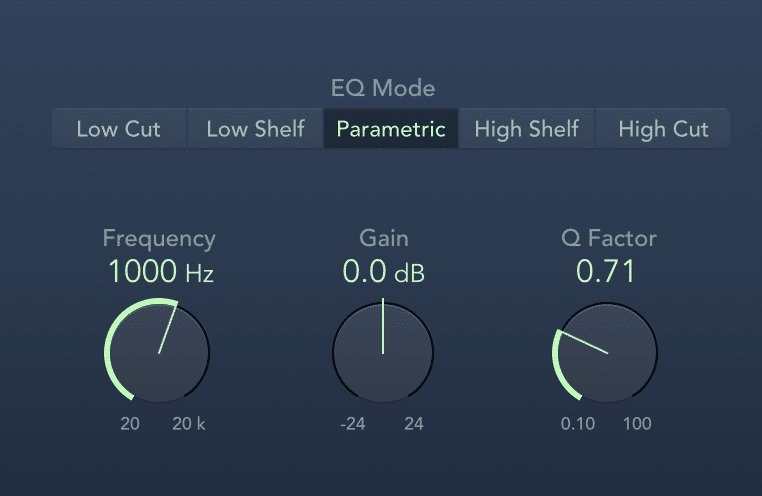
Parametric EQs give you access to three parameters: frequency, gain (cut or boost), and Q factor.
The first is fairly self explanatory, it allows you to sweep up and down the range to identify the pitch you want to cut or boost. As with Gain, you use this to dial in just how much of it you want to boost or cut.
Q factor (often referred to simply as Q), defines how wide or narrow the bell curve is.
Just like with filters, parametric EQs do not simply boost or cut one single frequency. That one you dial in determines the centre point for a bell curve, and the EQ operates either side of that in decreasing amounts.
A higher Q factor delivers a narrow curve, and vice versa.
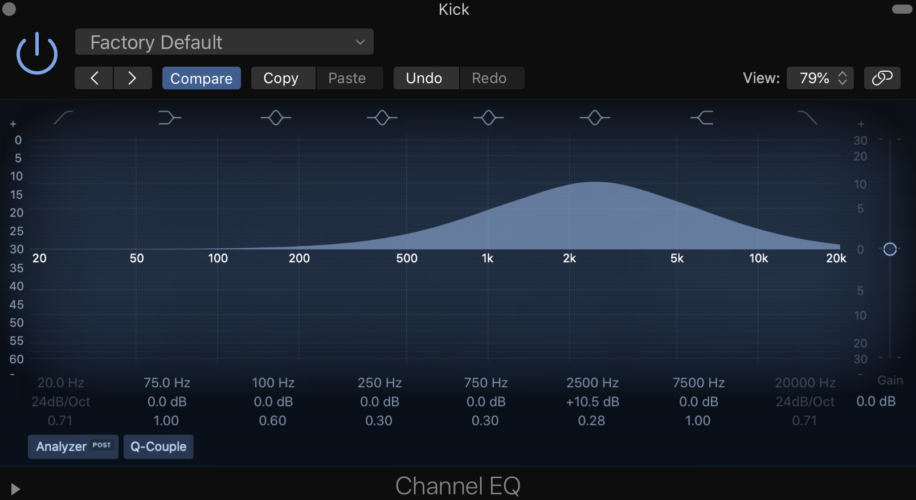
Generally speaking, you should try to cut narrow, and boost wide. Again, this is simply a guideline though, let your ears lead the way!
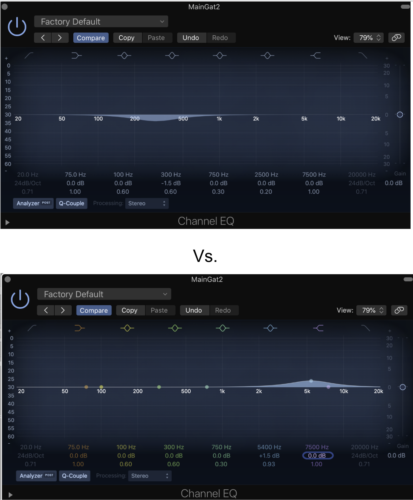
Paragraphic EQ
A paragraphic EQ is what you’ll typically see and use in most DAWs.
They generally combine EQ elements such as parametric, shelving and filter type equalization, and present the effects of these to you in a graphic display.
This is a fantastic technological advancement as it allows you to visualize your EQ changes, however it can be dangerous. All too often novice mixing engineers rely on their eyes rather than their ears.
Remember, music is listened to, not looked at, so use the visual cues by all means, but try not to lean too heavily on them.
EQing Your Mix
When mastering the skill of equalization, it’s important to understand not only how to use the EQ itself, but how and where to apply EQ changes to certain instruments.
There are a number of ‘EQ Cheatsheets’ available on the internet.
These are incredibly helpful to refer to while you’re learning to mix. But as with anything, they should be considered guidelines… and you should let your ears lead the way.
In addition, these aren’t the only areas where you might apply EQ to a given instrument, so try not to stick to them too strictly.
Pro EQ Tips
Using Solo
Be careful with your use of the solo function when EQing. Definitely use it to narrow in on the instrument you are manipulating, but make sure to listen in context as well, as this is what really matters.
Boost Gently
When boosting frequencies, it’s best to use wide, gentle boosts rather than narrow, aggressive ones. The human ear is far more sensitive to EQ boost than it is to cuts, and you run the risk of making instruments sound unnatural by boosting too aggressively.
Cut Narrow
When cutting frequencies, you can afford to be a bit more decisive. Though there are times where you may want to boost frequencies subtly, there are also times where you are aiming to eliminate an offensive frequency altogether.
This is where you can apply some aggressive subtractive EQ. This aggressive tactic will help your mixes.

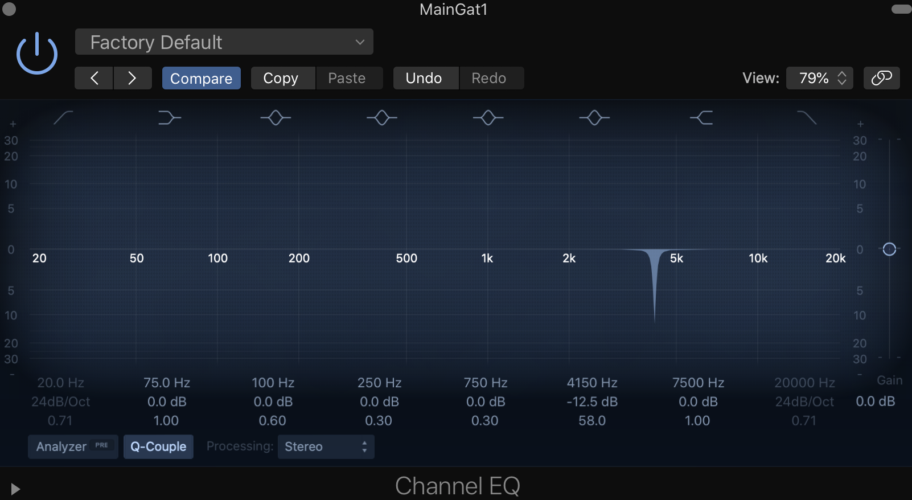
Identifying Offensive Frequencies
Often when listening to an instrument, you can hear that something just isn’t right. There’s something ugly in there. That’s what mixing engineers would consider an offending frequency, and here’s what you can do to eliminate one.
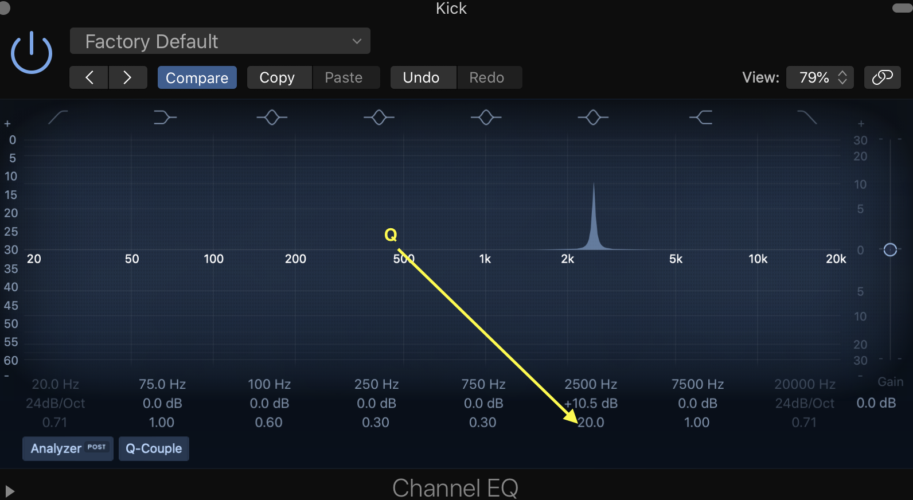
You’ll want to start by estimating the range where it sits, e.g. low end, upper mids, high end etc, and loading up an EQ on the track. You’ll want to use a parametric or paragraphic EQ for this.
Then, using an appropriate band based on your estimate, narrow the Q all the way down, and make a significant boost.

From here, slide it up and down the spectrum and listen carefully. What you are doing is attempting to make the offensive frequency even more obvious. It should be fairly easy to identify when you’re getting close, as it will start to sound really ugly.
Once you’ve found it, turn that boost into a cut, and maybe ease up on the Q a bit, depending on your requirements.
Cutting vs. Boosting
Because EQ boosts often sound more unnatural than cuts, it is preferable to try and cut where possible. Often, it can be appropriate to apply a subtle cut at one end of the frequency spectrum, to create a perceived boost at the other.
For example, more clarity can often be achieved in a guitar track by cutting out some of the boxiness and muddiness in the lower mids, rather than boosting presence in the upper mids.
Using Complimentary EQ
The nature of mixing is that many tracks occupy or share the same frequency spectrum, and they end up fighting for attention.
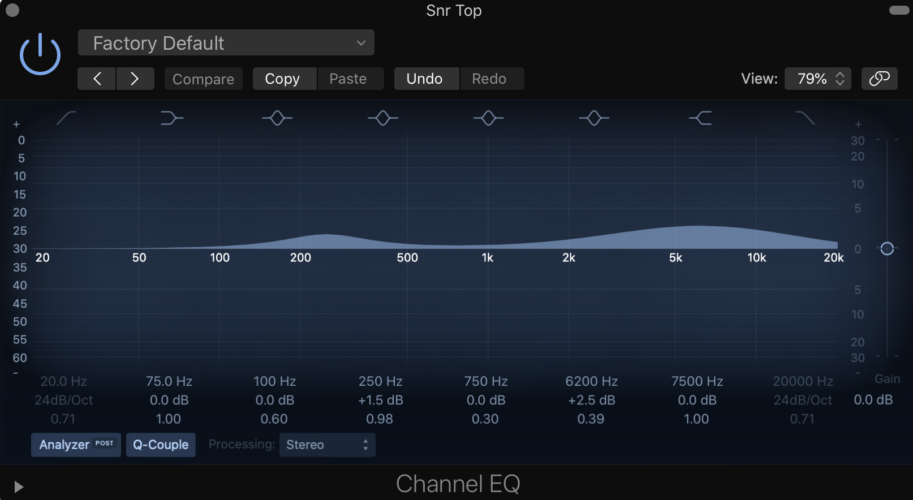
Common examples of this are vocals and guitars fighting for mid range, cymbals and synths fighting for air in the top end, or kick drum and bass competing for low end.
One technique implemented by mix engineers is called complimentary EQ, which is the process of making opposite cuts and boosts in competing instruments, essentially creating a tongue and groove effect.
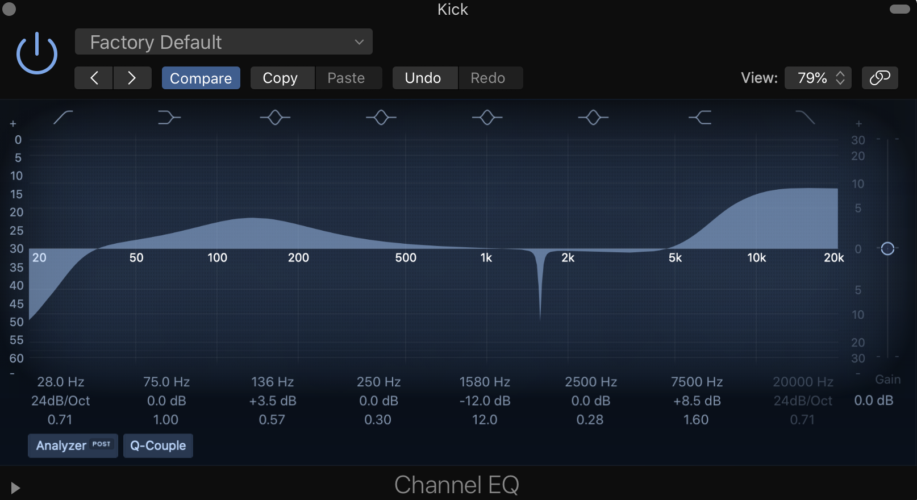
Here’s how you can use it to make a kick and bass sit together nicely in a mix:
Start by identifying which of the two will sit above, and which will sit below, in the range. The fundamental frequency of the kick drum will be consistent, so this should be easily established, but it may be a bit trickier for the bass guitar as it is a pitch based instrument.
Find the lowest play note on the bass guitar and use this as your reference point. Using a frequency analyzer, such as the ones often built into paragraphic EQs, determine which instrument accesses the lowest fundamental frequency.
In our case, the kick drum has significant energy in the 50Hz region, whereas the bass is sitting around 80Hz.
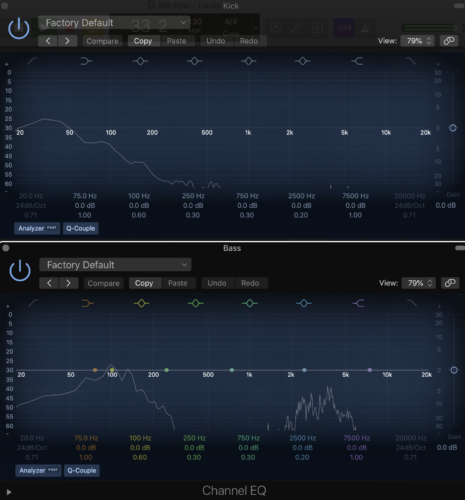
Apply a small, narrow boost at 50Hz on the low drum kick, and a similar cut at 80Hz and see how it sounds. First, apply the opposite EQ changes to the bass track.
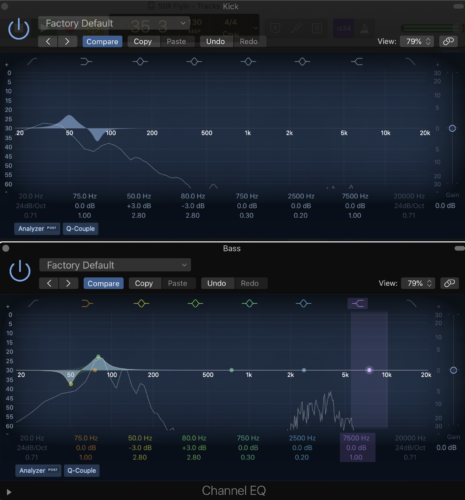
Bypass and unbypass the EQs to hear the difference. Notice how the bass and kick now work together in harmony, see how that sounds? As if there is a little pocket for the kick in the bass, and vice versa?
You may wish to apply this technique to give some space in the guitars for the bite in the bass to come through, or to allow the guitar and vocals to mesh nicely.
In Conclusion
Let’s review:
- Equalizers (EQ) are frequency based effects which manipulate the sound of an instrument or track, boosting or cutting specified areas of the range.
- Many different types of EQs exist, and are useful for different purposes. The main types are: filters, shelving EQs, graphic EQs, parametric EQs, and paragraphic EQs.
- As well as understanding how to use equalizers themselves, it’s also important to understand how they mix with different instruments, and where certain timbral elements exist within the range of each, whether it’s on the low end or high end.
- By boosting gently on the high and low end, cutting narrowly, and seeking to cut rather than boost where possible, you will create a more natural and much better sounding mix. Then it sounds great!
Now you’ve got a few tips under your belt, so you can start!
It’s time to start applying them to your own mixes. When it’s all in sync, it’ll make it sound like something good, then, something great!
Your mixes will be a step up from there!
Remember though, mixing is a creative endeavor, which means apply your artistic license as you need it to your mixes… and at any point, if it feels necessary, use your eq wisely, throw the rulebook out the window!
Your mix will sound good, and your eq even better!
Trust your gut, and your ears to make it right…