Got some sick riffs you want to lay down and show your friends and family? Well, unless you’ve got a tape machine sitting in the garage, you’re probably going to want to learn how to record guitar on your PC or Mac.
In this article, you’re going to learn about two totally different approaches to home recording. You’ll explore recording on a budget at home using Audacity, and my personal approach as a professional guitar recorder in my home studio.
Whether you are an electric or acoustic guitar player, this involves three simple steps:
- Guitar miking or plugging in
- Recording the guitar
- Post-processing your recordings
Just like guitars come in all shapes, sizes, and prices, there are a number of ways that each of these steps can be achieved.
That’s why we have chosen to show how to crush your recordings on a low budget, and create epic studio recordings like the pros, if the funds are available.
This step-by-step guide will show you just how to capture amazing guitar recordings, so anyone reading can get a baller result even using free Digital Audio Workstations (DAWs) like Audacity.
Let’s get tracking!
Surprising Benefits Of Recording Yourself Playing
Music is first and foremost an art, a way to get out what is inside of you and share it with the world!
When you record and share your music, the feeling this generates on the inside is like you saying, “I am here and I made this!”
Like all arts, you can make a TON of money, but more importantly you’ll have a lot of fun creating. Now that I am heading towards “that side” of life, I am so thankful music was a part of my entire life and will continue to be so until the day I die!
As a kid, the purchase I’m most proud of making was an old school 4-track to record my personal jamming and horrible songs I wrote when I was 17ish. Back then, this involved recording to cassette!
I never made any money off of those recordings. Though, I did sell four burned CDs at a coffee shop show once, but that hardly made me a fortune!
That said, it has been really fun to share these recordings with my kids as kind of a “stamp in time” for who I was as a person then, and how I was as a player back then.
In addition to the legacy conversation and the psychological benefits of playing music, hearing yourself play on a recording is one of the fastest ways to improve quickly!
I have always been a tempo “rusher” (is that the right word?!), and playing with a click while recording has been one of the key elements of taming this tendency to rush.
Whether you want to improve your playing quickly, earn fans and make some money, or just create and document journalings, life lessons, worship, or story through song, it is pretty amazing that with minimal equipment and a cheap computer you can be making great recordings in no time!
Before You Open Up That DAW…
Whether you are using Audacity, Reaper, or any other DAW, there are a couple of things you’ll want to take care of before you open up a new session.
That’s because recording a killer guitar track involves more than just a piece of software. If it were that easy, everyone would be doing it!
1 – Eliminate Tones That Aren’t Working
When recording professional sounding guitar tracks, sometimes your “go to” tone just isn’t the right tone for the job. Sometimes you have to think outside of the box and try a different tone that suits the song.
This is a very important step.
When being hired for a recording gig, I’ll listen to the track and then decide what guitar tones I want to run with. I base my choice of amp, guitar, and guitar effects on the track and what it might need.
Perhaps a different pedal or amp choice can make the biggest difference.
I often experiment at this point in time with a few variables to see what I think will fit best, but I often come back to a few tried and tested combinations.
My starting point for tone building is often something from each of these categories:
- Guitar: Les Paul, Strat, Telecaster or an ES-335
- Amp: a Fender style clean amp or a Marshall style crunchy amp
- Pedals: Ibanez Tubescreamer, Klon Centaur, and/or a Marshall Bluesbreaker
I often find that any combination of those leads to a good basic tone to build on. Once I get to that stage I start crafting it to suit what the tracks will need. Sometimes, at a later point, I will use more than one amp to create different tonal textures.
If you use any pedals, put them in line with your amp and make sure all your favorite tones are dialed in at this stage. I wouldn’t recommend applying time and space effects like reverb and delay at this stage unless they are absolutely necessary.
Reverb is best added at the mixing stage to give you more control over the amounts that you use. Once something has been committed to record, it can’t be removed. If you don’t need it to be there at this stage, leave it out until the end. You may want more control over this sort of effect later in the process.
2 – Keep Your Setup Simple
There’s more than one way to skin a cat, and the same goes for recording guitar, except less messy… Let’s take a look at your options:
Simple – A Plug and Play USB Microphone
Before you can actually record your electric guitar or acoustic guitar, or mic up your guitar amp, you’ll need something to do that with.
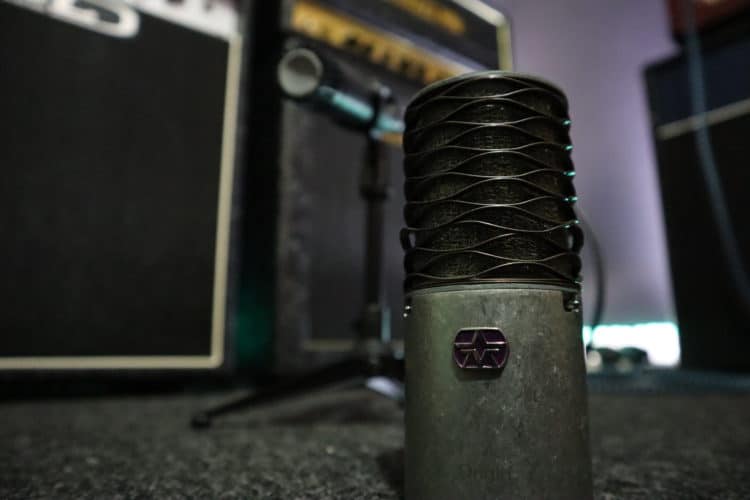
There is a huge range of USB microphones out there that you can connect directly to your computer in place of an audio interface. I’d recommend a condenser style mic with switchable pickup patterns, allowing you to switch between cardioid and omnidirectional polar patterns.
Easy – Recording Guitar Directly into the Audio Interface
Sometimes in a session, I will bypass a lot of these steps and just plug my guitar straight in. I have two main options of recording directly in my home studio if I want to record that way.
- Direct into my audio interface
- Via my Line 6 Helix
When I’m recording guitar directly into my audio interface, I often set up two tracks that record exactly the same feed simultaneously.
The reason for this is so that I can process one track with an amp simulator plugin like Guitar Rig 5 or Amplitube. I can also provide a totally dry, unprocessed guitar track for re-amping by the producer.
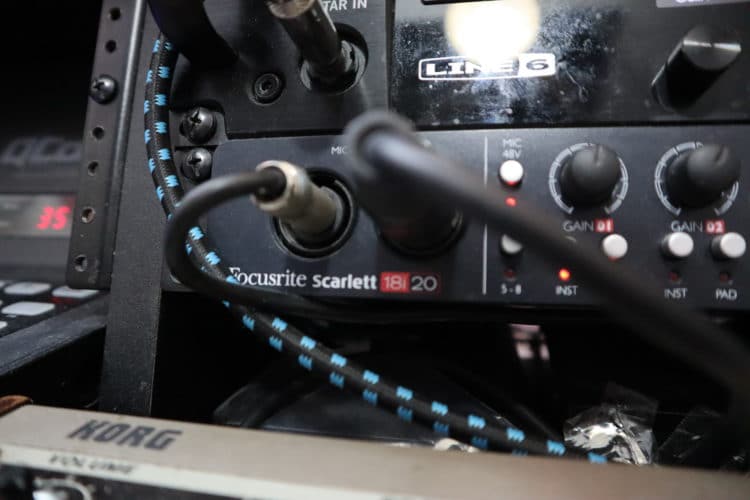
My Focusrite audio interface has some great mic preamps, so when plugging straight in, I don’t feel the need to use a DI box. The audio interface preamps are enough to give my guitar a good, dry sound.
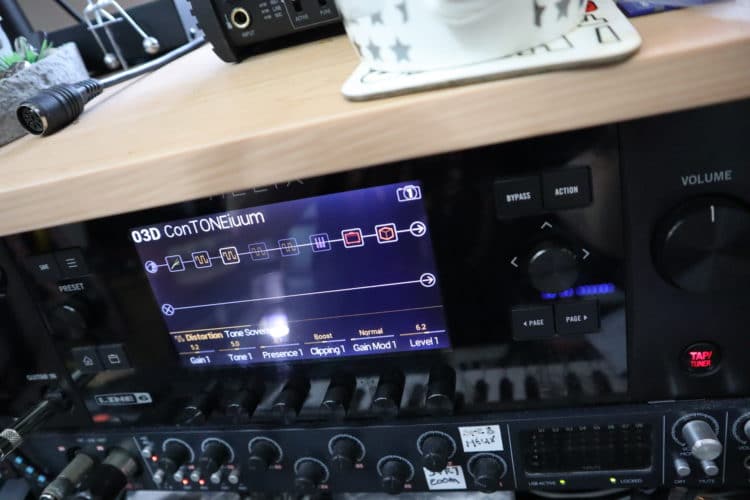
My Line 6 Helix is a rack-mounted guitar amp simulator full of guitar effects, amp models, and more. When I am recording guitar with this, I will set up a rig in the hardware prior to recording in the same way I would if I were using a full guitar rig in the room.
Least Expensive – A USB Guitar Cable
You could also pick up a USB guitar cable, that has a standard 1/4″ jack plug on one end and a USB plug on the other.
These double as a USB audio interface to allow you to connect your guitar directly to your computer and record without the need to get any additional hardware, such as a stand-alone audio interface.
It also allows you to record your guitar without a guitar amp.
The cons of a USB cable is the lack of monitoring options that an interface would provide but, they are in-expensive and will get you recording fast.
Pro – Crushing it With an XLR Mic
A dual mic setup for amp speakers delivers incredible results two reasons:
- Gives you the widest possible range of frequency capture possible from one source
- You get more options to use at the mixing stage.
There have been times where my final guitar takes have been a mixture of two mic signals blended together. There have also been other instances where I chose one mic take as my only take.
My two favorite microphones for guitar amp mic’ing are:
- Shure SM57 Dynamic Mic
- Aston Mics Origin Condenser Mic
The SM57 is a studio staple for guitar amp recording, and it delivers a fantastic focused and tight capture from speakers.
I’ve recently taken a big shine to the Aston Origin. It’s a very open and big sounding condenser mic that captures the full frequency range of the speaker, and a little room ambiance in the same take.
In order to record with one of these or other XLR microphones, you will need a best audio interface like the Focusrite Scarlett 4i4.
Mic Tip: Listen to your Microphone
Don’t be fooled into thinking you need the top model or whatever mic the pros are using.
Use your ears to make a judgment. Learn what your mic can do by recording and moving it around. You can get great results just by listening and understanding how your mic works best.
3 – Avoid Incorrect Mic Placement
When I’m happy with the way everything is sounding in the room, I will take the mic that I’ve chosen and put it into position. If I am running a twin mic set up I will set them both up accordingly.
Mic’ing Electric Guitars
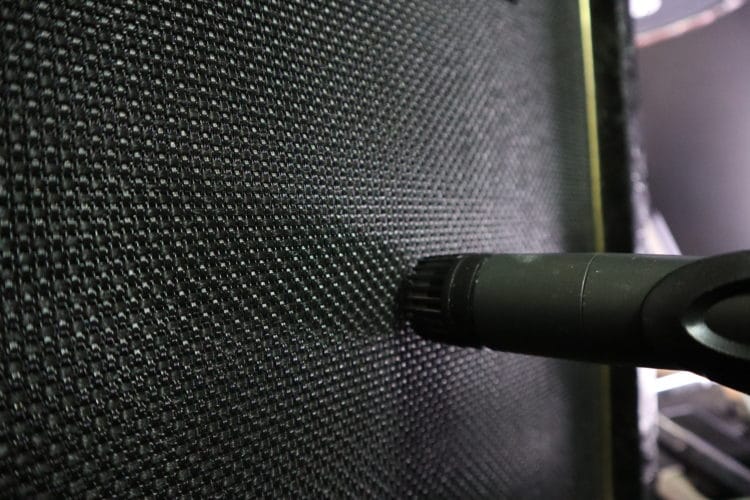
It’s important to understand how the microphone placement in relation to the speaker can affect your tone.
The closer the microphone is placed, the brighter it will sound. If you want to emphasize the low end, move the microphone back from the speaker and this will add extra depth and warmth.
If you place your mic lined up with the center of the speaker cone, you will get a very mid-focused tone. If you want to scoop the mids a little then you can move the mic to the side of the speaker.
Experiment with different positions to find out what matches your sound best.
My preference is to have the SM57 pointing just off-center with the speaker, but fairly close to capture the brightness and the attack.
I like to set the condenser mic a little further back to capture some of the bass. I will move the condenser from the center of the speaker out to the side to find where it best sits for the mix of the pair.
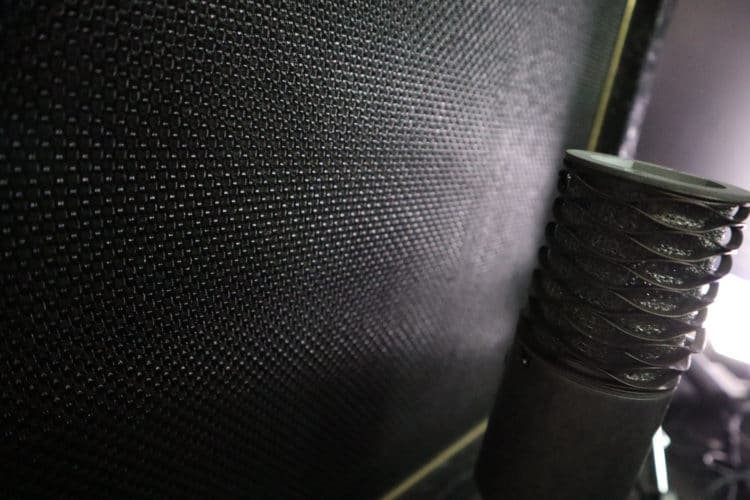
Both mics can handle high SPL levels, but I do often find myself switching on the Aston Origin’s 10dB pad just for added protection.
To get the analog mic signal to your computer you need to connect to an audio interface. Most medium-priced interfaces provide phantom power to condenser mics.
Mic’ing Acoustic Guitars
Recording acoustic guitar on a budget can be done very easily, especially if you decided to purchase a USB condenser style microphone.
To get the most out of your acoustic recording, you will want to position the mic so that it picks up the sound from around the area where the neck and body join. Usually around the 14th/15th fret.
The closer to the guitar you position the mic, the more direct the sound will be on the recording.
If you want to capture a little space and more of the sound in the room, move the mic back slightly. If you use a condenser mic, this will capture a wider range of sound than a dynamic mic.
A condenser microphone provides the most rounded sound with one microphone. When I have the option of using more than one mic on an acoustic guitar, I often opt for a room mic of some sort to capture some of the space around the guitar.
Even if I don’t use this in the mix, I feel I need to have it in case I do need it.
I do sometimes find that recording acoustic guitar can present a whole other range of challenges to the process. Acoustic guitar is a very tricky instrument to record, and I always consider it to be a separate step.
4 – Use Headphones For Monitoring
You’ll need a way to hear yourself, not only when you’re in the midst of recording, but also to listen back to what you’ve recorded to check it over.
Buy a pair of headphones that have studio recording and mixing in mind. You can find a good pair for less than $50.
Find headphones tuned for enhanced low frequency performance if you can, so that if you are recording some pretty heavy tones, you won’t lose any of the weight on your guitar sound.
Most USB mics and audio interfaces have a specific jack for headphone monitoring.
9 Steps to Record Electric Guitar for Free Using Audacity
For this part of the article, you are going to learn how to use Audacity to record guitar tracks at home. Let’s imagine you have very little budget and you need to be able to record guitar on a PC or Mac as cheaply as possible.
Audacity is a great choice because it is a free DAW. It does not have the processing power and features of many high-end DAWs, but it will give you a facility to record your electric guitar parts on a budget.
It doesn’t take a long time to learn how to use Audacity. With a few of the tips and tricks in this article, you will be able to create your own studio at home and record your guitar.
Step 1: Download Audacity
Head over to https://www.audacityteam.org and download Audacity to your computer. It is available for Windows PC, Mac, and Linux users.
The download should be fairly quick as Audacity is a small program package.
Once the download is complete, install Audacity to your PC or Mac.
Step 2: Load Up Audacity
Now that you’ve got your mic set up plugged in, and your headphones (Or external speakers) plugged in, it’s time to get things rolling.
Double click the Audacity icon on your desktop to load the DAW.
Step 3: Select Your Audio Devices
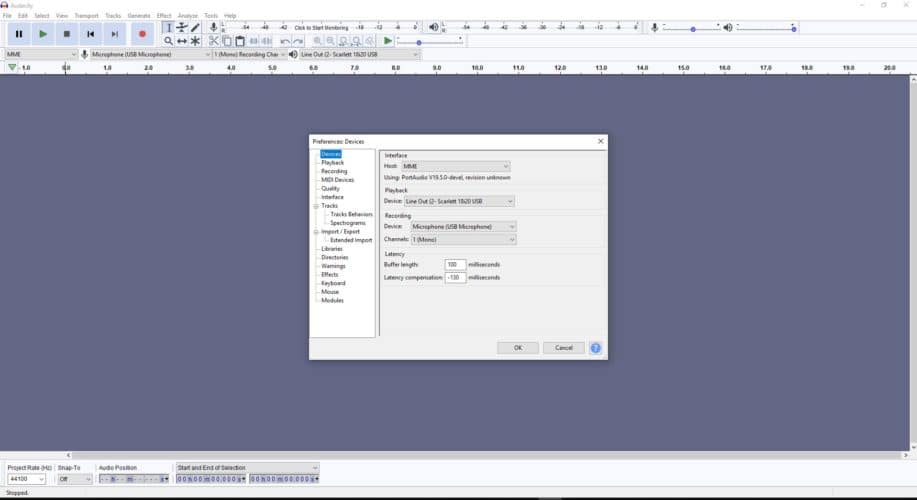
Before you can start making some noise with your guitar, you first need to get the DAW set up to receive information from your USB microphone. To do this, you need to access the Preferences menu.
On the top bar you will need to click Edit and go to Preferences. Or, you can press the keyboard shortcut CTRL + P.
Once the Preferences menu loads, you want to navigate to the Devices tab if this does not load as default.
You will see the headings Playback and Recording with drop down options. From these drop downs, you want to select your USB microphone or audio interface. This controls the flow of audio in and out of the DAW, from your microphones and back out to your headphones or speakers.
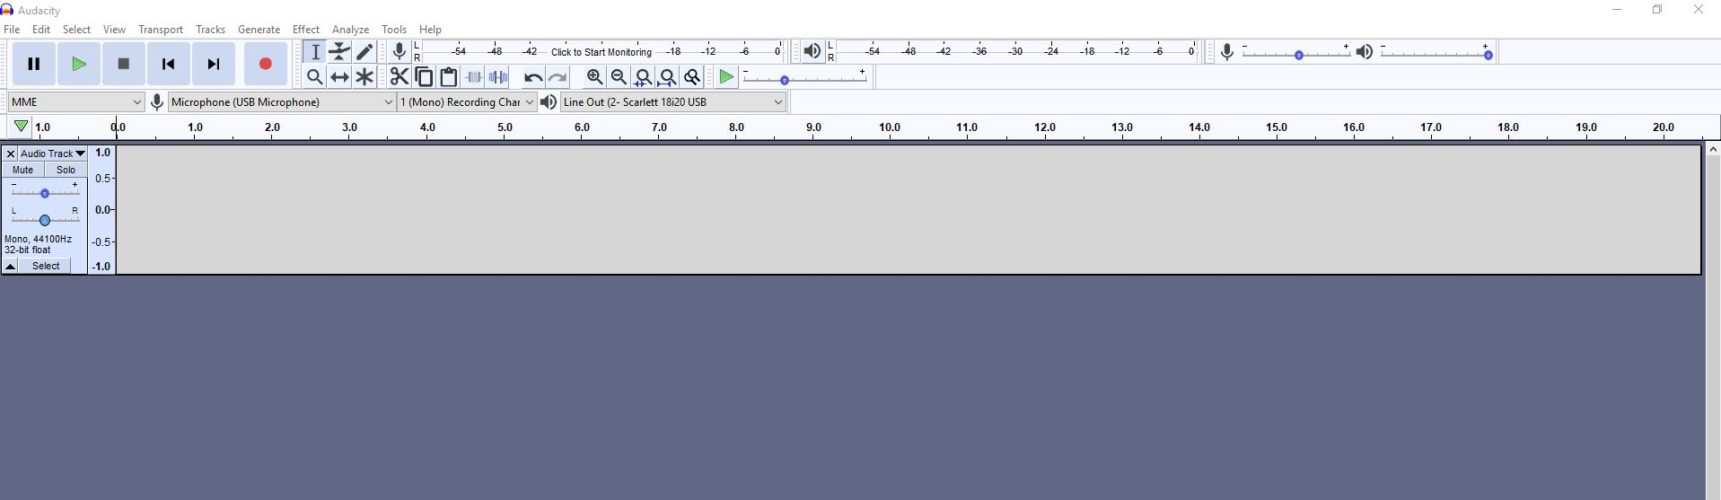
Step 4: Create An Audio Track
Tracks are easy to create in Audacity. Simply select Tracks from the top menu and highlight “Add New.” This will prompt you to select a type of track.
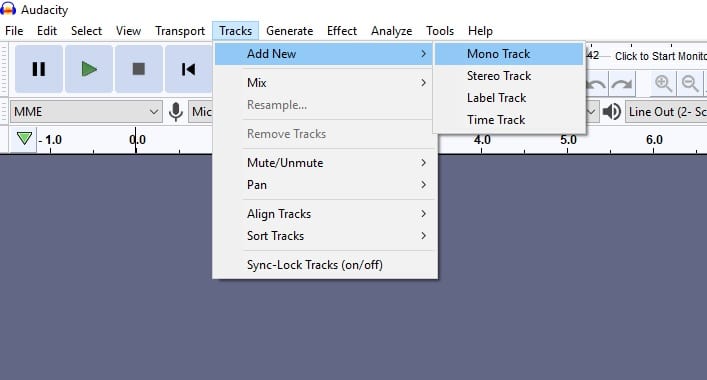
95% of the time, as a guitar player, you will be choosing a Mono track. Especially when using a single USB microphone.
Step 5: Set Up Your Metronome
Recording with a metronome is a great way to ensure that your guitar parts are tight and in time all the way through the track. Audacity has a built in metronome that you should be using to keep your playing tight.
From the Generate tab, select “Rhythm Track” and Audacity will open a pop up window with some rhythm options.
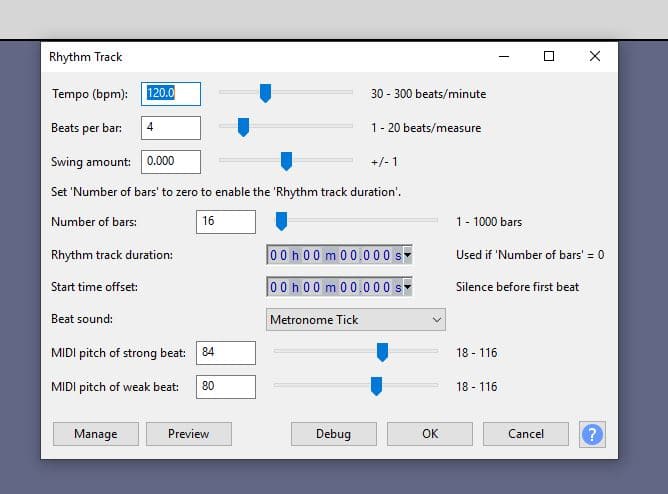
Set the tempo to match your project and the number of bars for however long you want it to run. I always recommend setting it high so you have a click running throughout. You can remove it later.

Step 6: Arm The Track
Arming the track will enable it for recording. This is incredibly easy in Audacity.
All you have to do is select the track you are planning to record on, set the time cursor to where you want the recording to start, and then….
Step 7: RECORD AUDIO!
Click that big red circle and record your guitar parts! When you want to record more parts on other tracks, you simply repeat steps 8 to 10 to create multiple tracks and layers.
You can layer as many different audio tracks as you want. One may be enough, but you have no limits.
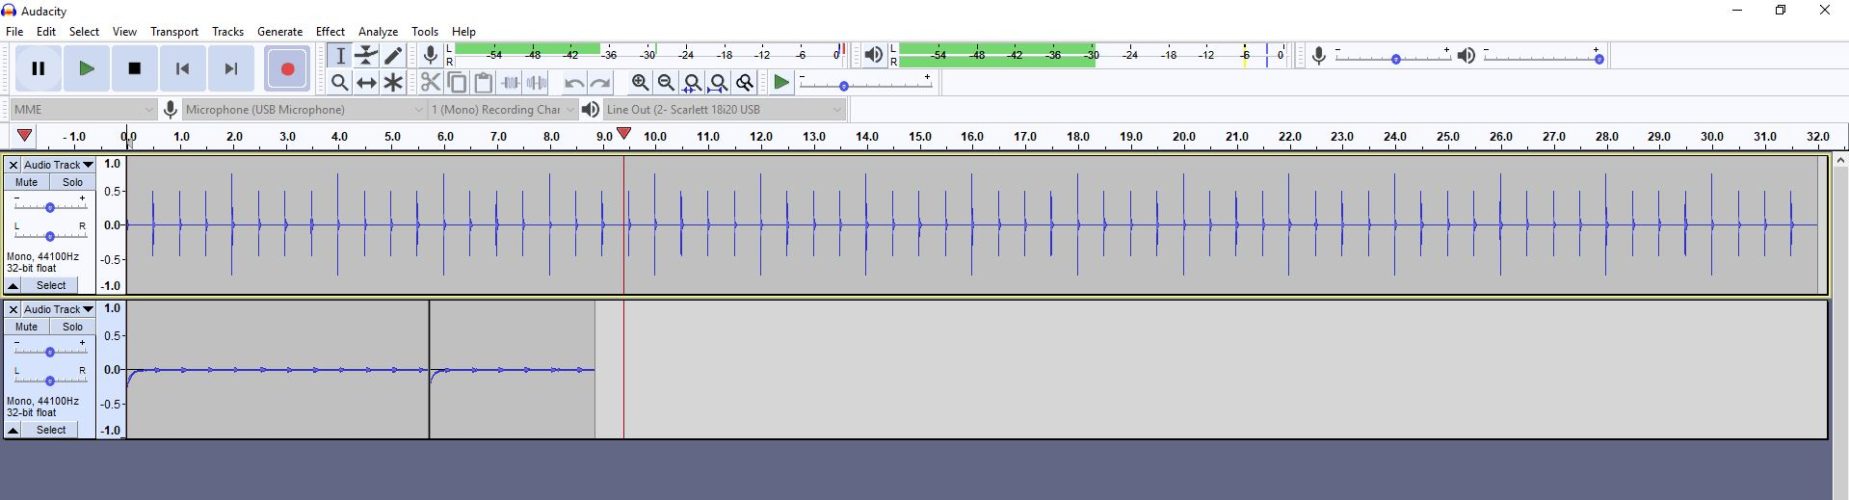
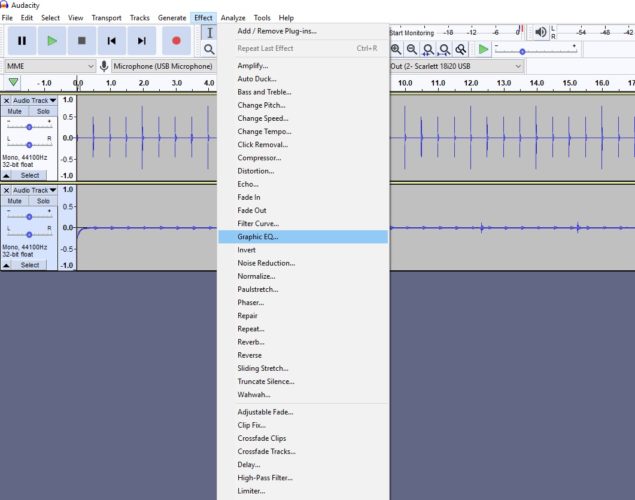
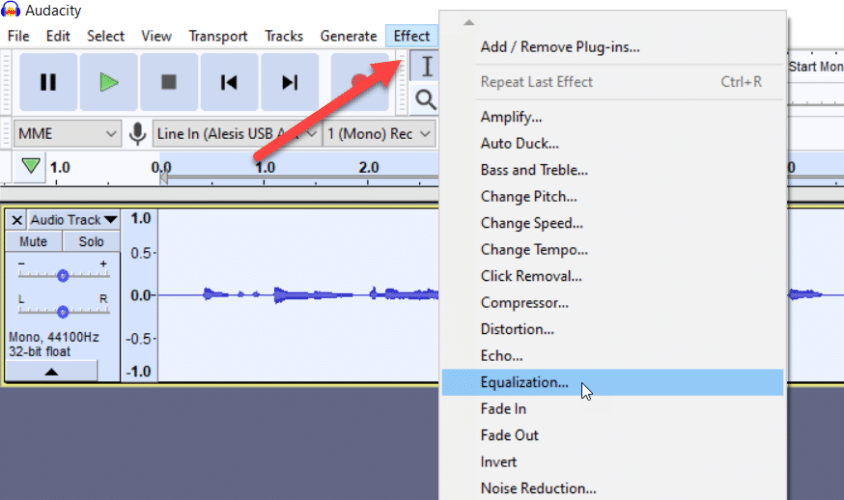
Step 8: Apply Processing To Your Recording
Post processing is a great way to add something to the tracks you have just recorded. Audacity comes with a huge range of built in effects, including EQ, Distortion, Phaser, Reverb, Echo and plenty more to enjoy.
To apply effects to parts that you have recorded, you must first select the part by clicking and dragging over it with the mouse to turn it blue.
Once the part is selected, go to the Effects tab at the top of the screen, and you will see a drop down of all the available effects.
More on these best post-processing settings at the end of this post.
6 Steps For Recording Guitar With My Go-To DAW: Reaper
Now that I’ve shown you how to record your guitar at home on a budget, I’d like to guide you through my own personal process for recording.
I apply these methods, tips and tricks when I’m recording in my own home studio, and when I’m recording on location at another studio.
While some of the gear I’m using here might not match what you have, the principles of this step-by-step walk though are transferable. I have been working out of my home studio for many years and I have built up a large collection of gear… from audio interfaces, to guitars, to amps and pedals.
I often try to record with a real guitar amp, as I prefer the sound of a real guitar rig and the way all the elements interact together.
Sometimes I will record directly when I am looking for a different sound than what I can get with my guitar amp collection and some microphones.
Let’s dive right in…
Step 1: Boot Up Reaper
My DAW of choice is Reaper.
Reaper is a very low cost DAW with licences available from $60. And it is supported by both Mac and Windows systems, and even has ‘experimental native support for Linux!’
It gives users the option to customize the visuals to their own likes. Users can apply a range of skins from the Reaper community pages or create their own. I’m running the Pro Tools skin on mine.
Reaper is a very powerful tool with a huge range of routing and track management options.
So for the number of different projects I work on, it’s perfect. Whenever I’m recording guitars, it’s my go-to digital audio workstation. I want a tool that is easy to use, that will get me inspired without having to go through too many menus.
I like to work fast when I record, and I get to do that with Reaper. It is the only DAW that I use. I have tried others, but I keep coming back to it. The user interface is very intuitive.
They also provide a huge amount of updates, and I like to keep mine on the last updated version to get the most out of the feature set.
Step 2: Load The Project
Before I start getting any of my guitar gear set up and ready to go, I will make sure the project is ready so that my workflow can be smoother once I hit record.
The first thing I will do is import the track, or stems from the track I am working on into the DAW and line them all up so the song plays back as intended.
If I have individual instrument stems, I will spend a few minutes just giving them a quick rough mix to inspire me on my tone choices.
Step 3: Check My Inputs And Outputs
Ok, so perhaps I don’t actually perform this step as much as I probably should, but it’s a great habit to get into.
From time to time (Again, I should do this more!), I head to the audio preferences menu in Reaper and make sure that my USB audio interface is connected as both my input and output source.

I use the Focusrite Scarlett 18i20 as my go-to interface for all my recording sessions at my studio.
Regardless of what audio interface you use, you will have similar options for selecting the microphone input channels and output channels for monitoring.
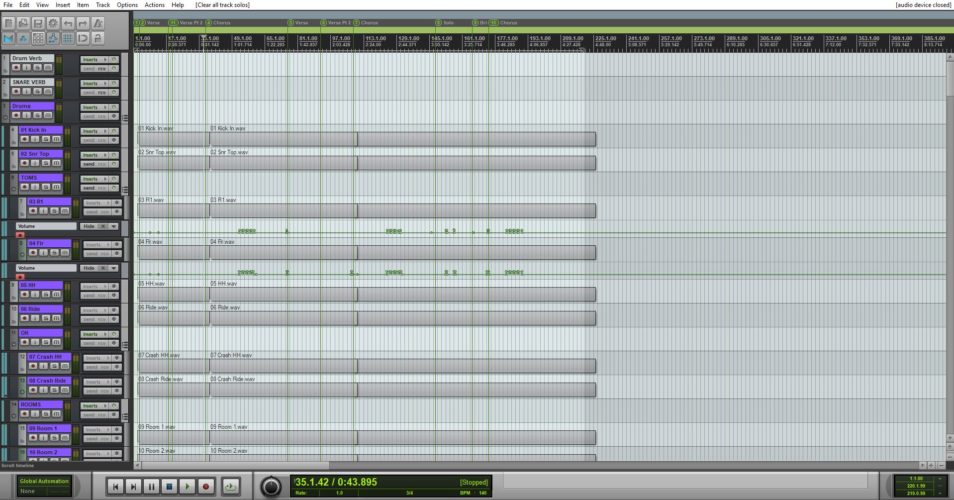
Step 4: Create Your Tracks
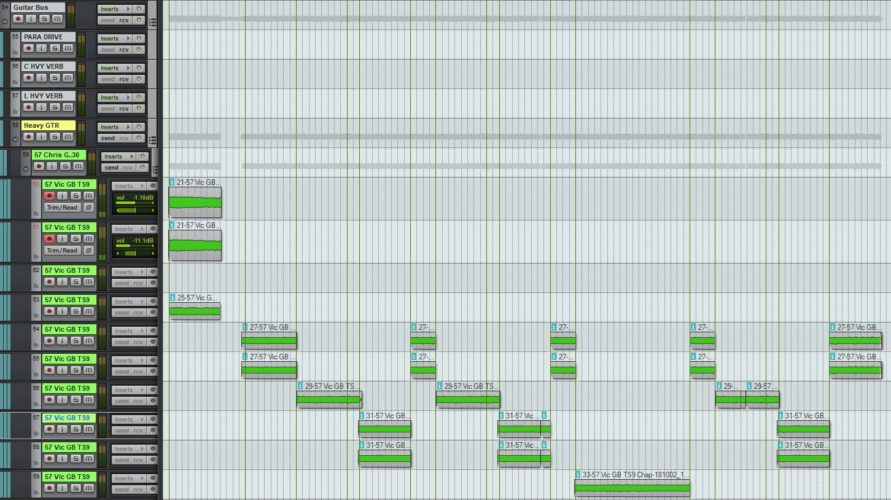
Reaper is very intuitive for track grouping. When I record guitar, I will create a bunch of tracks at once… and I group them depending on what I’m doing.
If I’m recording multiple layers, using different guitars or more than one guitar amp, I will create one folder track for each guitar or amp type… with a bunch of sub-tracks under it.
I find this keeps everything neat and tidy in my DAW, especially when it comes to the mixing and editing stage.
I also find this useful for when I might want to apply some processing to an entire part of the guitar recording. If I wanted to treat one guitar, or one mic, with an EQ or a compressor, I could apply it to the parent folder and it would cover everything under it.
Step 5: Arm Tracks And Check Levels
Reaper makes it very easy to arm tracks. You simply click the record icon and away you go.
You can also select the input for each track. When I record multiple mics on one amp, I will set these accordingly.
When you arm a track in Reaper, it automatically starts to display the input volume on the mixer window.
I will always play a few chords here just to make sure there is no clipping. If the input signal is too hot, I will drop the input volume on my audio interface to stop the pre-amps clipping.
Step 6: Record
Once everything is set up and I’m happy that nothing is clipping, I’ll hit the big red button and get to work.
Recording Tip: Always record to a metronome
Recording to a metronome is a great way to keep yourself tight and in time. If you have a drum track to record to, this is great… but I always prefer recording to a metronome.
This means if any of my parts need to be cut, copied and pasted, they will seamlessly line up with the grid on the track.
Adopt Effective Monitoring Techniques
When I am recording guitar at home, I have two means of monitoring in my studio.
I have two sets of studio monitors:
- M Audio DSM3 Three Way Monitors – These are my main monitors but are now discontinued from the manufacturer. They occasionally appear on eBay for good prices
- KRK Rokit 5 – I have the Gen 2 versions of these monitors. They are affordable and sound great. I’d recommend them to anyone looking for great monitors on a budget. The Gen 4 is the current line and it has some great added features such as room correction EQ.
My monitors connect directly to the back of my Focusrite audio interface.
I also check my mixes, and do my guitar tracking, while wearing a pair of AKG K92 Headphones.
Many home studio users will often find issues with their mixes due to the room they are mixing in not being treated for proper audio use.
So I use Sonarworks Reference 4 in my studio.
Sonarworks is an audio plugin that measures and calibrates my room using it’s own microphone that plugs into your audio interface and a series of pulses the software emits.
It works out how my room reacts to different frequencies and reflection points, and corrects them with an EQ.
When I work with Sonarworks switched on, it gives the impression of working in a treated studio and allows me to make recordings that translate perfectly to all other applications.
It’s not cheap, but if you are serious about being able to record your electric guitar like a boss and get the best sound possible, Sonarworks is a worthwhile investment.
Apply Post-Processing
After I’ve recorded my parts, I may need to apply some post-processing. How I handle this part of the process depends entirely on the recording at hand.
If I’m being commissioned to produce the guitar track for someone else who is producing the full song, I won’t apply anything at this stage except maybe some light EQ tweaks to roll out any frequencies that I don’t like the sound of.
Typically, if I’m going to send the guitar track off to someone else to use, I won’t even apply any reverb… unless I feel it’s absolutely necessary to the track. If I do choose to add reverb, I will also send over a dry version of the track with no reverb added.
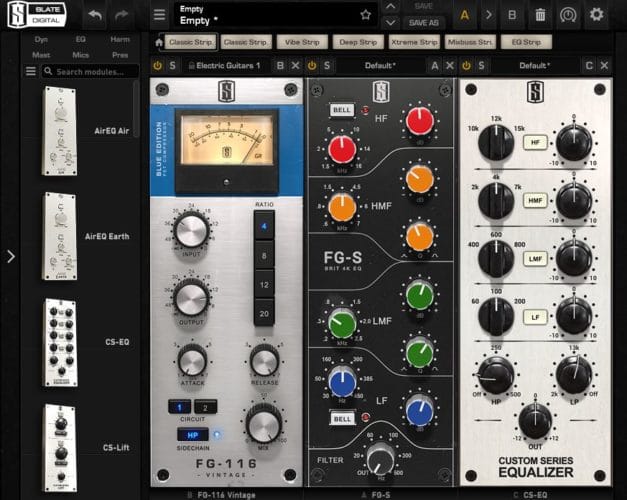
I currently do all my post-processing in the box, and I use the Steven Slate plugin pack. There are plenty of different third party processing plugins available, but this is the one pack that I prefer for my own use.
Start With Dynamic EQ Curves
When you start processing your recorded tracks, you will most certainly be using EQ to tweak your tones to fit into your mix. The true art of mixing lies in making sure everything across the frequency spectrum fits into the pocket.
Here are some examples of EQ’ing that I’ve done on recent mixes. You can use this as a starting point and tweak to taste.
Remember, there is never an all-in-one solution for EQ. You will need to EQ each track on each song differently. Learn to trust your ears and listen to what the song needs.
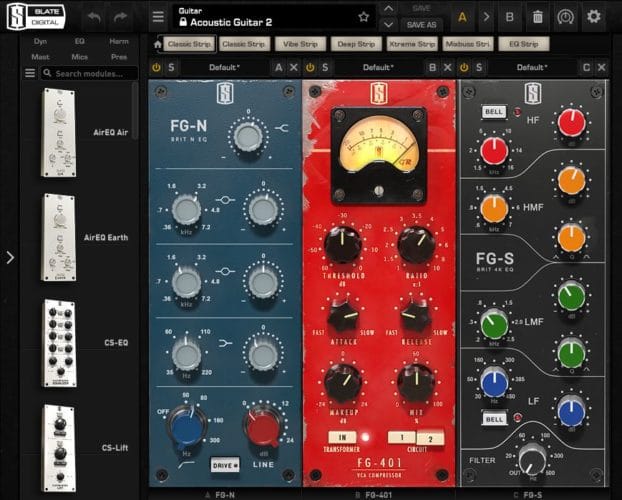
Electric Guitar
Electric guitar is an instrument that likes to live in the mid frequencies. When I EQ an electric guitar I always start by rolling off anything below about 80Hz and anything above 10kHz. This prevents any clash with the bass and the cymbals.
My preferred style of EQ is an SSL Mixing desk style. I’m currently using the Slate Digital SSL EQ. This EQ screenshot is from a heavy rock guitar track I worked on.
You can see I’ve boosted slightly at around 200Hz and 600Hz for the fullness of the guitar. I tend to cut a little around 2.5kHz and leave the top end fairly flat around 7.5-8kHz.
I don’t typically cut at 2.5kHz, but in this mix the guitars were recorded fairly bright and it was clashing with the lead vocal a little.
The second EQ in the chain is just acting as a low and high pass with a roll off at 100Hz and 13kHz in this case.
Acoustic
The acoustic guitar is a much trickier instrument to EQ. The fundamentals of a great acoustic guitar sound lie in it being recorded well. EQ can take an acoustic guitar tone to the next level… but take care recording it to get the best sound at the source.
My usual acoustic EQ chain consists of 2 different EQ’s. Again, I’m using the Slate Digital package for my processing.
I start with a Neve style EQ. I roll off at 70Hz to remove any boom in the bottom end and I also cut -3dB at 80Hz to keep that bottom end in check. Acoustic low end can sometimes be overpowering.
I like to boost about 1dB at 3.2kHz just to bring out the pick attack a little.
Then I apply some compression (More on that to follow) before going into an SSL EQ.
With the SSL I apply a cut of -3dB at 700-800Hz just to prevent the acoustic getting in the way of the low mids of the electric guitar. I picked this back up a little by boosting 1dB at 2.5kHz where I had applied a cut on the electric guitar.
I also boost the top by 0.5dB at around 7kHz to add some sparkle to the top end.
Avoid Deadening Compression Settings
Compression is an effect that many home mixers are a bit too overzealous with. It’s easy to apply lots of compression to everything in an attempt to make your mixes sound bigger… but with lots of compression comes lots of issues.
Start light with compression. Just because it’s having a subtle impact on the part it does not mean it isn’t working.
If your compressor has a VU meter, start by getting the meter moving just a little. I like to start with a 1-2dB reduction by keeping the threshold high. I then reduce the threshold to get the sound I want.
The lower you set the threshold, the more the compressor will “pump”. If you have huge gain reductions it will drastically reduce any peaks in your track… but this can also lead to unnatural sounding parts, especially on intricate guitar passages.
When recording electric guitars, I only apply compression when I feel the guitar parts need to be “glued” together a little. Guitar amps naturally compress as they are pushed.
I’ll set a high threshold just to get a small gain reduction, and set the attack to slow so that the impact of the compression isn’t that obvious. I want a subtle compression on guitar parts.
Conclusion
In closing, you can see that it is possible to achieve great recordings at home without having to spend a lot of money.
My own process is something I’ve learnt over the course of 10 years of recording… and the tips from how I record in my studio are transferable to your own methods and learning.
One important lesson that I think everyone should take away when learning to record is not to focus on the price of gear. Even if you have a low budget and limited resources, don’t worry.
Learn how to use your gear to the best of your ability, and learn what it does. Trust your ears and not your wallet.