Today you’re going to learn about the various elements of mixing and how to use them to make your tracks sound amazing.
If you’re keen to follow along with the techniques you’re learning about in a real life context, download the multi-tracks for “Still Flyin” by The Apprehended here. We’ll be using this song to demonstrate some of the important audio mixing techniques you’ll be learning.
We’re going to be using Apple’s Logic Pro X for this tutorial, but the principles apply whether you are mixing in analog, or using any other popular DAW.
Let’s dive in.
How Do You Start A Mix?
Edit Your Tracks First
Editing and mixing are really separate processes, and the best practice is to edit your tracks before you start any audio mixing.
TIP: Make sure the project tempo is set correctly, it will help in identifying edit points. The tempo for our song is 130bpm.
This typically involves cutting tracks to remove unwanted noise: like string noise on the guitar and bass, or breath or mouth noise in vocal tracks.
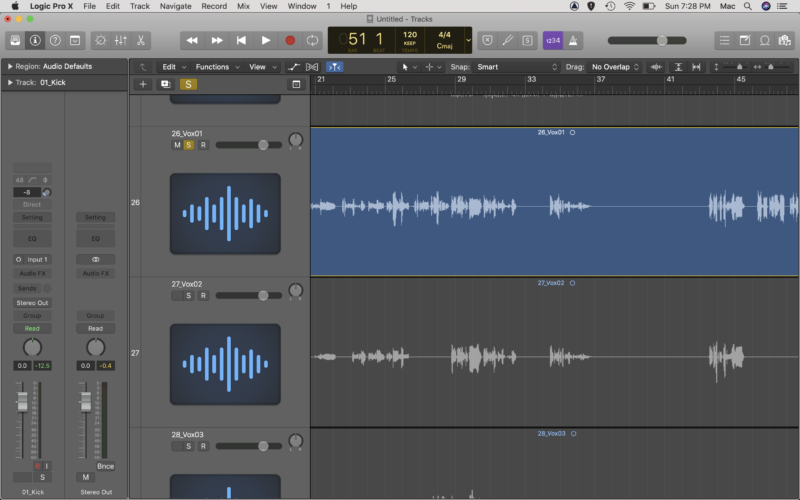
Trim the audio as appropriate, and make sure to add fades at the start and end of each region to eliminate any clicks or pops. Be careful not to trim too close to the end of phrases, particularly on vocal tracks.
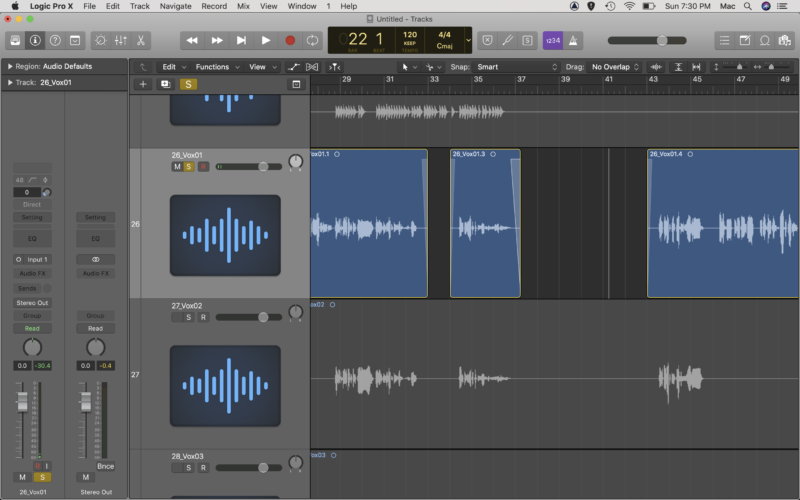
The audio we are using has already been well edited, so the above is simply an example. You should spend some time playing around with editing though as it is an essential skill.
More advanced editing skills come into play when fixing time or performance based issues. Yes, we said don’t leave stuff to fix in the mix, but sometimes things get missed.
It might be a bung note on guitar or a bass line that comes in a smidge too early. In this case, you may need to chop the audio and move it into place, or take a part from another section in a song.
For example, if there is a problem with one performance of a guitar riff, you may be able to find the same riff played correctly in a different part of the song, and drop it in place.
In our track, there is a slight fingering error in the bass at Bar 21. Luckily, it is simply a repetition of Bar 19. So, we are going to make cuts either side of that part, and copy it over to Bar 21.
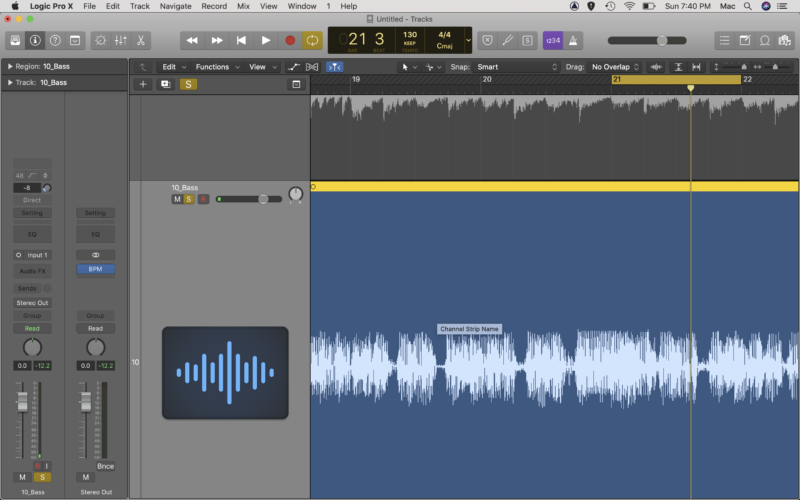
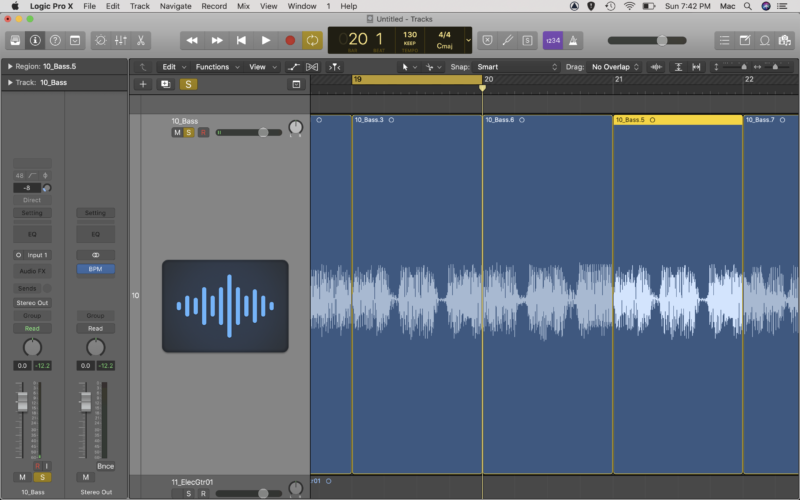
From here you’ll want to apply crossfades either side of the edit, listening in solo to identify any discrepancies in time, and to ensure the edit sounds right.
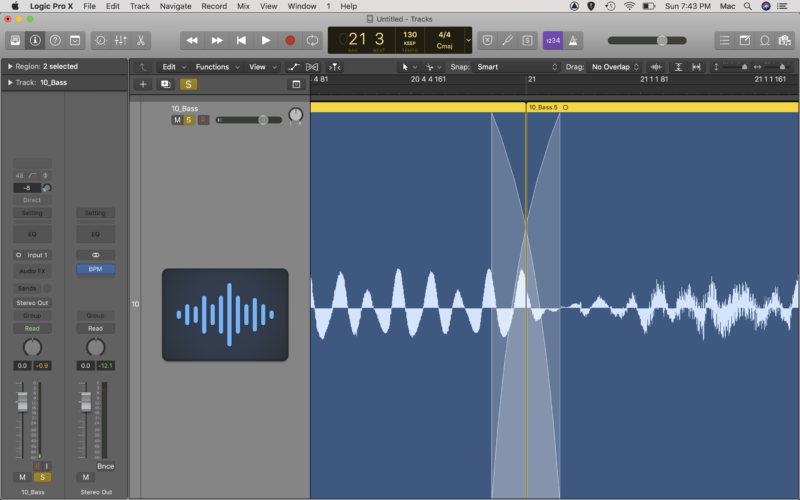
When editing your tracks, it’s best practice to go through each individually, in solo, to determine any issues and try and edit them out of the audio recording.
When listening to multi-track instruments such as drums, you should listen and edit them as a group.
Mix Prep – Cleaning The Kitchen Before You Cook
One of the best things you can do to make your audio mixing process easy, is spend some time prepping the session.
It’s just a few simple techniques, but it can make your process a whole lot quicker, particularly as you continue recording and mixing new music, and get accustomed to a certain look and feel in your sessions.
Track Naming
There’s nothing worse than having a collection of audio tracks with inconsistent names: left guitar 1, 4th take kick drum_10, BV vocal FINAL 411…
Take a bit of time to go through and name all of your tracks in a way that makes sense for you. Some audio engineers prefer all caps, some all lower case, some prefer full names (Electric Guitar 1), some like abbreviations (BV2).
Have a think about what makes the most sense to you, but remember that in certain views in your DAW, only so many characters will be displayed. So you should try and keep track names shorter where possible, keeping the most important identifying information up front.
Color Coding
This is another one of those little pro tips that seems unimportant, but can actually save you a tonne of time.
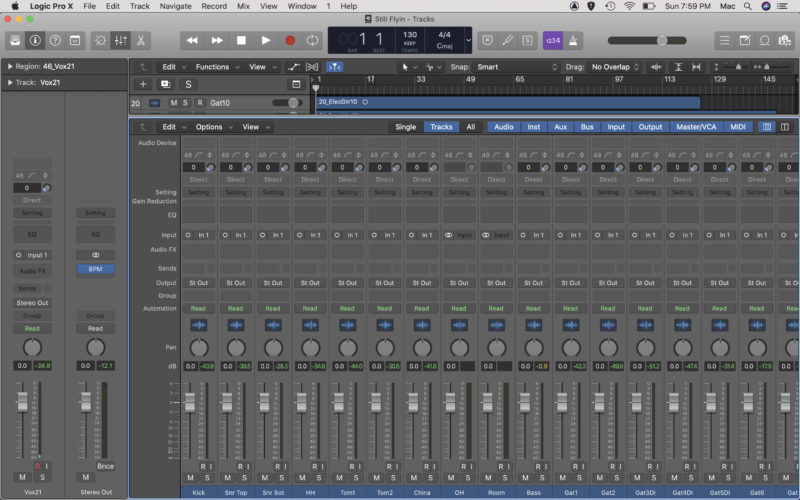
Look at our session in Logic, it’s pretty hard to tell what you’re looking at, right?
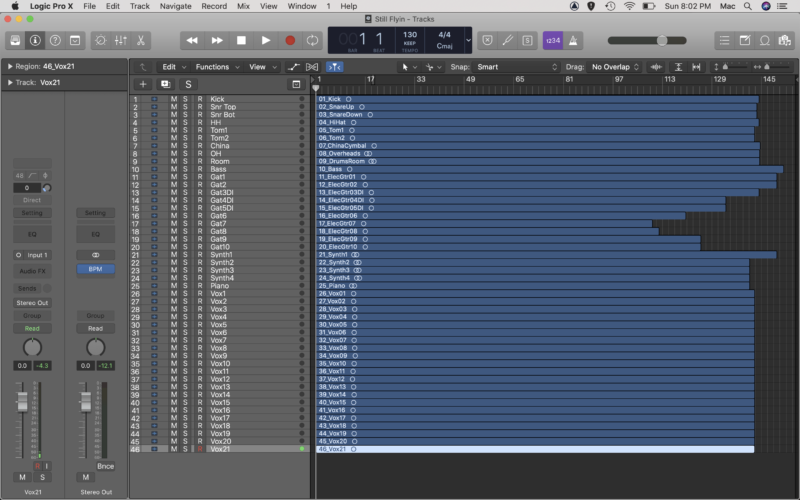
A little time spent on color coding, and you can see exactly what tracks you’re working with at a glance.
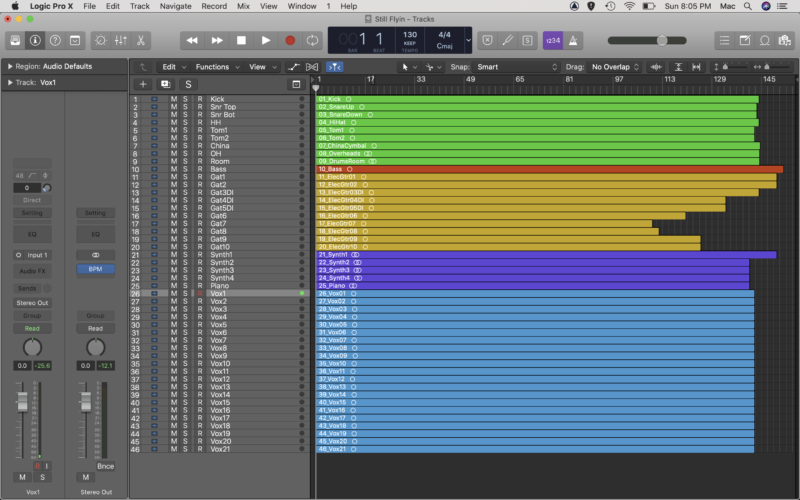
Much better, right?
Setting Some Markers
It’s also a really good idea to set some markers in your DAW to designate sections in the song. This makes life real easy when you want to find chorus 2 during your audio mixing session.

Find What Works For You
Ultimately, what’s going to save you the most time and result in the easiest audio mixing process is getting comfortable with your own layout and process. Color coding is great, but it’s even better when you stick to the same scheme in every session.
Same goes for your naming convention, and also your session layout. Spend some time thinking about what works for you. Vocals at the top? Drums at the bottom? There’s no right or wrong. There’s just stuff people do.
What Plugins Do You Need For Mixing?
The world of plugins is vast, from simple equalizers to complex multi band compressors to CPU heavy impulse response reverbs.
All of these elements contribute to a pro level mix, but the truth is as long as you have access to EQ, compression and reverb, you should be able to get a pretty decent job done.
That said, when you’re learning about audio mixing, it helps to know about all of the different types of plugins you have access to, and how you can apply them to manipulate sounds within your mix.
Mixing engineers typically utilize the following types of audio manipulators:
Dynamics Based Plugins
- Compressor
- Limiter
- De-esser
- Transient designer
Frequency/Pitch Based Plugins
- Equalization (EQ)
- Pitch correction
- Harmonic exciter
- Harmonizer
Time Based Plugins
- Reverb
- Delay
- Doubler
Modulation Plugins
- Chorus
- Flanger
Other Mixing Techniques
- Static Mix
- Automation
- Distortion/Saturation
You don’t need to know how to use them all though to get a solid sound mix. In fact, if you’re just getting started you should focus on 4 key areas: the static mix, equalization, compression, and EQ.
How To Mix Your Tracks Like A Pro Mixing Engineer
Now that you’ve got your session organized and easily navigable, you’ll want to start by creating a static mix.
Creating A Static Mix
A static mix focuses on two things: channel levels and pan.
Basically, what you want to do is balance the level of each of the tracks so that each instrument is audible.
You might find that certain instruments are louder in some places than in others, which makes this task very difficult. That’s okay. You’ll learn how to deal with that soon using compression and automation.
Pay close attention to the master bus, you’ll want to balance the tracks so that the mix is sitting in the -6-10dB range, to give you ample headroom for compression and limiting later down the line.
It might help to focus on a certain section, such as a verse or a chorus, and try setting the balance for that particular part in the song.
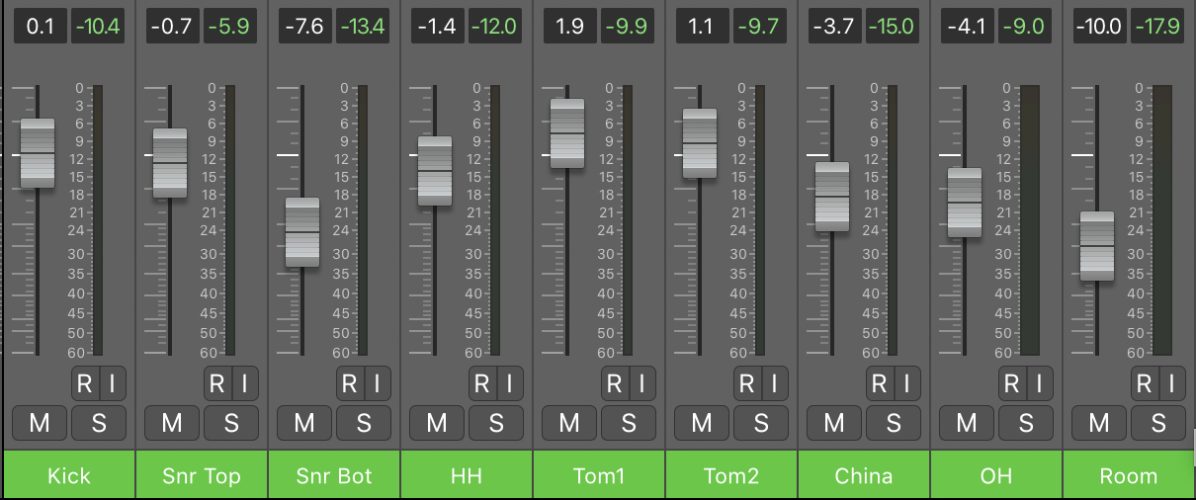
For multi-track instruments such as drum kits, you may find it helpful to start by isolating those tracks and creating a mix within the instrument itself, and then bringing in other tracks from there as you continue to balance.
When mixing a drum kit, a good place to start is by bringing up the overheads first with all the other drum faders down.
The overheads capture the entire kit and create the image of the drums as a whole. From there, bring up the other close mics (snare, toms etc) to add support and clarity where required.
Using Busses In Your Mix
In audio mixing, busses are a great way to group tracks together, and create paths and organizational layers in your DAW.
There are a couple of ways to use busses, either as sends, or as outputs. You’ll learn about using sends when we discuss reverb, but during the static mix phase it can be super helpful to set up a few busses.
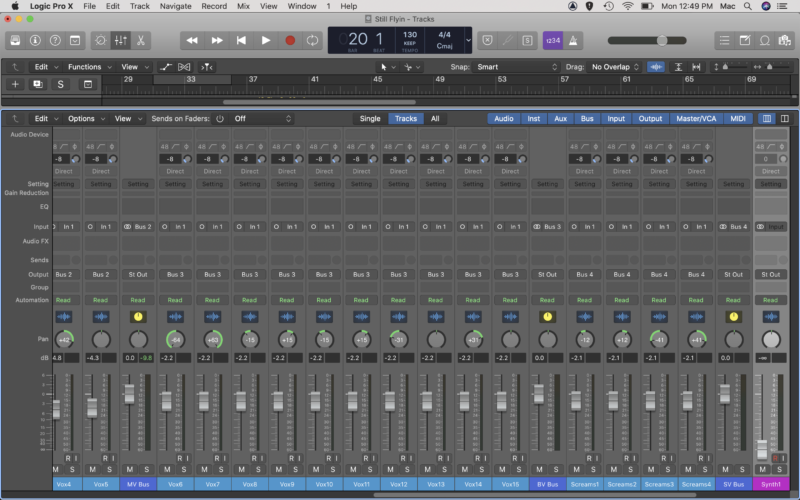
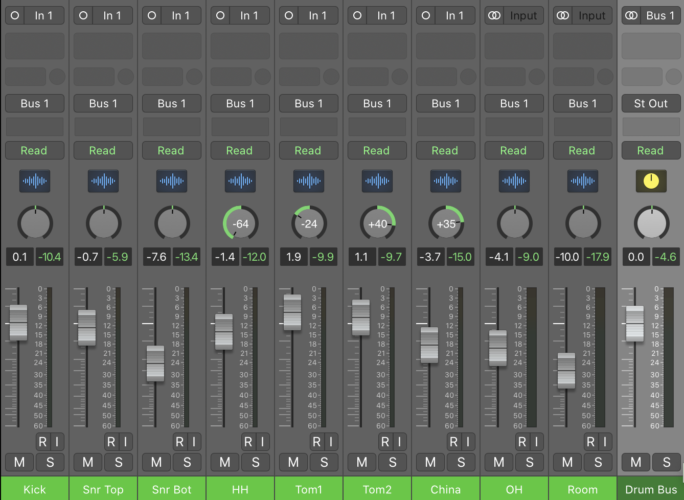
For example, after you’ve set the levels of each of the drum tracks and have a nice mix going on the kit, you might like to set the output of all of the tracks to a stereo bus, which will create an auxiliary (aux) track in your DAW.
What this means is that rather than the output of each of the drum tracks going to the master output, they are routed to an auxiliary track for further processing, and then to the master output.
This enables you to control the level of the drum kit as a whole with a single fader, as well as apply mix techniques across the kit as a whole.
Panning
Panning is the process of placing musical elements within the stereo field (left to right). Some work best in the centre such as bass guitar, kick drum, and lead vocals. However others can be spread out across the field.
For example, our drum Overheads are sent full left and right, but we have positioned the hi-hat and two toms somewhere in between, seeking to replicate their place within the stereo field as captured by the overhead mics.
We’ve also chosen to send Guitar 1 and 2 left and right, a common approach for this kind of music, but have brought them in a little bit from the extremes so that they sit slightly inside the drum kit, which gives the impression that the drums are slightly wider and allows them to kind of ‘hug’ the guitars and the rest of the mix.
This is completely up to taste. You might prefer the guitars sitting at the edges with the drums slightly narrower, or you might even decide to flip the drums entirely with the hi-hat sitting on the right, for an audience perspective approach.
One thing to bear in mind when panning is that you have more than 3 options (left, centre, right).
In fact, in the DAW world you have 127 degrees between full left and full right. To make your mix really pop, and to give each element its own sense of space in the stereo field, you should take advantage of this.
This recording has a ton of vocal tracks, so you can experiment with different panning positions to your heart’s content.
Mic vs. DI Tracks
When mixing, you might come across tracks labelled as DI (direct input), when dealing with guitar and bass. These are signals that are captured directly from the output of the instrument, or sometimes being processed through pedals first.
The point is, they are not sent through an amp and then recorded through a microphone. For this reason, they sound extremely different. It’s not unusual to hear a straight Bass DI recording in a mix, depending on genre, however typically you’ll want to re-amp the guitars or use an emulator.
In our song, we have a few guitars recorded through amps, and a few DI tracks which appear to be used for the lead guitars. This gives us the flexibility to dial in our own tones using free guitar amp simulators which may be included in your DAW.
If your chosen DAW does not have an amp sim built in, there are a few free downloads on the net such as:
- Native Instruments Guitar Rig 5 Player
- IK Multimedia Amplitude
- LePou Plugin Suite
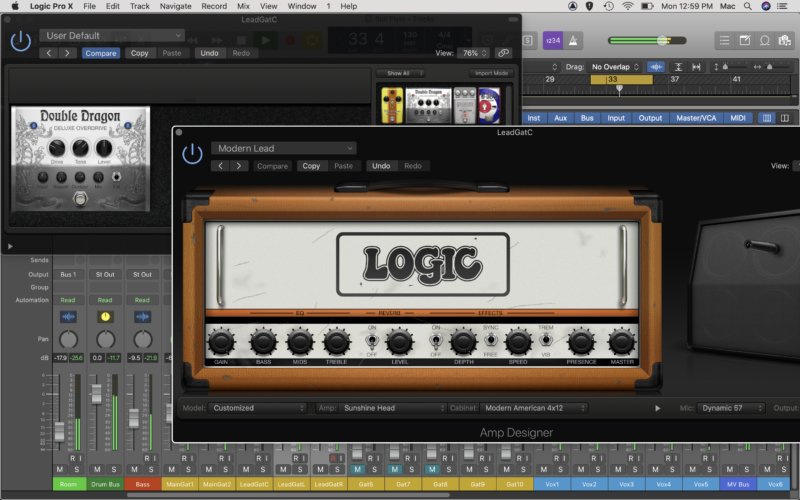
We’ve used Logic’s Orange head sim with a drive pedal in front to give the DI lead tracks some life, and create a nice smooth overdrive to make the leads pop.
Using Equalization In Audio Mixing
Where the static mix focussed one the dynamic (levels) and stereo (pan) fields, EQ is all about frequency. Equalizers give you the ability to either boost or cut desired or wanted frequencies (or more accurately, frequency ranges), to manipulate the sound and timbre of each instrument.
When it comes to EQing, it’s important to remember that the main goal is to get all of the tracks to sit nicely together. A secondary goal of course is to make every instrument sound as good as it possibly can, but this should really be a focus in the recording stage.
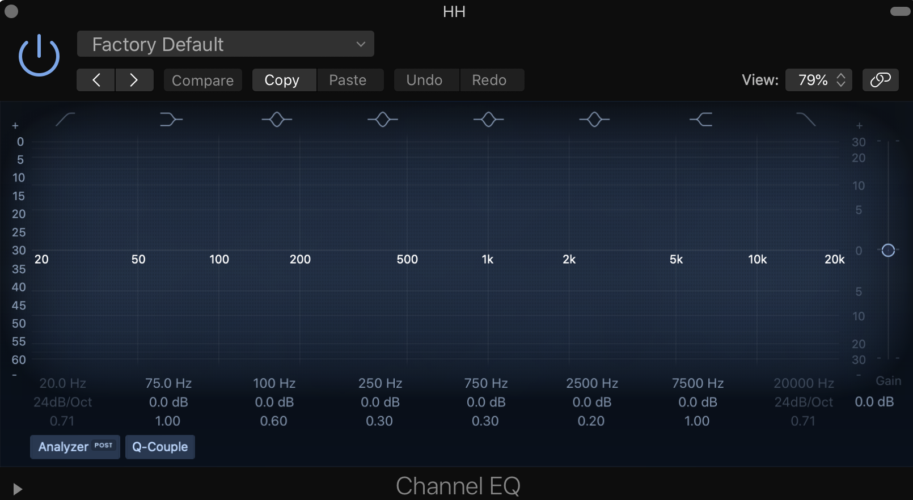
There are a number of different types of EQ, but the most widely used in DAWs is the paragraphic EQ. If you’re keen to learn more about different EQ types, as well as in-depth tutorial on using EQ to mix like a pro, check out our guide here.
Complementary EQ
When talking about EQ, you’ll often hear references to frequencies measured in Hertz (Hz), or as highs, lows, mids etc.
While certain instruments have greater energy in certain frequency ranges (kick drums have a lot of low end content for example), most audio tracks actually exist across the entire spectrum.
This can easily cause issues in a mix, as it often means that all of the different sounds are competing for the same frequency space.
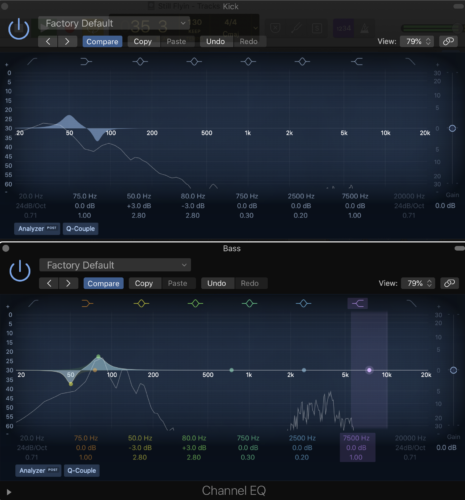
One technique commonly used by audio mixing engineers is called complementary EQ. This involves applying opposite cuts and boosts to two tracks, which essentially creates a tongue and groove effect, allowing the different sounds to mesh together neatly.
You can utilize this technique to give the kick and bass guitar their own space in the low end, or to create some space for vocals in the mid range when they are competing with guitar tracks.
Surgical EQ
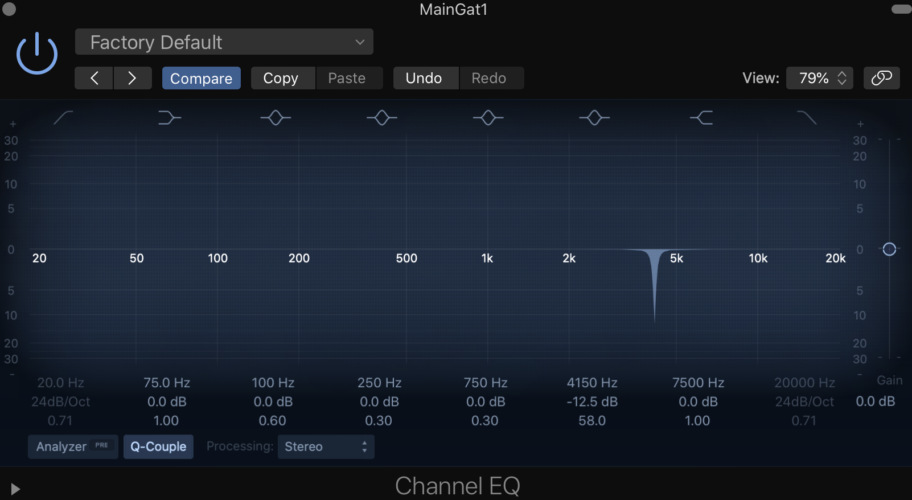
Many times an audio recording includes undesired frequencies, which in practice can make tracks sound ugly. Depending on the instrument this might manifest as tinny, muddy, nasal, harsh, sibilant, or unclear.
When approaching a mix, try and listen to each sound in isolation, as well as in context, and see if you can identify any tonal issues. If you find you’re making notes such as “vocals are too nasal,” or “guitars are muddy,” these are perfect opportunities to apply some surgical EQ.
Try a parametric or paragraphic EQ to identify the offending frequency, and then cut as appropriate.
Adding A Little Extra Something With EQ
EQ isn’t just about cutting out undesired frequencies.
Though it is best practice to try and use EQ to cut rather than boost as much as possible, there are occasions where a little boost here and there can make a track sound like a million bucks.
For example, you might want to add some air to a vocal recording by boosting above 10kHz, or give the snare drum a little more body in the 200Hz region.
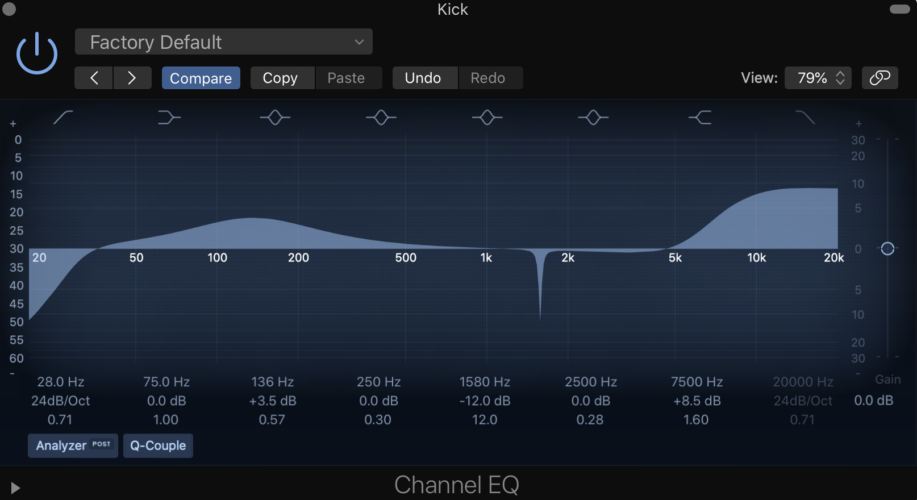
TIP: When using EQ to boost, be gentle. Boost wide and subtly. If you find you’re pushing close to 10dB, your issue might be elsewhere, and you might be better served creating cuts elsewhere in the track, or in a competing instrument.
Using Compression In Your Mix
Second only to EQ, compression is one of the most vital components of audio mixing, and a skill which every pro mixer needs to master.
Compression is concerned with dynamic range, which is the relative loudness of each of the sounds in a mix, and essentially seeks to tame that dynamic range.
Now, don’t get us wrong, dynamics aren’t an inherently bad thing. In fact, dynamics are what make music push and pull, rise and fall. The problem is with instruments that are overly or inappropriately dynamic. A common example of this is a vocal track which is quiet during the verse and gets extremely loud during the chorus.
While there are measures we can take to reduce this during recording, they can only go so far. This is where compression comes in.
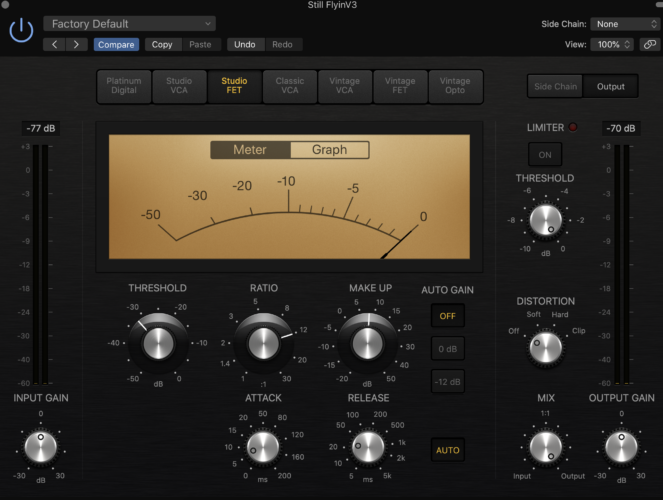
What Compressors Do
Compressors are designed to compress (or “turn down”) the signal when that signal’s level passes a certain threshold.
It’s kind of like Whac-A-Mole, where the mole is the level of your audio recording bouncing up and down. Sometimes the mole gets close to the threshold, but doesn’t come all the way out. When it does, the compressor’s hammer comes down and whacks the mole back into place.
How To Use Compression
Let’s say you’re working with a vocal recording that’s overly dynamic, and you want to even out the level between different sections.

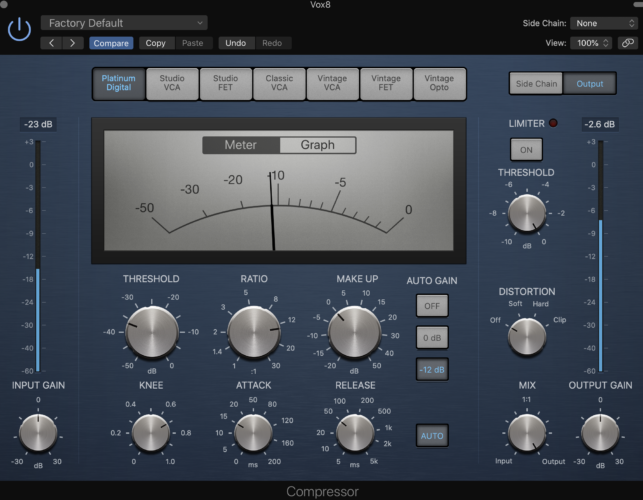
You’ll need to adjust to the compressor’s threshold control to set the level at which the unit will activate.

The ratio control allows you to set just how much compression is being applied to the signal once it passes the threshold. The higher the ratio, the more compression applied.
By controlling the level above the threshold, you reduce the dynamic range of the vocal track, evening out the performance and making it much more consistent.

Getting Creative With Compression
Compression can also be used to create timbral or tonal changes. Just like we used a compressor to turn down some loud vocals (and as a result, lift the perceived level of the quieter vocal sections), you can use dynamic controllers to bring up certain elements within an instrument.
For example, you might use compression to give a snare drum more attack to get it punching through the mix. Here’s how:
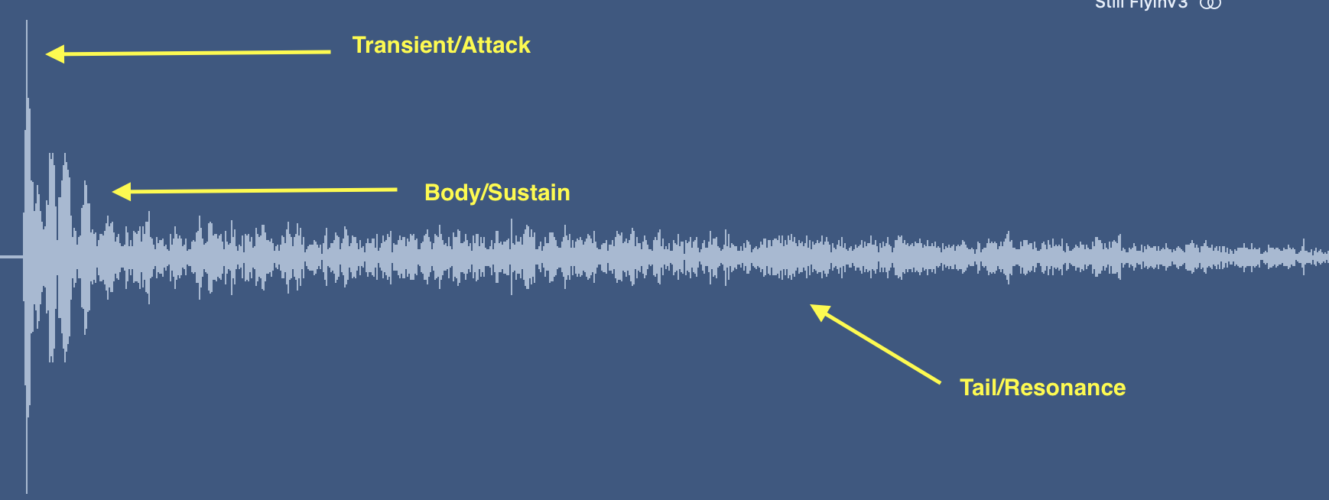
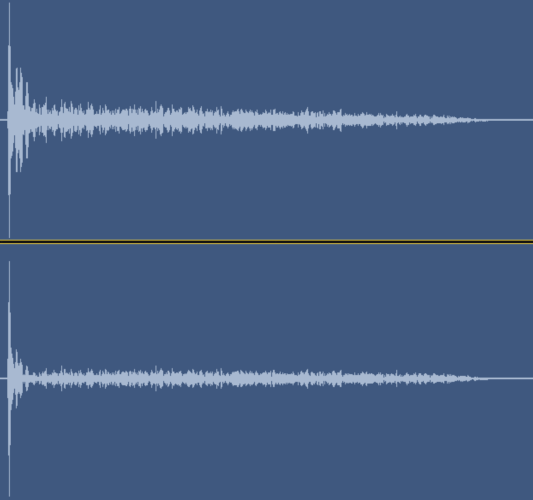
The above image shows the three components of a percussion instrument. The peak at the beginning is called the transient, and is the attack and precision of the drum hit. The next section is the body and sustain of the drum, and the last bit is the tail end of the sound.
We’ve used some fairly aggressive settings here to demonstrate the effect, but the main thing you’ll need to pay attention to is the attack setting. What this does is it controls how quickly the compressor jumps into operation once the level passes the threshold.
Because we are wanting to give the snare hits more attack, you actually don’t want to turn down the initial transient, which in fact is the loudest part as you can see above.
So, roll the attack back on the compressor settings to tell it to act more slowly, which will allow the transient to jump through unaffected, and force the compressor to act on the rest of the drum sound. This results in a perceived increase in the attack or sharpness of the snare.
Creating Space Using Reverb
Reverb is a funny little thing, and it can either make a break a mix. One of the main mistakes when learning to use reverberation in the context of audio mixing is overdoing it. So, if you can fight the urge to drown everything in a gorgeous hall reverb, you should be alright.
Reverb, for the most part, emulates the sound of an instrument in a certain space, such as a room, hall, or chamber. Other reverb plugin types like plate and spring are emulating traditional outboard units, which themselves sought to replicate what happens when you make sound in a space. Reverb-ception…
Where pan dealt with placing sounds in the stereo field (left to right), reverb can be used to give the elements of your mix a sense of depth (front to back).
Using Depth In A Mix
Reverb can make a guitar lead sound like it’s miles away, or a vocal track sound like it’s right in your ear. That’s depth.
To avoid muddiness in a mix, it’s generally advisable to not employ more than 3 different reverb types in a mix. A typical approach would be to set up near, mid, and far reverb effects, and apply these to tracks as appropriate.

For example, you might send the main vocals to the near reverb to bring them to the front of the mix, but send the backing vocals to the mid reverb, sitting them behind the main vocal recording.
Using Busses For Effects
Now, when you’re using the same reverb effect for multiple instruments, it’s going to get pretty CPU intensive loading up a new plugin on every track. Instead, try using busses.
Busses are best thought of as a pathway, just like an actual bus. To get your tracks on the bus, you activate a send.
When we used busses during the static mix, we were sending the track output down a bus for group processing. When using effects like reverb, we use the track send instead, which sends a copy of the audio signal rather than the track itself.
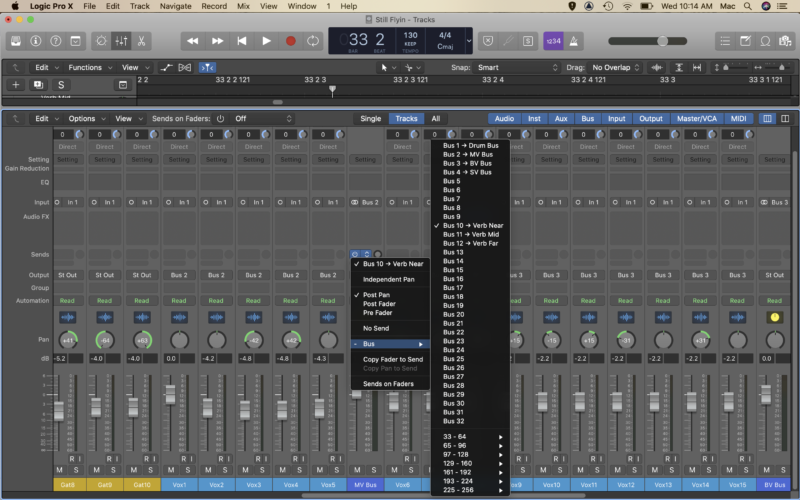
Adjust the send level control to determine how much of the signal you want to send. The more you send, the more reverb will be applied.
Reverb Controls
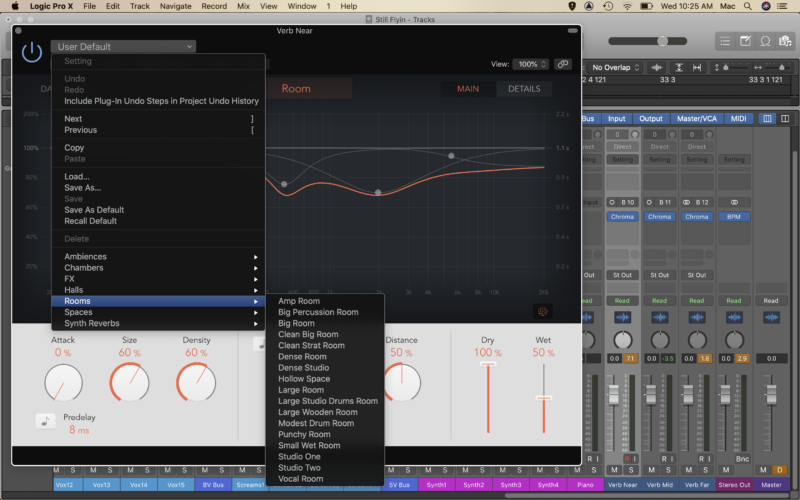
The controls available on reverb plugins are pretty intense, so your best bet to begin with is to check out the free presets.
You can get creative from there if you like, experimenting with settings like size, distance, and reverb time, to change the perceived space.
Remember, though, to process in the context of the mix, as you can easily go overboard here… which is not conducive to your goal of making everything fit together nicely. So listen closely, and don’t forget that less is more; not every track needs a reverb treatment!
What Makes A Good Mix?
Short of spending time improving and refining your audio mixing skills, there are a few things that contribute to a good mix. In fact, there are three vital components of a great mix that don’t have anything to do with what you do in the DAW.
Your Mix Is Only As Good As Your Room
Every single room has a distinct sonic footprint. See for yourself. Grab a bluetooth speaker and blast your favourite track in the bathroom, kitchen, lounge, and bedroom. You’ll notice that the audio sounds a little bit different in each room.
This is a problem for audio mixing, as you’ll naturally make adjustments for the room you are mixing in.
For example, if your room is particularly resonant in the low end, you’re likely to compensate by reducing the bass frequencies in the mix, resulting in a track with considerably less low end than it should have.
We get around these problems in the audio world by using acoustic treatment. Acoustic foam is cheap and easy to come by, but it is relatively ineffective, other than the narrow frequency range it absorbs.
At home, the best thing you can do is introduce soft, absorptive material into the room, such as sofas. You can also experiment with different layouts to find the best mixing position.
There are a number of free apps that can help you determine the best place to mix from in your room, as well as any specific frequency issues.
Get Yourself Some Decent Monitors
While you can get around the whole acoustic issue by simply mixing on headphones, this is generally advised against.
Mixing on headphones is certainly achievable, but they typically give you a distorted sense of the stereo field. Tests have shown that mixing on monitors typically results in a much more cohesive and professional sounding track.
Ruling that out then, your studio monitors become your lifeline, the one thing you can count on to tell what changes to make. Well, the two things…
With that in mind then, it’s advisable to spend as much as you can afford on a good set of monitors. We aren’t talking about a cheap set of computer speakers, or even a decent pair of hi-fi speakers.
Professional studio monitors are designed to deliver a true sound and a flat response. Consumer speakers are designed to sound good. Which is great for listening, but not great for audio mixing.
You want your monitors to be faithful, delivering a sound that is honest and uncoloured. Luckily, this doesn’t have to break the bank, as these days there are a bunch of audio manufacturers making quality, affordable studio monitors that sound fantastic.
Don’t Skip Out On Using Reference Tracks
One of the most powerful things you can do to lift the quality of your audio productions is to use reference tracks, and it’s entirely free! No expensive outboard gear or costly plugins involved.
Pick a few tracks you love the sound of, and throw them into your DAW. Make sure they are similar to your song in genre.
Spend some time listening and comparing. What does each audio element sound like in your mix, compared to the reference track? Are the vocals louder or quieter? Are the guitars brighter or duller? How do the drums sit in the mix?
When mixing for long periods of time, it’s common to ‘get used’ to the sound of your track, the good parts and the bad. This can make it difficult to identify changes that need to be made, even obvious ones.
By continuously referring back to your reference tracks, you’ll always be checking that you’re on the right path.
Piecing It All Together
Now that you know a few key techniques and rules of mixing, it’s time to throw them all out the window! Okay, maybe not all of them, but it is important to remember that mixing is a creative endeavour, and you should always feel free to experiment.
Push compression settings to the extreme, drown everything in reverb, pan stuff to crazy places, and see what works.
While everything you’ve learned here will form a great foundation and guideline for your future mixes, you should develop your own technique, style, and approach. That’s what will truly set you apart from the rest.
Mixing FAQ’s
What Is Mixing?
Mixing isn’t fixing (you can use that if you like); mixing is about gluing all of the audio elements together into a cohesive production.
- Adjusting levels to balance tracks
- Using pan to control the stereo field
- Using equalization to remove unwanted frequencies and boost more desirable ones
- Controlling dynamics through compression
- Applying effects such as reverb to create depth and interest
Once the mix is finalized, a track is usually sent off for mastering.
Is it all in the mix?
Let’s take a step back, because it’s not all in the mix.
All too often, amateur (and even professional) sound engineers make sacrifices during the recording process, telling themselves they’ll “fix it in the mix.”
Well, you only need one piece of advice about this: DON’T DO IT.
Sure, there’s a lot that can be done once the tracks are laid down, and a lot can be done to save a poorly recorded instrument or vocal.
But, you can’t fix everything. And often, you’re just creating more work for yourself by not getting it right at the source.
So, spend a bit of extra time in the recording process, get the mics set up correctly, and set your guitar amps just how you want them. Don’t be afraid to spend a few extra minutes nailing that vocal line.
What Is The Process Of Mixing and Mastering?
There is a lot of confusion and misinformation about mastering these days. Often, when people mention mastering a song, they are actually talking about the mixing process.
In the traditional audio world, mastering is done by a professional mastering engineer. This involves taking the bounced stereo track, and applying effects such as EQ, compression and noise removal to the song or album as a whole.
It also involves a technical element for preparing audio for vinyl or CD if physicals are being created.
Nowadays, mastering is often done in tandem with mixing, as it is so easy to apply mastering techniques to the master bus in your DAW.
Analog vs Digital Mixing
There are a couple of schools of thought when it comes to audio mixing, sparking the debate: Analog vs Digital Mixing.
Analog involves the use of traditional mixing desks, outboard audio equipment such as delay and compression, and in the most traditional sense, recording to tape.
By contrast, audio mixing in digital involves using a computer, and in most cases that’s it. Mixing engineers working in this way utilize a DAW (digital audio workstation) such as Pro Tools or Logic, using plugins to apply changes to equalization, compression, etc.

