Do you want to be able to host better meetings with Zoom? Do you want these sessions to be super productive and effective? Then you’ve come to the right place.
Let’s face it, the world of meetings has changed. You don’t need to be in the same room as others anymore.
The world is now your meeting room.
And in this article, you are going to learn about how you can make your Zoom sessions better.
Zoom Is Becoming More And More Essential
Zoom is very rapidly becoming the place for online meetings. As the world stage for business expands, people are crossing time zones and countries more than ever, without leaving their home.
Let’s say you have a client on the other side of the world that you want to build a great relationship with.
Sure, you could phone them. But on the flipside… imagine the benefit of a face-to-face meeting.
The logistics make this tricky, right?
Zoom puts you face to face with your clients and colleagues in a virtual meeting room. You can hold long calls with multiple participants, and see everyone’s faces as you do so. This really is the future of connecting with others.
These 11 tips are going to make your Zoom meetings better and more effective by teaching you a bunch of awesome things the system can do to benefit you.
You’re going to learn everything from making your camera look better, to getting the best audio sound possible.
You’ll also learn about becoming a master of screen sharing. Your meetings will flow like never before.
11 Top Video Chat Tips for Zoom
1. Avoid Getting Out of Your Pj’s
Zoom is primarily a video calling software, but that doesn’t mean you have to use your video if you don’t want to.
In fact… one of the main benefits is that you can choose to opt-out of the video part.
Sometimes, you can get just as much done with a voice only call. Sure, it’s nice to see someone face to face, but there are also benefits to audio-only calls.
By choosing not to use video, you can save the energy required for less-important things (dressing up, focusing on your looks, pleasing with your facial expressions, etc.) and focus on the things that truly matter (connecting and getting things done).
You could be lounging around the house in your PJs, and that’s totally cool. You can be productive and comfortable right? It’s not a crime.
Especially in your one on one chats, go audio only!
You can easily switch off your video feed in Zoom by following these steps:
Step 1: Click your photo on the top right corner to bring up a dropdown menu. From this menu, select settings:

Step 2: From the settings screen that pops up, you want to select video from the left hand panel. Then from the video settings, make sure the box is ticked next to the option “Turn off my video when joining meeting.”

2. Create a Zoom Contact List and Short URL’s
If you need to regularly set up a call with the same people, don’t waste your time creating a new meeting each time. Once a Zoom URL has been created, it remains valid. The only time the URL will change is when a new meeting is created.
So, let’s say you need to set up a meeting with the same 6 people that happens once a week.
You can make this easy.
Set up the meeting for the first time and send the URL to everyone, then tell them to keep hold of this URL. This is now the URL they can use to dial into that meeting at the same time each week.
The best 2 ways to keep a recurring meeting link safe are:
- Save the link to your internet favourites. Get all your meeting participants to do the same. You could send an email reminder closer to the time to remind everyone to access the call via that link.
- If you have a website that can create redirects easily (Such as WordPress), you can use a free plugin like Pretty Links to create an online meeting URL. This can be distributed to your contacts and they can click the link and automatically be taken to the Zoom URL.
For example, you could create the URL, www.yourwebsite.com/zoomteamcall1, and tell your colleagues to use this at the designated time each week.
3. Improve Your Face
Ghost face is something that you’ve most certainly come across if you’ve been using online meeting places. It’s the effect of you looking incredibly pale and white when on webcam. This is often caused by the webcam compensating for low lighting by boosting brightness.
In turn, this makes your skin tone turn into a brilliant white glow. This doesn’t look so great in meetings.
Zoom has a great built-in feature to help eliminate this.
Step 1: Click your photo on the top right corner to bring up a dropdown menu. From this menu, select settings:
Step 2: On the settings window, select Video from the left side panel and ensure the box that says “Touch up my appearance” is ticked. This is an automatic function in Zoom that will make your skin tone more realistic looking.

Improve On-Camera Skin Tones
You can make your skin tone on camera look awesome with some simple lighting hacks. These are things that photographers have been doing for years, and it’s all to do with controlling color temperature.
By getting hold of a simple lighting setup, you can greatly enhance your on video skin tones.
A rope light, lamp, or LED light panel will be perfect for this, especially if you can adjust the lighting color.
Anything with a range of 3200 – 5600K would be ideal.
Now, the way you choose to light yourself is totally subjective to the results you want to achieve.
Warmer light will give you a glow. This is great if you are a pale or neutral skin toned person in natural light.
The reason an adjustable light is useful here is so that you can fine tune the lighting to match your skin tone.
Cooler lighting (5000K and up) will be brighter, will show more whites, and will also give a slight blue overtone. Warmer lighting (3200K and down) will give a more warm feel with yellows and reds.
You don’t want to go too extreme one way or the other, but finding the blend that suits your skin tone will make your videos look amazing.
4. Share Your Screen For Better Communication
Screen sharing is the best way to present things to your meeting, and it couldn’t be simpler. It can make it easy to share complex messages, while also allowing you to show visual additions to whatever meeting topics you have on the agenda.
If you want to share your screen, click the “Share Screen” icon at the bottom of your Zoom meeting.
![]()
This will then take you to a new screen asking you what you want to share. You can share the monitor as a whole (meaning your guests will see everything), or you can share a specific program or document that you have open, and it won’t show your regular desktop.
You have the option to share content on a Phone or Tablet by selecting the iPhone/iPad option, or even an interactive whiteboard for writing and drawing in the call.
You can also share your computer’s sound, perfect for playing back videos over the meeting.
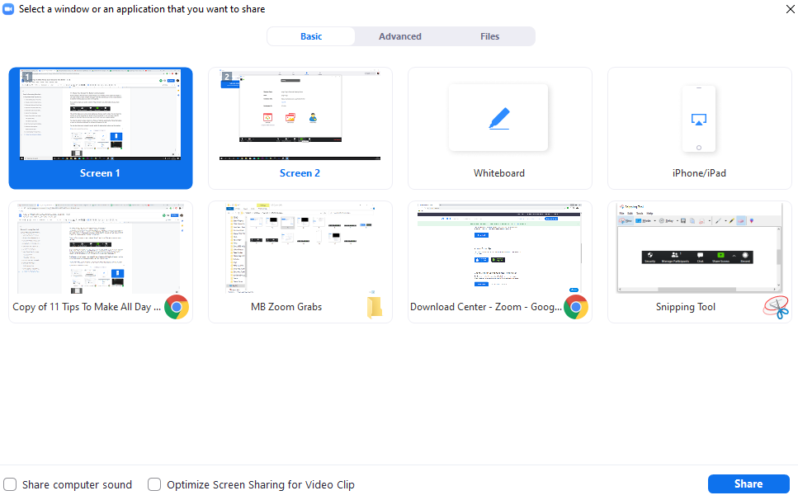
Once you make your selection, simply click the share button to share your screen with your meeting. They will see whatever you want them to see.
5. A Picture Tells a Thousand Words
When you present to an audience, a whiteboard makes all the difference.
Drawing on your screen by marking items for emphasis or creating charts on the fly works wonders.
With your ipad or android tablet, you can connect your tablet to your computer. Then, you can share your screen and write/highlight using the annotation tools. Very cool.
I don’t like plugging in and unplugging my tablet, so I purchased a cheap drawing tablet to use as a dedicated “drawing board” connected to my pc.
6. Eliminate Audio Issues With Headphones
This is a really simple hack for you to bring into your meetings.
If you use headphones while you are in Zoom meetings, your microphone won’t pick up the playback audio from your colleagues. You’ve probably been on a call before and found that you can hear yourself through the other person’s microphone as you speak.
Well, imagine that, but with 10 other people on the call. That’s a lot of noise going around!
Wear headphones to keep that noise in check!
7. Record Your Meetings
Recording meetings is a great way to ensure that nothing is ever missed. It means that you have a record of what was discussed. It also means that anyone who couldn’t dial in, can still go through the recording and hear what they need to hear.
It’s very easy to record a meeting in Zoom. Firstly, check your Settings menu to ensure that you’ve got your recording location set somewhere easy to find on your computer.
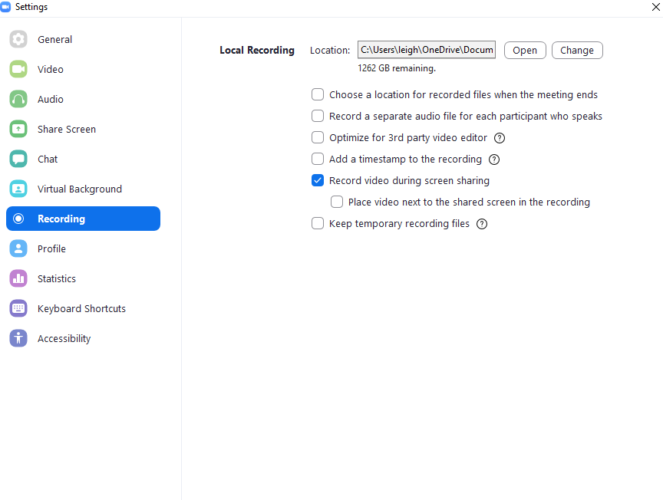
The settings menu also allows you to record separate audio streams for each participant (perfect if you want to edit this for use later on), optimize for editing in other programs, add time stamps, and more.
Once you’ve got your settings all sorted, it’s time to record your call. This couldn’t be any simpler to do.
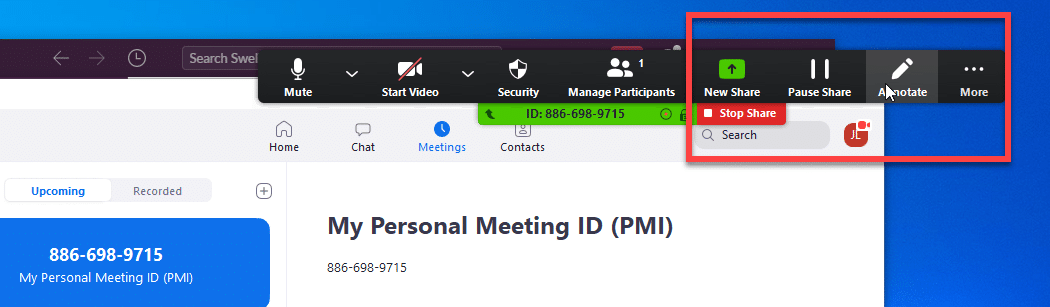
At the bottom of your meeting screen, you have a small toolbar with a few icons. You want to hit the record button:

This starts the recording process, and begins recording the audio and video streams. If you want to pause the recording, or stop it when finished, simply click one of the new icons that appear:

8. Never Zoom With Your Laptop Or Computer’s Microphone
You can very easily Zoom with your laptop’s built in microphone, but you shouldn’t.
Laptop microphones are very often low quality, and will not deliver great sounding audio. After all, the reason you’re reading this article is to improve your Zoom calls, right?
So, don’t allow poor audio to get in the way. If you want your Zoom calls to be awesome, check out these two ways to improve your audio.
The Easiest Way
The easiest way to avoid using your laptop mic is to get a headset style mic. Many of these are aimed at gamers and streamers, but they also fit the needs of the modern online meeting attendee too.
They double as a set of headphones and a microphone. They are often fairly cheap and portable as well, so you can easily pop them into your laptop bag and take them anywhere you choose to go.
You get the benefits of great audio from a microphone designed for voice transmission. You also remove that overspill that you get when your microphone picks up noise from other participants, and plays it back through their speakers.
The Better Audio Way
If you want to go all out, look into adding a high quality USB mic to your meeting setup. USB mics are plug and play, meaning you don’t need to be an audio whiz to get great results.
If you’re the one running the meeting, this is especially important. You need to be heard loud and clear by everyone else on the call.
Simply plug the USB cable into your laptop and get to work. Some USB mics even feature an additional headphone output so you can combine your high quality microphone with a set of headphones.
You’ve now stepped up your audio game. Your meetings will sound great.
9. Get The Zoom App for Mobile, & A Mic To Go With It
Zoom meetings don’t just have to take place from your home office with your laptop. Get the Zoom app on your phone, along with a small plug and play mic, and you can take your meetings with you.
Downloading the Zoom app is simple.
Open your app store (AppStore on iOS and Google Play Store on Android) and search for Zoom. Or, head over to the Zoom website and click on the download link for your device style.

Much like a laptop’s built-in microphone, your phone’s built-in mic is fine for limited purposes. But if you really want to deliver the best quality audio to your meetings, then you want to look at adding a mic to your setup.
There are a huge range of mics available that will plug directly into your phone’s headphone socket. Some are very small and portable, and others offer more features. Some of the larger ones will also have headphone outputs built in.
10. Minimize Interruptions
If you don’t want to be the nuisance on a call that interrupts everyone, mute your audio. Your guests will thank you for it. This is also something that, as a meeting chair, you should suggest to anyone on the call.
When you aren’t speaking, mute your mic.
In the bottom left of your Zoom meeting, click the mute button.

When you want to speak again, click it again to unmute.

You can also go into your settings and auto-enable microphone muting for when you join a call. Go to the settings menu, select audio, and check the “Mute my microphone when joining a meeting” option.
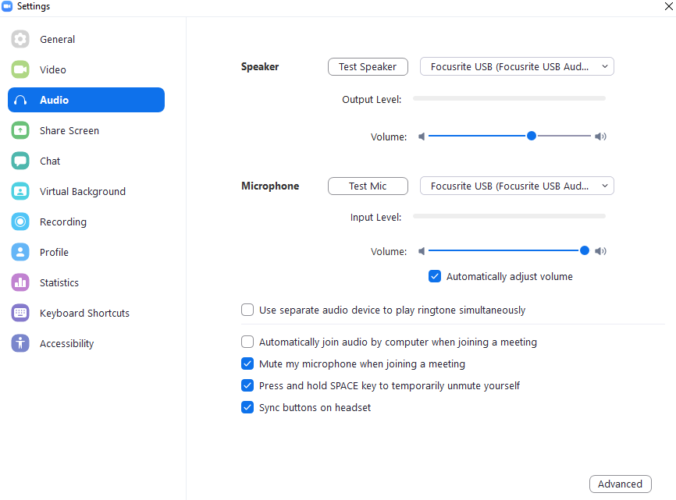
The option under this is also useful to keep checked. This means that while your microphone is muted, you can unmute yourself by just holding down the space bar. When you then release the space bar, the mic will mute itself again.
Mute Everyone Else
If you are the one running the meeting, you can take this initiative on yourself and mute everyone else with a few simple steps. This can save you the time required chasing people to mute themselves.
Once you are in your meeting, you want to click the Manage Participants icon at the bottom of the meeting window.
![]()
This will open up a sidebar that shows you everyone in the meeting. You can either go through each participant and click the microphone icon next to their name to mute them, or click “Mute all” at the bottom to mute everyone’s mic.

11. Avoid Saying “I Forgot Your Name”
It’s a situation no one ever wants to be in. Everyone has introduced themselves and said what they do, but now you need to ask a question… and you can’t remember the name of that specific person.
Pretty embarrassing right?
Well, don’t worry… Zoom has got you covered!
Head on over to the settings page again, select Video and check the option for “Always display participant names on their videos”. This will show you who is who. You’ll never forget a name again.
