Is your finished track missing that special something?
Are you finding your productions just aren’t quite hitting the mark when you compare them with your favourite beat-makers?
Well, if you’re not mastering your tracks properly (or at all), this could well be the problem.
Before you learn all about mastering in Logic Pro X though, it’s important you get a few of the fundamentals right. If you haven’t already, you should check out our ultimate guide to mixing like a pro.
Alright. Let’s talk about mastering.
Master or Disaster? 3 Things You Need To Nail First
Regardless of who is mastering your tracks, there are a couple of important things to have tied up before you commit your track to the mastering phase.
Make Sure The Mix Is Finished
This might seem obvious, but there’s nothing worse than getting halfway through a mastering session and realizing you forgot to turn the guitar lead up half a dB.
Once you’ve ‘finished’ a mix, you should sit on it for a couple of weeks and listen to it on a number of different sound systems, before importing the audio file and starting the mastering phase.
Make Sure You’ve Got Headroom
Mastering needs room in the overall dynamic range of the track.
If your track is already pumping close to 0dB, then you aren’t going to have any room for compression or limiting during the mastering phase. This is an important tenet of mixing – leaving headroom for mastering.
Make Sure You’ve Got The Right File Type
You can’t master with an MP3 file, so make sure you bounce out a high quality audio file from the mix session, such as a WAV file.
We’d also recommend keeping the track at 24 bit, assuming you recorded and mixed in 24 bit of course.
How Do You Mix And Master In Logic Pro X?
It’s common to hear people use the phrase “mixing and mastering” as if the two are inseparable processes that take part simultaneously.
Though this may be true in a number of cases, especially in the digital age, it’s important to note that they are (or should be) very separate and distinct parts of the audio production process.
In this article, you’ll be learning about mastering in Logic. If you’re new to music production or just keen to ramp up your mixing skills, you should check out our article on Mixing in Logic Pro X.
Can You Master With Logic Pro X?
It might seem a null question in an article literally written to show you how to master in Logic, but given the DAW isn’t directly marketed at mastering engineers, it’s a fair one.
Traditionally, mastering has been done in dedicated mastering DAWs such as WaveLab. Well, traditionally mastering would be done on physical outboard gear, but we don’t all have bottomless pockets, so let’s take that off the table.
The truth is that like mixing, mastering, can also be done in any DAW, so long as you have access to a few important tools.
- EQ
- Compression (& Multiband Compression)
- Limiter
- Stereo Wideners
- DeEssers/Noise Reduction Tools
How Do You Master A Song In Logic Pro X?
Before you import your finished tracks into Logic Pro and start mastering, it’s important to give yourself some time and space from the mixing process.
It’s extremely beneficial to approach the mastering session with fresh ears, so try to give yourself a couple of weeks in between finishing the mix, and starting the master.
This 6 step guide will give you everything you need to start mastering in Logic, but remember, at the end of the day this is a creative endeavour. So, by no means should you stick to the rules.
Follow your ears!
6 Steps To Mastering In Logic Pro X:
- Using Reference Tracks & Logic’s Match EQ
- Measure Twice, Cut Once – Measuring In Mastering
- Taming The Beast – Frequency Spectrum
- Down Boy – Controlling Dynamics
- Playing The Stereo Field
- File Type & Dithering
Using Reference Tracks & Logic’s Match EQ
Just like in the mixing process, using reference tracks is incredibly important.
Unfortunately, just as with leg day, it often gets skipped.
It can be pretty humbling (read: defeating), to compare your mixes against reference tracks and realise they aren’t quite there yet. So, make sure you’re using reference tracks during the mixing process, and don’t leave anything to ‘fix in the master’.
That said, certain aspects of mastering will help get your mixes to that next level, so rest assured you still have some room to work.
Import your finished mix or mixes to a new audio track in Logic, accompanied by 3 different reference tracks. They should be similar in genre to the track you are mastering, so if you’re working on a country track, don’t import 3 death metal songs.
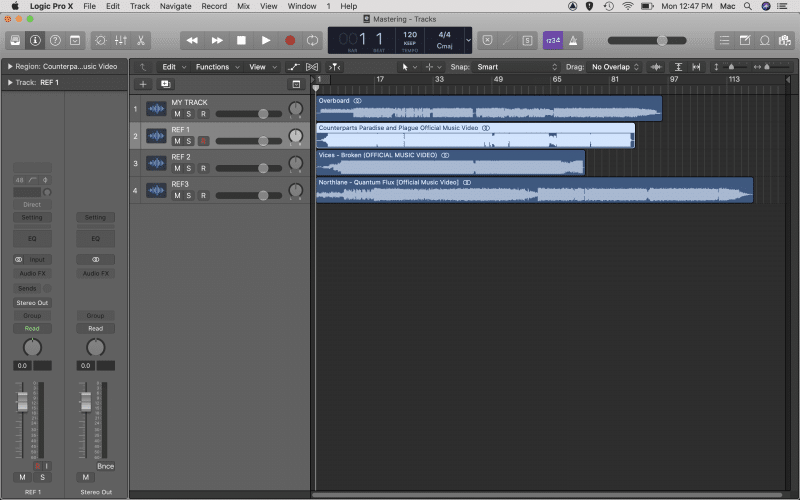
Start by matching the levels across all tracks, so the difference in volume doesn’t mess with your perception (louder always sounds better).
It’s likely that your mix will be significantly quieter than the 3 already mastered reference tracks. Don’t freak out, you’ll learn how to deal with that later.
Once you’ve got your levels straight, spend a bit of time muting and soloing the reference tracks and your mix. Listen and compare the 4 tracks, and make a few notes (literally write them down):
- What do you like about the sound of the 3 reference tracks? (Why did you choose them?)
- Does your mix sound brighter or darker than the references?
- Does it have more or less high or low end?
- Do the reference tracks sound more, or less compressed than your mix?
- Do the references sound wider, or narrower than your mix?
- What other differences do you note between your mix and the 3 references?
Logic’s Hidden Gem For Referencing – Match EQ
There are tonnes of reasons why we love Logic, and the built in Match EQ is just one of them.
It’s an invaluable tool for mastering, allowing you to analyse the frequency spectrum of your mix against your references, and literally seeing the difference.
Create a new audio track and load up 3 instances of Match EQ on it (one for each of your reference tracks).
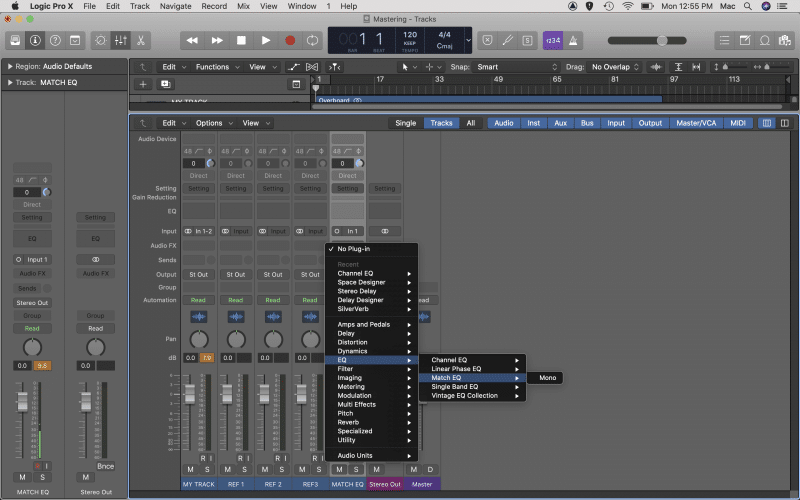
Hit F to bring up the Project Browser on the right hand side, giving you access to your 4 audio tracks.
Drag your mix file onto the Current tab in Match EQ, and one of the reference tracks onto the Reference tab. Then, on the EQ Curve, hit Match.
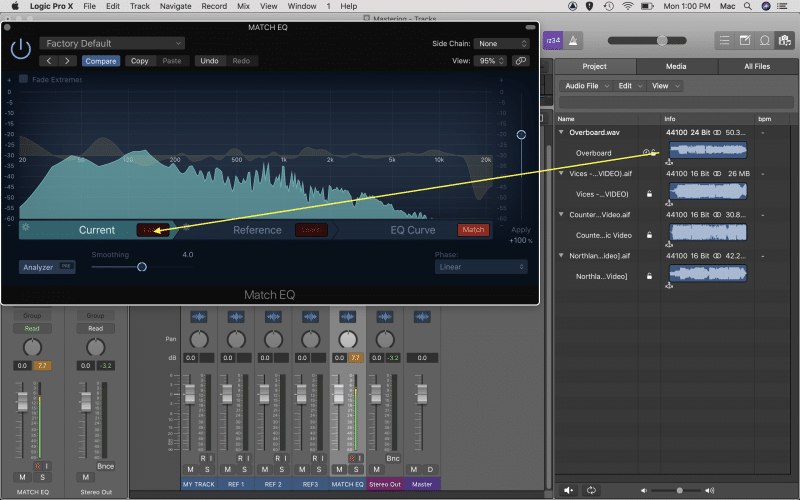
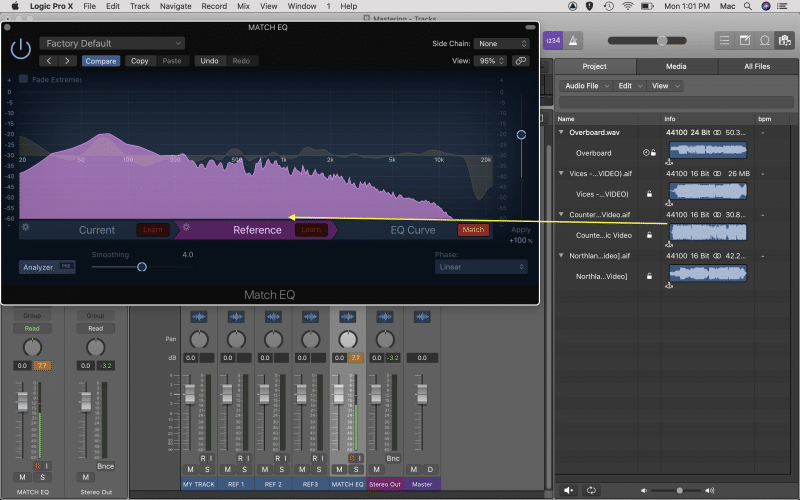
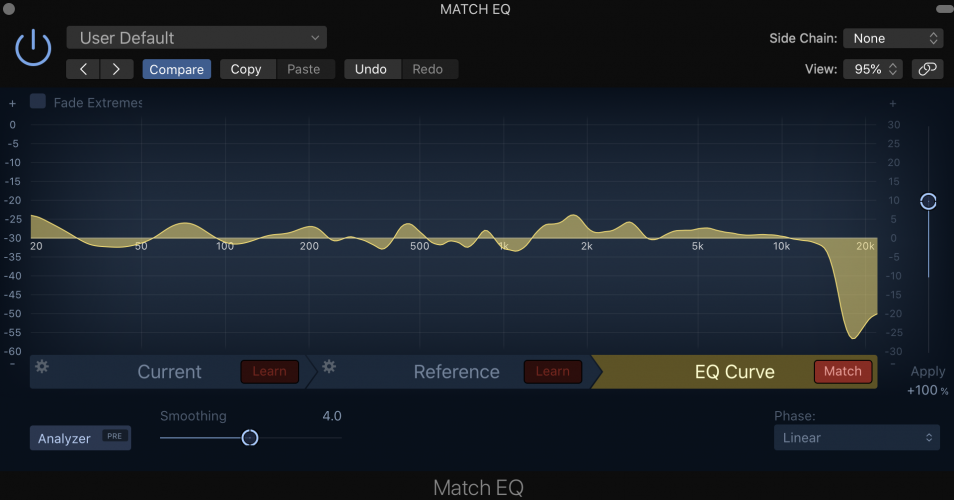
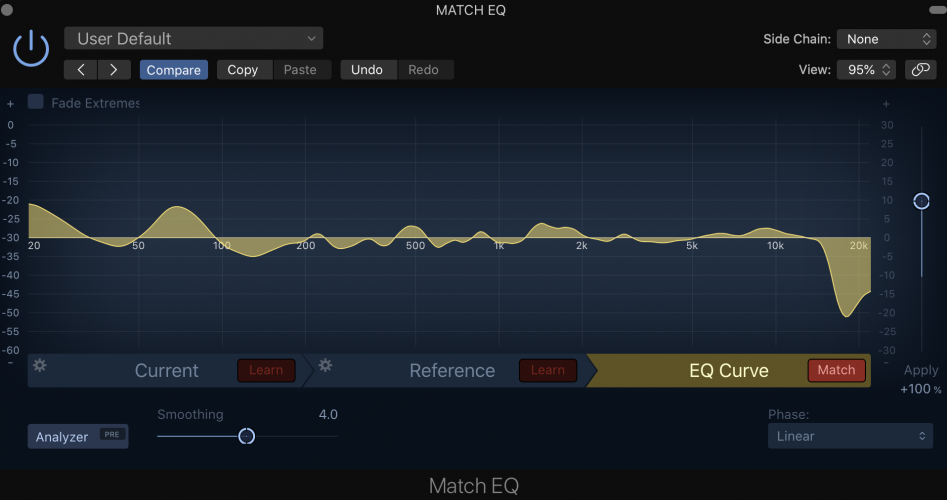
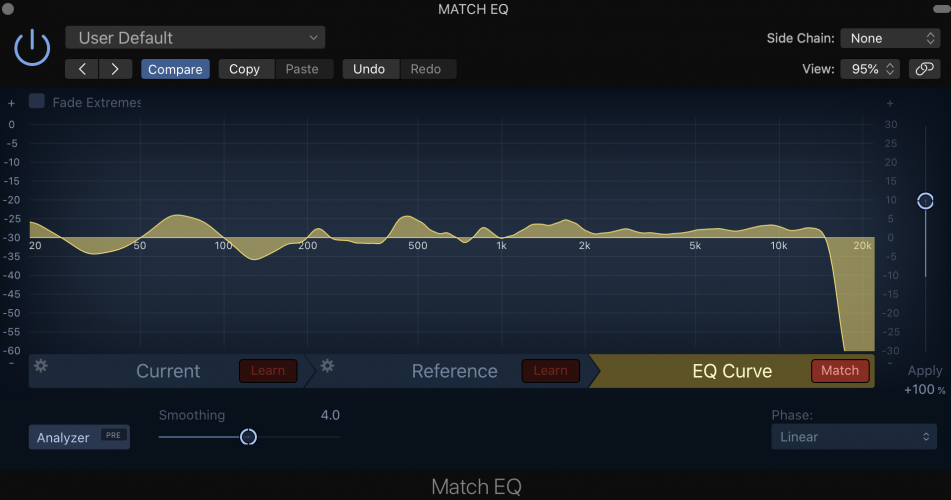
The plugin will create an EQ curve that visually demonstrates the differences in frequency spectrum between your mix, and your reference.
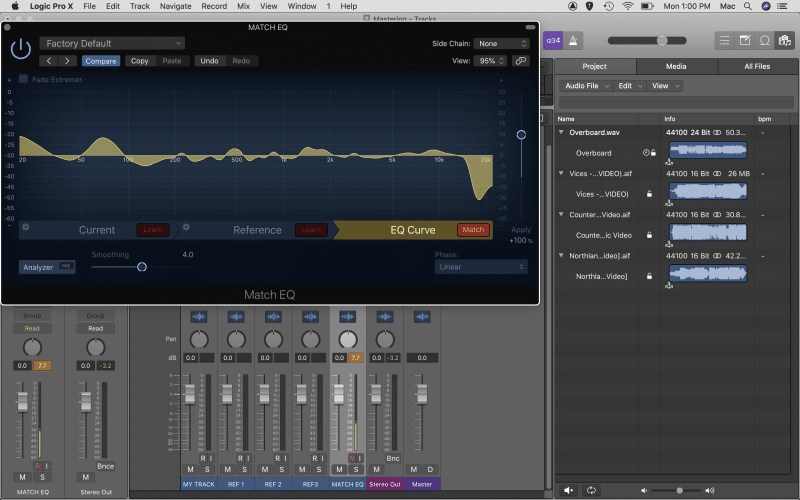
Now go ahead and do the same for the other 2 references, using the other 2 instances of Match EQ.
What you want to do now is compare the three EQ curves, and see if there are any trends.
For example, it appears our mix has quite a few challenges in the low end. Compared to the references, we have a lot of energy around 80Hz, and not a lot in the 100-200Hz range. Our mix also appears to be lacking a lot of high end, dropping off significantly around 12kHz.
So, we’ve now got some clear areas of improvement, but here’s the thing. The golden rule, as with mixing, is to use your ears, not your eyes.
Though there are some pretty clear signs here that our mix needs frequency work, we shouldn’t make any changes based on this alone. No two tracks are ever going to be exactly the same and that’s not what we are aiming for.
We are only using this new information as a guideline for potential areas of improvement.
You should compare any trends noted from Match EQ to the notes you took when listening and comparing. If you get a result like the above, and you noted that the reference tracks sound a lot brighter than your mix, then you’re on to something!
By the way, if you do get a result like this, where Match EQ is showing a crazy difference like 15dB+, then something is probably wrong in your mix and you should go back and make some adjustments.
This is simply an example, and is actually using an unfinished mix to demonstrate how you can use Match EQ to level up your music production.
Measure Twice, Cut Once – Measuring In Mastering
One of the principles in mastering is measuring. That is, using tools to measure things such as:
- Frequency range
- Dynamic range or loudness
- Stereo field
Logic Pro X has a number of measurement tools including a Loudness Meter, Correlation Meter, and Level Meter, all of which can be found in the Metering section under Audio FX.
But they’ve gone one step further and incorporated all of these features into a handy new plugin called MultiMeter. It also includes a goniometer for measuring stereo fields, which you’ll learn about further down in this guide.
Frequency – Analyzer
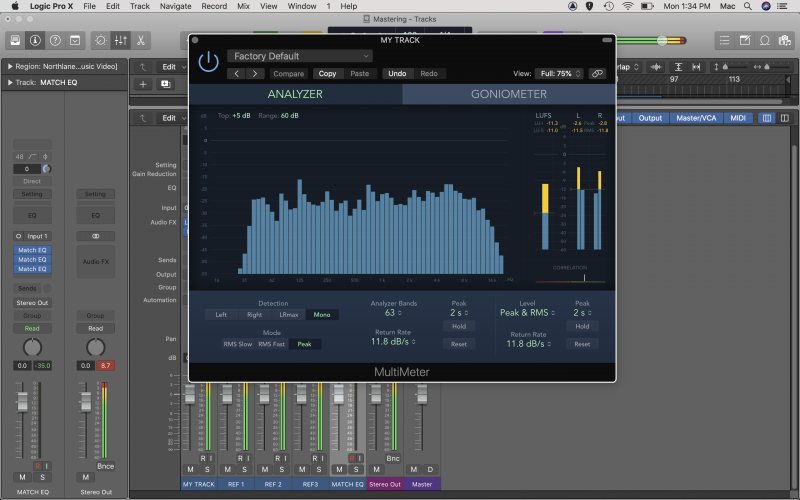
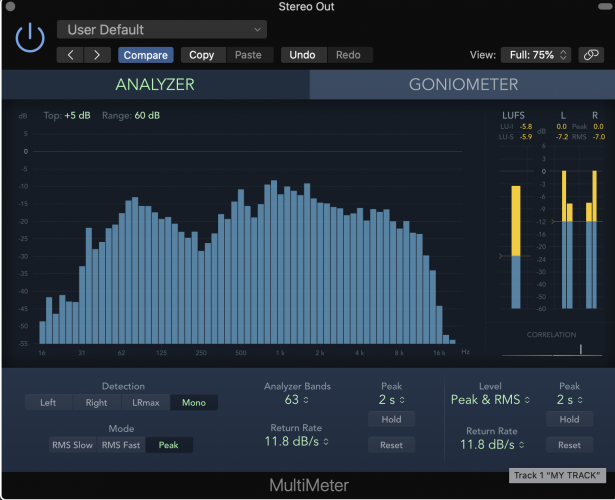
The Analyzer section in MultiMeter is a real time frequency analyzer, which shows you changes in frequency as they happen.
There is no set goal for what this should look like across a mix; think about the different frequency settings on your car radio, iPod or in Spotify. Different genres have different expectations when it comes to what the frequency spectrum should look like, but you can use Logic’s Analyzer to find anomalies.
For example in our mix, 100-125Hz is coming through really strong. We might use an EQ to cut a little in this area. Or if the frequency is particularly dynamic, we might target it with multi band compression, which you’ll learn about shortly.
That’s the beauty of a real time analyzer, it allows you to determine the best method for taming the frequency range.
Loudness & LUFS
Loudness is a contentious topic in mastering, as it has been the subject of abuse for many years now.
Remember how the human ear identifies louder sounds as subjectively better? Well, mastering engineers (or more accurately the record labels that hired them) learned how to use this to their advantage by using a limiter to make finished tracks louder and louder.
Think about it, if you’re listening to the radio and a track comes on that’s louder than the last, and the human ear naturally prefers louder sound sources, then you are more likely to prefer that song, and go out and buy it!
Yeah, we are talking about that time, when people went out and bought music.
This resulted in something called the Loudness War, which ended up sacrificing the beauty in music and its dynamic range in favour of overly compressed or squashed tracks that appeared louder.
Loudness is still an issue in contemporary music, though it has been stamped down by new limitations enforced by streaming and broadcast companies.
So, while the goal used to be ‘get the track as loud as possible’, it’s now ‘get the track as loud as possible, within the confines and limitations set by the platforms the track will play on’. All the way, seeking to retain the nuance and dynamic range that makes music music. Tricky, huh?
That’s where the LUFS meter comes in in Logic’s MultiMeter – it helps you measure the loudness of your masters.
We are going to do some more comparison to our reference tracks here; load the MultiMeter onto the Stereo Output, and listen to the loudest section of your reference tracks one by one.
Pay attention to the LU-I (integrated) value displayed at the top of the LUFS meter. Note down the value (it will change over time so find an average value or note down a range e.g. -5.7 to -6.3dB).
Do this for all 3 reference tracks and compare the values, this will give you an indication as to how much squash or compression is acceptable for the genre you are working in, and what the loudness level of your master should look like.
For example, heavy rock tracks will typically feature a lot more compression (and therefore be a lot louder), than say, a 20 minute free form jazz odyssey,
You’ll learn about what to do with this information, and how to achieve your desired loudness level soon.
Taming The Beast – Frequency Spectrum
Now that you’ve spent a bit of time listening, analyzing, comparing, and taking notes on what needs work, it’s time to start applying some mastering processing.
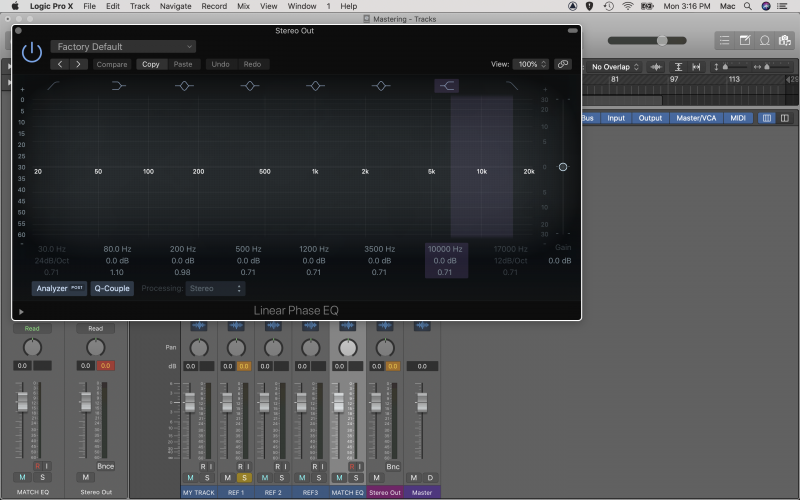
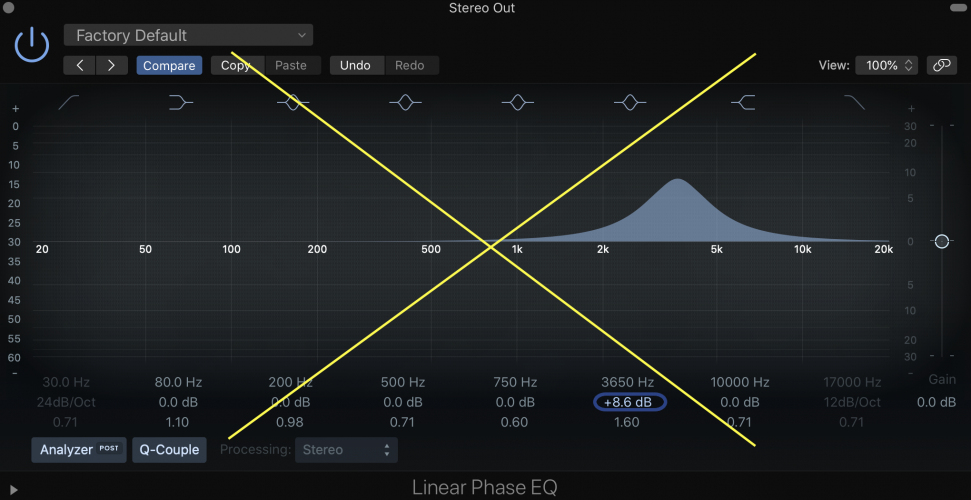
When applying any equalization during the mastering phase, we’d highly recommend using Logic’s Linear EQ plugin.
Though the Linear EQ is harder on your CPU than the standard Channel EQ, it’s a sacrifice worth making as the plugin doesn’t cause any phase shift.
Phase shift is a natural by-product of EQ and is something you can get away with on individual tracks, but it can cause problems for the master.
Not only does the Linear EQ look great in black, it has a higher resolution than the standard EQ, giving you the ability to make finer adjustments – important in mastering.
You should use the Linear EQ to make small adjustments based on your notes, but try not to boost or cut any more than 3dB. If you need to make more severe adjustments, you should consider going back to the mix.
When attempting to tame overly excited frequencies in a master, you might find that EQ doesn’t quite do the trick. This is especially the case when the frequency you want to tame is quite dynamic.
For example, certain notes on a bass guitar might create unwanted boosts in the low end, but only when that note is played.
For this, we might choose to apply multi band compression.
Down Boy – Controlling Dynamics
As you’ve seen already, dynamic control is a huge part of the mastering process.
And, if you really want to master like a pro, you’ll need to learn how to use three types of dynamic tools:
- Compressor
- Multi band compressor
- Limiter
Compression Obsession
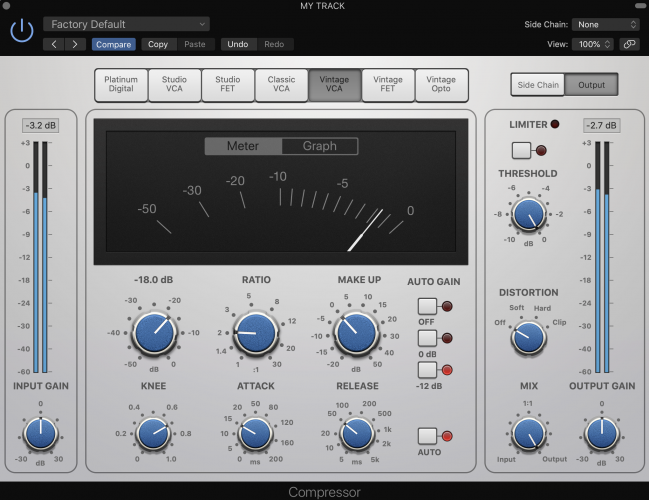
If you are finding the mix has too much dynamic range, that is, certain sections are much louder or softer than others, you may wish to apply a little compression to the track.
Compression in mastering is typically much subtler than in mixing applications, so be careful.
For example, you’ll want to set the ratio at no more than 3:1, aiming for less than 3dB of gain reduction. Of course, let your ears be the judge here, but these are some pretty universal guidelines for using compression in mastering.
Applying compression to the mix can help tighten up the dynamics of your track, allowing you to employ more limiting to bring up the loudness in your mix.
You’ll want to pay close attention to the gain (sometimes called make-up gain) function. Gain gives you the ability to make up for any change in volume from compression, and it’s important that you are comparing signals at the same loudness.
I’m With The Band – Multi Band Compression
Multi band compressors are exactly what they sound like, compressors that operate in several bands, split across the frequency spectrum.
Whilst traditional compressors apply compressors across the entire frequency range, multi band compressors allow you to isolate particular areas of the range that are particularly dynamic.
For example, you might have an overly dynamic mid-range, where guitars, vocals, and keys are all fighting for the same space, and as they come together, they make the mid-range honky, nasal, and fatiguing.
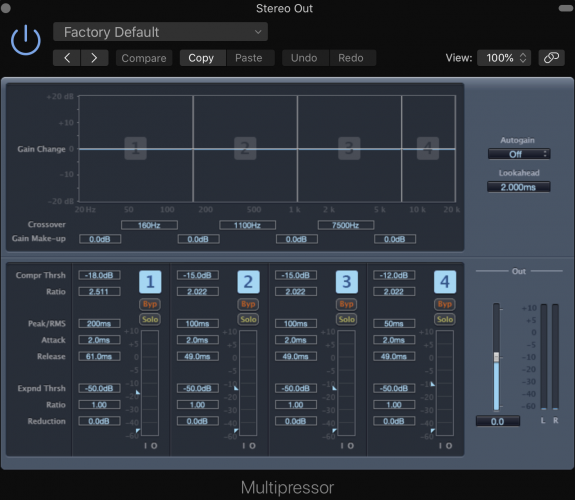
Logic’s built in multi band compression, Multipressor, is a fantastic tool for applying this technique.
Here’s how it works:
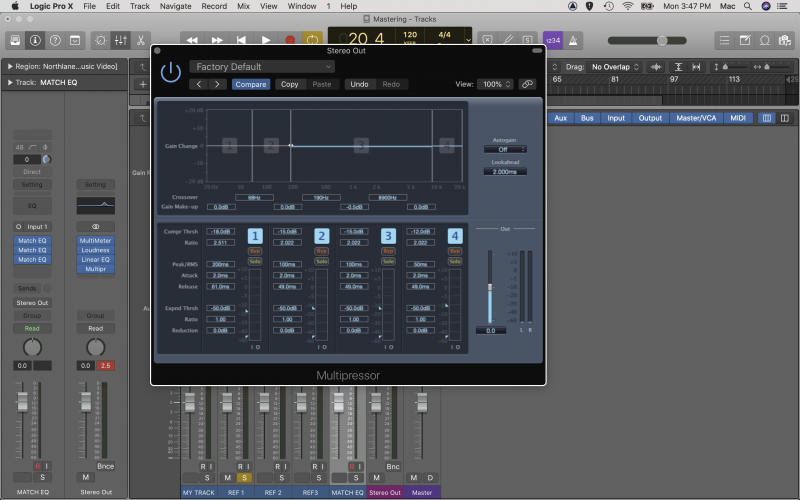
The Multipressor has 4 bands, which you can tweak as desired by dragging the lines that designate the band boundaries.
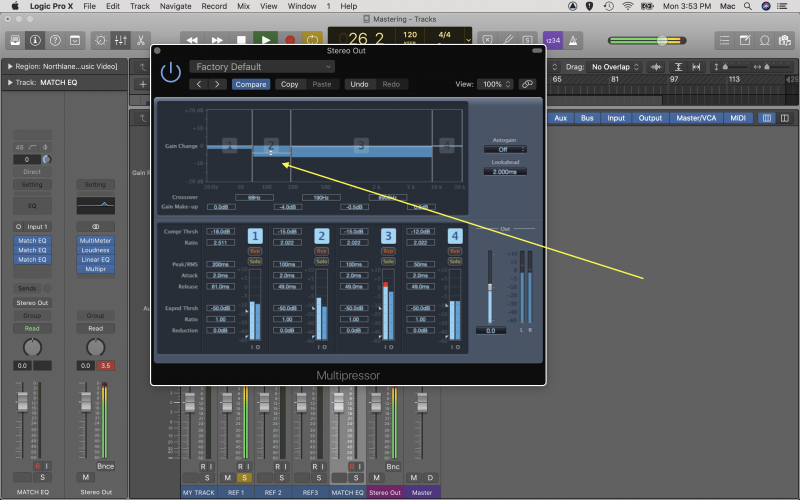
Here, we’ve set the boundaries of band 2 to target frequencies between 68-190Hz. This is because we have an overly dynamic low end, where certain bass notes, when combined with the kick drum, are pushing through louder than others.
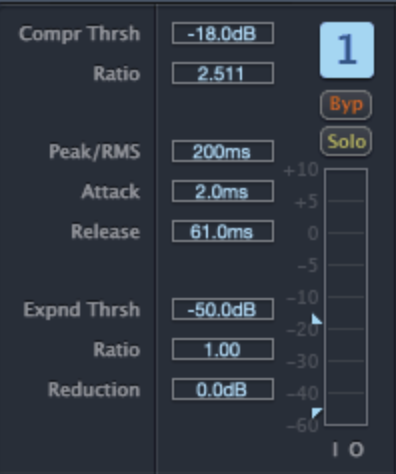
As with a regular compressor, you have access to controls such as ratio, threshold, attack and release, to fine-tune the compression to your needs.
You also have the ability to solo or bypass a band, so you can hear it in isolation and listen to the applied compression.
At the top of the GUI, you will see a blue band moving as the compressor works. This demonstrates the gain reduction applied by the compressor. Don’t forget to use make-up gain to match the levels pre and post-compression.
Turn It Up To 11 – Logic’s Adaptive Limiter
You learned earlier about loudness and how to measure it, now it’s time to use a limiter to achieve that loudness.
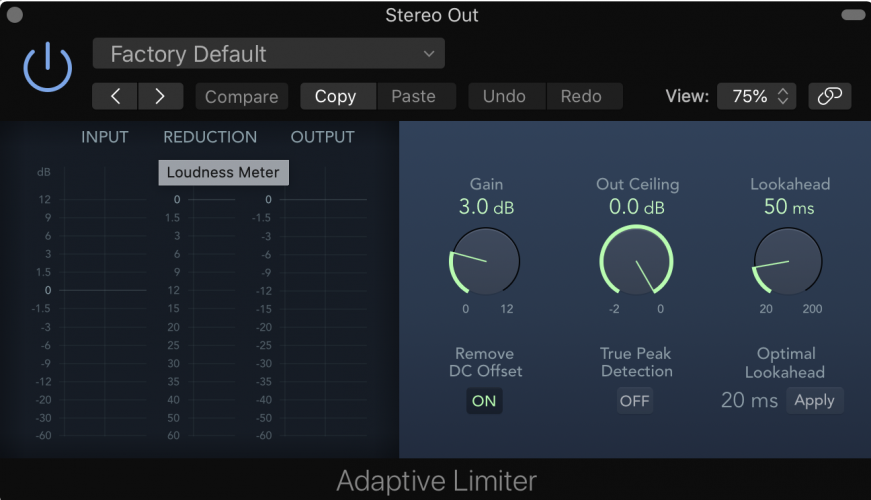
Logic’s Adaptive Limiter is the perfect tool for this job.
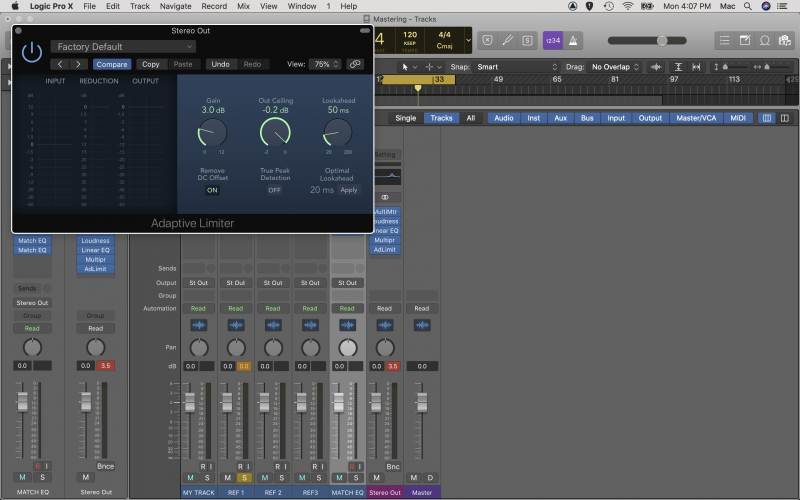
The first thing we are going to do is set the Output Ceiling to -0.2dB. This gives us a little bit of a safety net. When it comes to digital audio, overloads are something you want to avoid like the plague.
Whereas analog gear can overload and create a subtle distortion that is often desirable, digital distortion sounds like fingernails on a chalkboard. Or rubbing polystyrene together. Or a poorly played violin. Or, a polystyrene violin scraping across a chalkboard.
You get the point.
Set your Output Ceiling to -0.2dB and don’t touch it.
We do this because although plugins are extremely quick, they are never infinitely quick. Even computers need time to process. So, to be extra safe from overloads, give yourself a little safety net.
You’ll want to keep Remove DC Offset on as well. This basically filters out anything below 20Hz, which is below our hearing range anyway, and prevents anything weird from happening to your speakers.
There’s one problem with Adaptive Limiter though, it doesn’t allow you to properly assess the limited track against the unlimited track.
This is an important part of mastering, as you need to be able to determine whether your limiting is creating any negative artefacts such as distortion or over-compression.
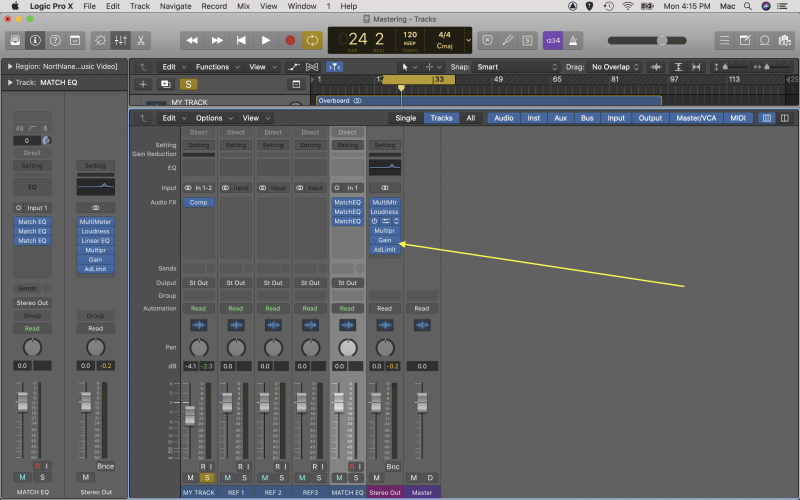
Luckily, Logic has a dedicated Gain plugin that we can use to our advantage.
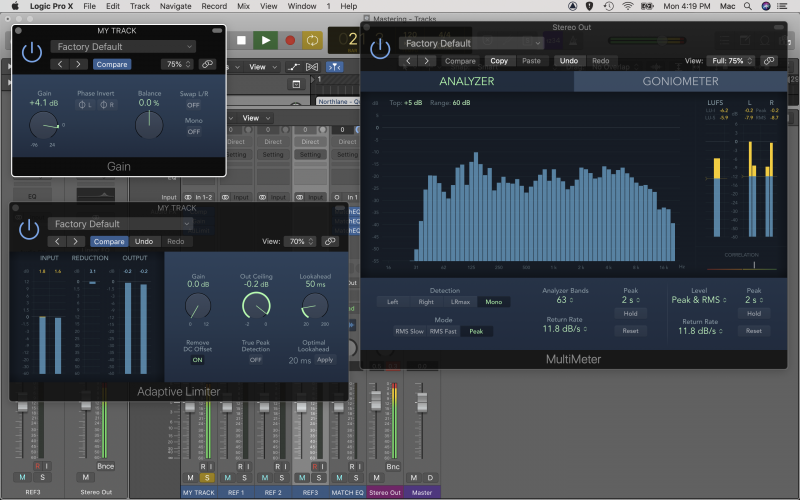
So, what you’ll want to do is set the gain control to 0, and insert the Gain plugin before the Adaptive Limiter.
Now, turn up the gain until your loudness matches the notes you made when you compared your references and your mix.
Playing The Stereo Field
When you mixed your track, you worked in the stereo field using pan, panning instruments left and right and creating space for each of them.
Well, you can play in this field in mastering too, using stereo widening tools. Unfortunately, Logic doesn’t have a built-in stereo widener, but there are plenty of great free ones.
iZotope’s Ozone Imager is a fantastic tool which you can use to give your track a little extra width, and really pop out of the speakers.
File Type & Dithering
Remember how we said mastering engineers stripped off their lab coats in the 80s and became part of the creative team? Well, there’s still a technical element to mastering, which prepares your work for however its being released e.g. digital, CD, vinyl.
The standard format for mastered tracks is a 16 Bit WAV file at 44.1kHz, so you’ll want to make sure to bounce out your track in the right file format.
When you export your master to this file type, you are essentially degrading the quality of your mix, assuming you started with a 24bit/48kHz file, and this comes with some side effects.
Dither is a way to hide these side effects. We won’t go too far into detail on how it works, but it’s basically a noise bed that’s extremely low in volume, and masks any artefacts.
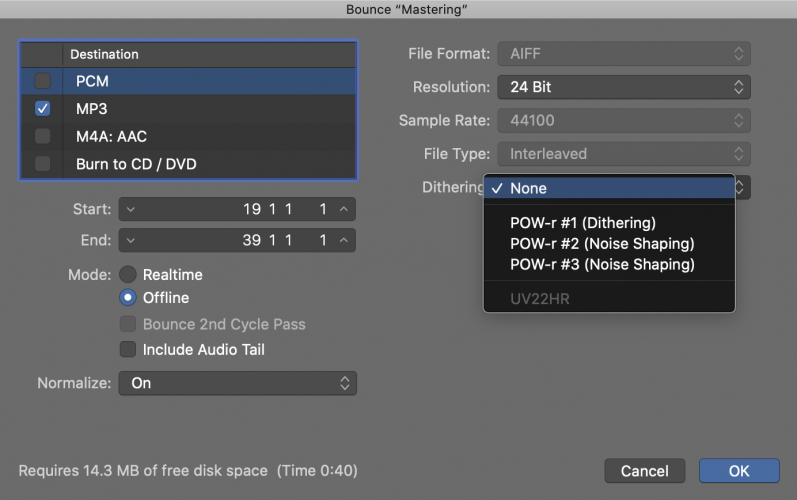
Dither isn’t a plugin as such, but something you apply when bouncing out a track. Logic offers three different types, check them all out and see which you prefer.
How Do You Master Your Tracks?
As a mastering engineer, mixing engineer, recording artists or bedroom producer, you never stop learning.
And, just as you’ve read several times, the rules are made to be broken. So dive deep into Logic’s tools, try experimenting with some third party plugins, and make the mastering process your own.
Why not leave a comment below, and share some of your mastering tips? We would love to hear about your own experiences!

