How do the pros get their tracks sounding so damn good?
It’s a question we’ve all asked, sitting in front of a laptop listening back to your recordings and thinking, what am I missing?
If you want your tracks to keep up on the sonic stage, you need to learn how to mix in Logic Pro X.
Here’s the thing.
You can’t just put up a few mics, hit record, and expect a polished track to turn up in your DAW. Same goes for producing electronic music in Logic, or any other software for that matter.
Sure, the instruments sound pretty great out of the box, but once you layer in several synths, a couple of drum kits, a sweet bass line and some vocal chops, you start to realise something.
Something isn’t right. Something doesn’t fit. Something’s missing.
Hint: it’s not another instrument track. Your track needs mixing!
A Long Time Ago In A Recording Studio Far, Far Away…
In a time before Autotune *gasp*, USB microphones and digital audio workstations like Logic, mixing a track was an incredibly complex and laborious activity.
In minutes, you can use Autotune in Logic Pro X to clean up a vocal track, switch to the Scissors tool to make some quick cuts, and apply automation in an instant. And if you mess it up, Command Z is your best friend!
Then, you can quickly move on to Mastering.
Unfortunately, sound engineers of old did not have access to this luxury.
Audio editing meant physically slicing tape with a razor, and splicing them back together – no Command Z here…
Applying volume automation throughout a track was hardly ‘auto’, it often involved a group of engineers riding the faders in real time as they bounced a track out to a 2-track.
Applying compression to a track meant physically patching in an outboard compressor and fiddling with actual knobs.
And with physical outboard gear comes a limitation, you only have as many compressors as you have! You can’t just keep adding plugin after plugin…
Luckily, we live in an age where your wildest dreams are at your fingertips. Okay maybe not your wildest dreams, especially if you’re one to eat cheese before bed…
But your craziest audio fantasies? They are just a few clicks and key commands away.
Let’s dive in.
How Do You Mix Tracks In Logic Pro?
Every engineer, producer or audio enthusiast has their own process for mixing, and there is in no way one best way to mix.
There are a few best practices though, and so in this tutorial you will learn about 5 key areas of mixing in Logic Pro X:
- The Static Mix
- Equalization
- Compression
- Effects
- Sends, aux tracks and busses
You’ll also learn about a few mistakes to avoid, and some pro tips for creating the ultimate mix. Remember though, every rule is made to be broken, and what matters is the end result. So, experiment a little and find what works for you.
Let’s Get Things Straight
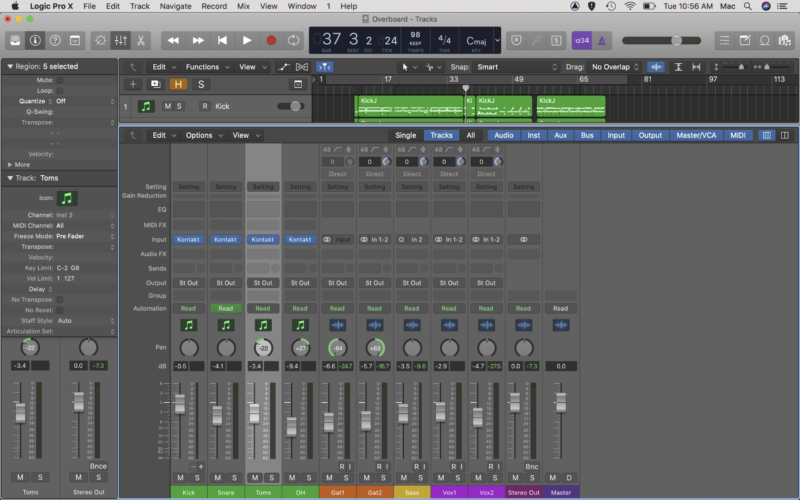
Before you jump into the mixing process, it’s best practice to set up your session for navigation and ease of use.
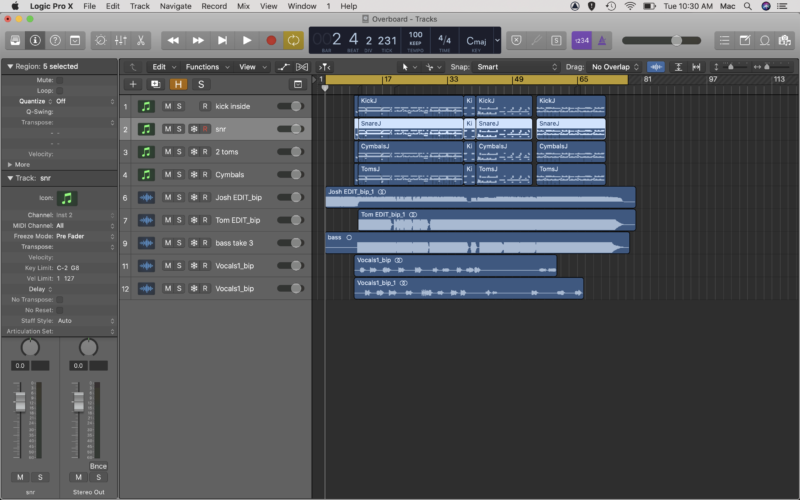
Chances are the names of your tracks are all over the place, like they are in our session. To keep things easy as you get mixing, it’s a good idea to clean up the track names. This is especially important when in the mixer view as the text display is fairly narrow.
Our session is still looking pretty bland, so we are going to add a splash of color. Our session is pretty small at only 12 tracks, if you have a large session, color coding is vital. It’s entirely up to you how you do this.
Most people apply colors based on instrument type e.g. making all drum tracks green.
Hit Option+C to bring up the Color bar, select your regions and choose your color.
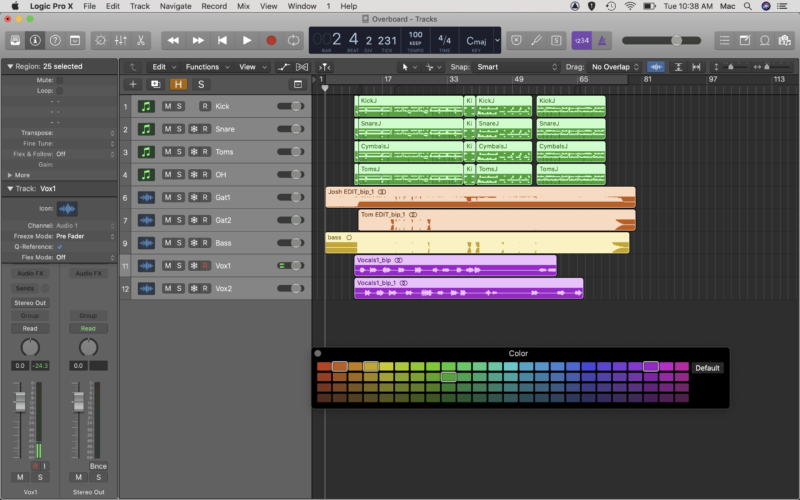
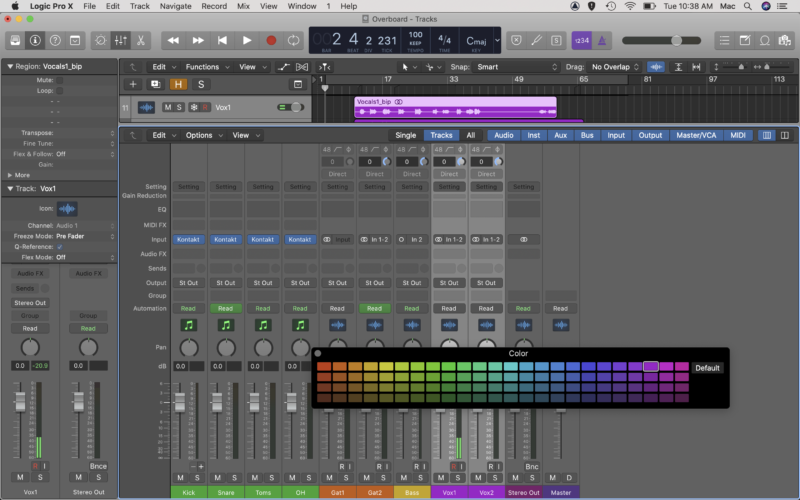
You’ll want to do the same in the Mixer view. Hit X to bring up the mixer, select the tracks, and apply some color again.
Creating A Static Mix In Logic Pro X
Now that you’ve got your session looking sexy and easily navigable, you’ll want to start with a static mix.
A static mix involves setting the volume or level for each track, and creating some stereo depth using pan.
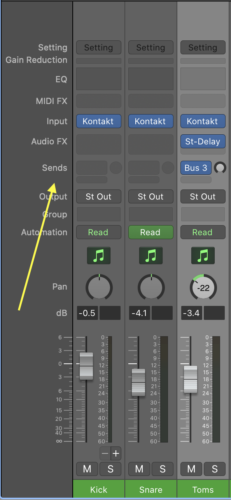
Setting Levels
Hit X to bring up the mixer, and use the faders to balance out the volume of each track. You’ll want to make sure that each track is audible, but not overbearing or masking any of the other instruments.
Don’t worry if you can’t get it perfect, it’s extremely likely that some of the instruments clash as they are fighting for the same frequency range.
For example, kick drums and bass guitar often battle for space in the low frequencies, while electric guitars and vocals can have issues in the mids. You’ll learn how to take care of this using equalization shortly.
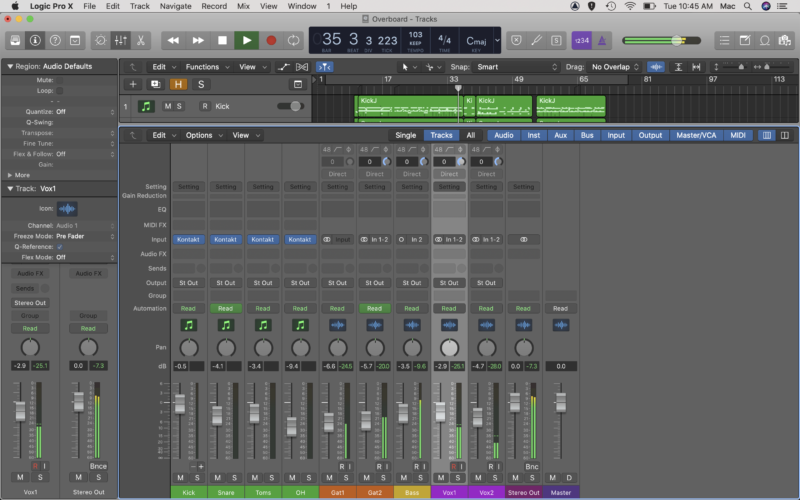
Pay close attention to the Stereo Out track, which is the master output. Try to keep the level at around -6dB. Remember, 0dB is the ceiling, and once you start pushing levels above this, digital distortion occurs. And it’s not pretty.
Using Pan To Set The Stereo Field
At the top of each fader, you’ll see a circle with a green line above it. This is the pan pot (panoramic potentiometer), and you will use it to position each track within the stereo field.
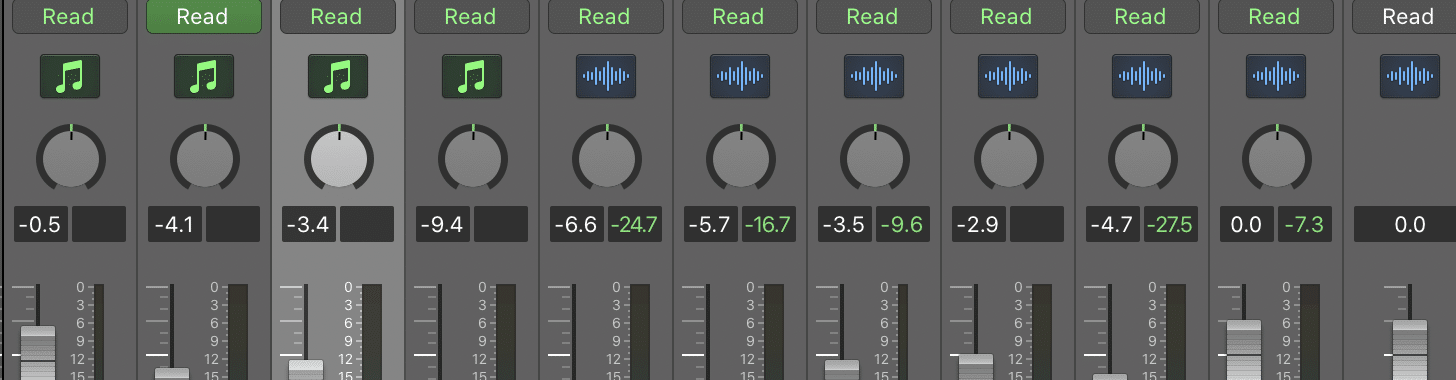
Whereas the fader controls the level or volume of each track, pan controls whether the track appears in the left or right side of the mix, or anywhere in between.
Again, there are no hard and fast rules here, though typically lead vocals, bass, kick and snare are kept at centre. From there, it’s completely up to you.
You should experiment with opening up the cymbals or overhead tracks as wide as possible, and if you have multiple guitar or keyboard tracks, try panning them left and right too. You don’t have to go hard left or right either. Try sitting the guitars just inside the cymbals, or vice versa.
When mixing a drum kit, you’ll need to decide on whether to position them from the drummers view point (hi-hat on the left and toms spread left to right – for a right handed drummer), or from the audience perspective (opposite). This is completely up to your taste, and you’ll find tonnes of examples of tracks that use either approach.
If you have several vocal tracks, for example one lead vocal and two backing vocal harmonies, try panning the harmonies a little to either side of the stereo field for a thick sound.
Let’s Get Freq-y
Equalization (or EQ as it’s more commonly known as) is a world of its own, and a skill you could (and should) spend hours studying and perfecting. Here’s what you need to know about using EQ in Logic Pro.
EQ is the process of manipulating the frequency spectrum of a track, and is used to either cut offensive frequencies, or boost desired ones.
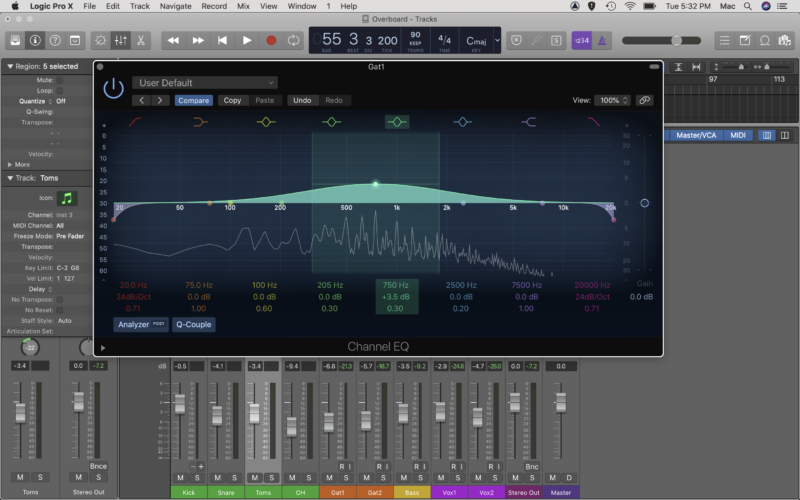
Logic has 5 built in EQs, the most commonly used of which is a parametric EQ called Channel EQ. It features low and high cuts, low and high shelves, and 4 bell peak type nodes.
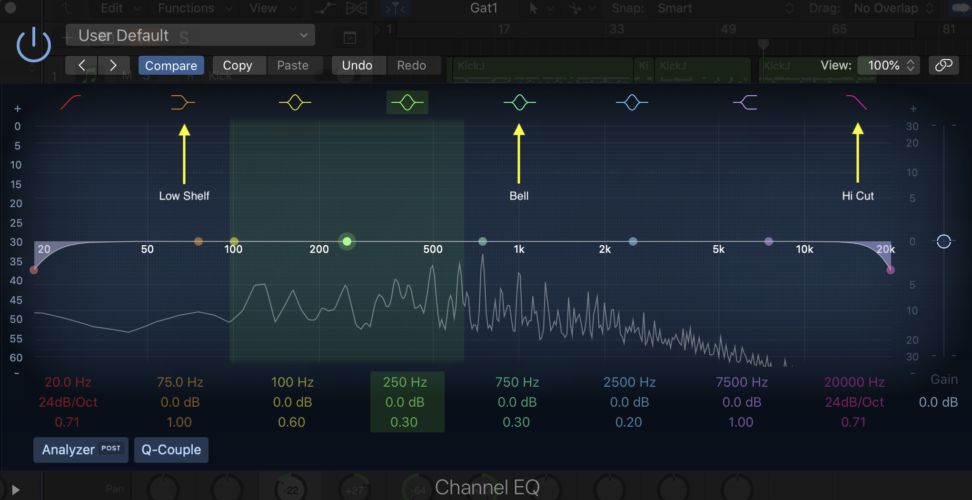
You can edit the peak frequency by simply clicking and holding a node and moving it left to right, and you can apply a boost or cut by dragging it up or down. You can also click and drag on the numerical equivalent at the bottom of the interface, or double click and enter a specific value.
A Few Tips For EQing in Logic Pro
- When trying to locate an offending frequency, apply a sharp boost (high Q) and move the node up and down the frequency spectrum. This will make the frequency even more offensive, and when you find it, you can apply a cut
- Bass guitar and kick drum often fight for space in the low end. Try applying opposing boosts and cuts to create a tongue and groove effect. E.g. Cut the bass a little at 80Hz and boost slightly around 150Hz, and apply the opposite EQ to the kick drum
- You can use a very similar approach to make vocals sit right in a mix where they are competing with cymbals or guitars
- When mixing vocals, fullness and warmth exists in the 100-150Hz range, clarity at around 1kHz (though be careful of creating an overly nasal tone), presence between 3-6kHz, and sibilance (S sounds), typically sit in the 4-9kHz region
Create An Impression With Compression
Where equalization is concerned with controlling the frequency range in a mix, compression is used to control the dynamic range of your tracks. It can also be used to change the tonal character of an instrument.
It’s incredibly natural for recorded instruments to have inconsistencies in volume throughout the recording. Certain guitar or bass notes may have been played more softly or louder than others, or your vocalist may have moved closer to or further away from the microphone during recording.
Same goes for drums, it’s virtually impossible for a human to hit a drum with the same force each and every time, hence the need for control of dynamics exists.
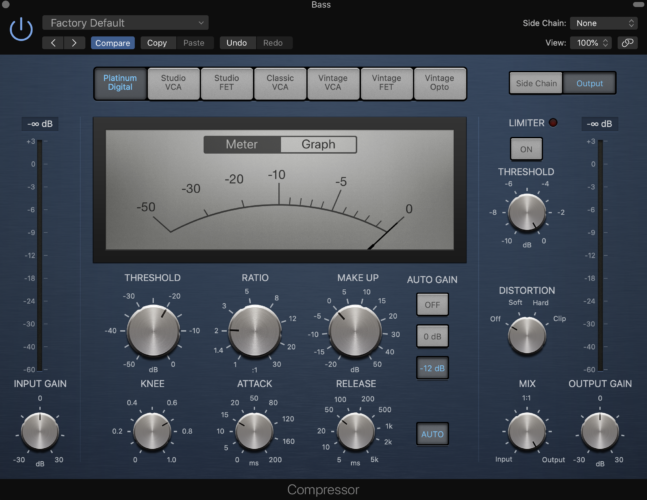
You’ll find Logic’s stock Compressor under Audio FX>Dynamics. It’s an incredibly versatile compressor plugin, with 7 different settings which emulate different types of classic and modern compressors.
How Compression Works
As with equalizers, compressors are incredibly complex, as you can see from the number of controls in the above GUI.
Compressors work to control the dynamic range by compressing (or turning down), audio signals when they go above a certain level. You use the controls of the compressor to set the point at which compression occurs, to what degree, and how quickly (among other things).
The five most important parameters to get the hang of are threshold, ratio, attack, release, and make up.
Threshold
The threshold controls the point at which the compressor kicks into action. You can think of it like setting the ceiling. When the track level reaches above this ceiling (the threshold), the compressor will engage and compress or turn down the audio.
Ratio
When the audio signal does reach above the set threshold, the compressor doesn’t necessarily compress the audio signal completely.
For example, let’s say you set the threshold to -20dB, and a signal passes the threshold and reaches -10dB. The ratio control tells the compressor how much to compress the signal above that level. This is expressed as a ratio such as 4:1, 8:1 etc.
The higher the ratio, the more the compressor reacts. At a ratio of 2:1, our -10dB signal will be compressed to -15dB (the difference between the threshold [-20db] and the signal level [-15dB] divided by 2).
Attack And Release
The attack and release controls determine how fast the compressor kicks in when a signal passes the threshold (attack), and how quickly the compressor disengages after the signal falls back below the threshold (release).
These two controls affect how much compression is applied, for how long, and greatly contribute to the sonic quality of the compression.
Make Up
Sometimes labelled make up gain, this control is used to match the compressed and uncompressed signal levels. Because compressors often make things sound louder, it can be difficult to compare and accurately gauge the effect of a compressor when switching between the affected and unaffected signal.
Because the human ear naturally favours louder signals, the louder, compressed track often sounds better by comparison. Use the make up control to ensure the levels are consistent so you can judge the effect of compression more accurately.
Compression In Use
Compression is best used to control overly dynamic instruments, for example, an inconsistent vocal recording.
Let’s say you have a singer who sings a few lines much louder than others, and you want to use a compressor to control these differences in volume.
Use the loop control in Logic to select a section of vocals, and open up the compressor plugin. Start with a modest ratio of 2:1-4:1 (4:1 is generally seen as the middle ground in compression ratios).
Roll back the threshold control until the compressor starts engaging when the loud vocals kick in.
The goal here is to allow the compressor to kick into gear only when the vocals get too loud, not at all times.
That said, you may want to apply a little compression to the vocal tracks (e.g. 1-2dB in gain reduction) for consistency, allowing the compressor to hit higher gain reduction amounts (5-10dB depending on dynamics) when the vocals get overly loud.
If the compressor is acting on vocal transients too slowly, make the attack quicker. Experiment with different attack, release, threshold, and ratio settings until you find the perfect setting.
Remember, mix with your ears, not your eyes!
Using Effects In Logic Pro X
Logic, being Logic, has tonnes of built in effects that you can use to spice up your tracks, add some depth and interest, and make your productions sound just like the pros do.
In this part of the article you’ll learn about two of the most commonly used (and more versatile) effects: Reverb and Delay.
Using Reverb To Create Depth In Your Mix
One thing you need to know about creating an epic mix is how to create ‘depth’.
If you’re new to mixing, the term ‘depth’ may be somewhat unfamiliar and a little confusing, so it might help to use a visual tool to understand how depth works.
Imagine a ball of blue light directly in front of you. The horizontal field (left to right), is controlled by pan. Whereas the vertical (up and down), represents frequency, which is dependent on the type of instrument (bass guitar vs violin for example), as well as any equalization applied.
The volume or level (controlled by the fader as well as compression), is represented by the light becoming brighter or duller. ‘Depth’ is represented by how near or far the ball of light is in relation to you, the further away the light, the more depth it has.
This is controlled using reverb.
By using all four fields or spectrums (stereo, dynamic, frequency and depth), you can give each instrument its own space in a mix, meaning every track can be heard clearly.
What Is Reverb And What Does It Sound Like?
Reverb (short for reverberation), is essentially the sound you hear when a sound is made inside a space, and that space reverberates and creates what’s known in layman’s terms as an echo.
In the world of professional sound, ‘echo’ is actually a type of delay effect, whereas reverb is the term used to describe the sound of space.
Before the world of plugins, and even before outboard hardware effects, reverb was literally created in a physical space. For example, if you wanted a big chamber sound on a choir, you had to record the choir in a big chamber!
Obviously this is incredibly inconvenient, so sound engineers quickly figured out how to emulate this effect using springs and plates. You may have seen the terms ‘spring reverb’ or ‘plate reverb’.
Nowadays, complex algorithms emulate these sounds, as well as chamber, hall, and room reverbs.
Using Reverb In Logic Pro – SilverVerb
Logic has 4 different reverb plugins as standard, and though they are all worth exploring, you should start with SilverVerb if you’re new to reverberation effects… as it’s the easiest to get your head around.
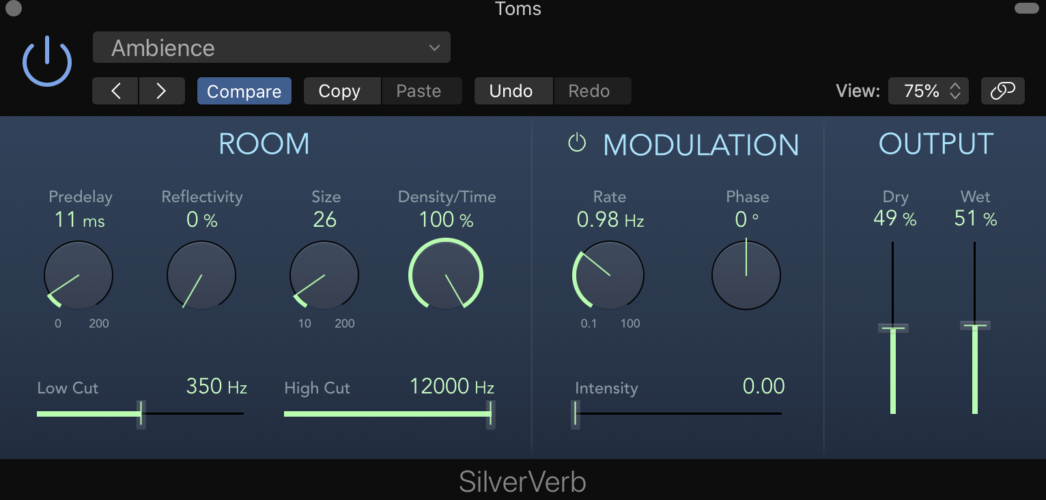
Predelay
The predelay parameters control the amount of time (in milliseconds) between the dry signal and the first reflection.
f you were to imagine standing in a room and clapping, the time it takes for the first reflection to reach your ears would depend on the distance of the nearest wall or point of reflection.
So, turning up the pre-delay increases the perceived size of the room (and therefore depth).
Reflectivity
Have you noticed how some rooms are more reflective or noisy than others?
That’s because certain surfaces reflect sound more than others. Think of the difference in reflectiveness between an empty hall, and your living room with carpet, sofa and thick curtains.
The reflectivity parameters control just that, how reflective the emulated space is.
Size
This one’s pretty straightforward, it controls the size of the emulated space. As you’ll hear when you start experimenting with reverb, different instruments in different contexts require different sized spaces. It’s also an artistic choice, so experiment!
Density/Time
This parameter controls how long the reverb effect lasts for. The higher it is set, the longer the reverb effect will last for. Higher settings are great for creative effects, though if you are trying to create a small amount of space on a vocal or lead instrument, try rolling this back a bit.
Output
The SilverVerb plugin also gives you individual control over the Dry/Wet mix. Turn Wet all the way up and Dry all the way down, and you will only hear the affected signal. Experiment with the two controls to find the perfect balance for your application.
Reverb Tips For Your Mix
As a general rule, you shouldn’t use too many different types of reverb in a mix. A common technique is to set up three different reverb types as aux tracks (you’ll learn about these soon), for near, mid, and far levels of depth.
Vocals are one instrument that almost always have a little reverb on them, but you’ll want to be sparing – unless you are going for a specific effect. Make sure you use a fairly near/short reverb on vocals if you want them sitting up front!
Typically, bass instruments are left out of the reverb game. This is because tracks tend to get muddy when reverb is applied on the low end. Have a play if you like, but make sure you are paying attention to the clarity in the low end when using reverb on kick drums or bass.
If you really want to help a snare drum pop in the mix, a bit of reverb goes a long way!
All of the reverb plugins in Logic have presets built in, so we’d recommend starting with a snare or drum preset and adjusting from there. To help bring the kit together nicely, try sending some of the other drums to the same reverb, such as the toms.
Delay…delay…..delay………delay
One of the most widely used effects amongst guitarists, delay is an effect often employed by sound engineers to create depth and interest in a mix.
The difference between delay and reverb is that delay is not space focused (it is not emulating a physical space), it is a time based effect that makes use of a repeat as opposed to a reflection.
If you’re standing in a hallway and clap, your ears will hear back from reflections from every surface in the room. It might help to imagine delay as the reflection from a single surface.
Delay In Logic Pro X – Stereo Delay
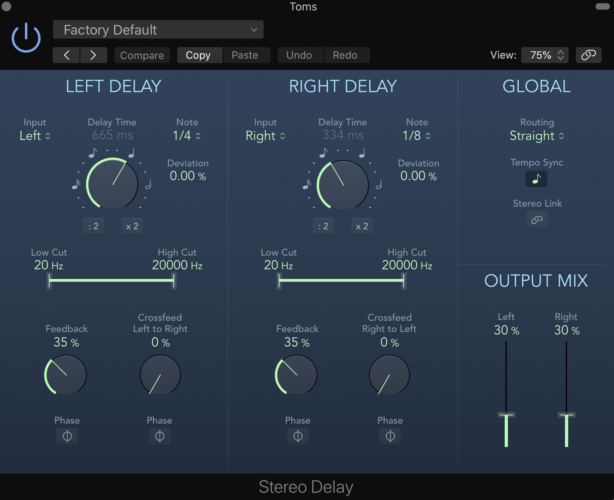
Delay Time
As delay is a more musical effect than reverb, its time factors are often represented by note lengths i.e. 1/4, 1/8 note etc. Though you can choose not to sync the plugin with the sessions tempo, we’d recommend leaving it as is while you get to know the sound of delay effects.
In Logic’s Stereo Delay plugin, you can set the left and right delay signals to different time increments. This is a cool way to produce an interesting ping-pong type effect in a mix.
Alternatively, you can set the left and right signals to the same delay time for a more traditional delay effect.
Feedback
The feedback parameter essentially controls how many repeats you will hear, and therefore how long the delay effect continues for. When this is set to 0, you will hear only one repeat. As you turn up the feedback, more and more of the affected signal is fed back into the delay effect.
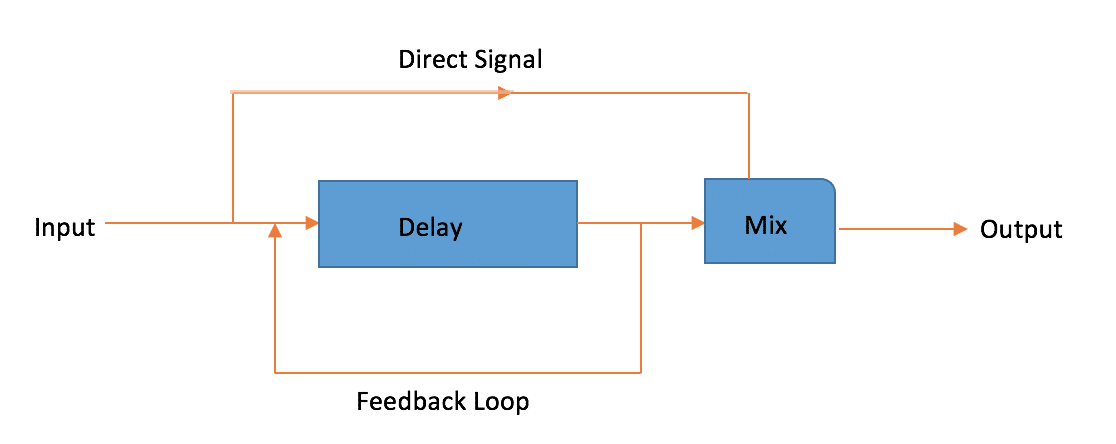
At 100%, it will feed back into infinity. You should definitely experiment with this, as it’s a good way to understand how delay works, but can also create some interesting effects that you can automate!
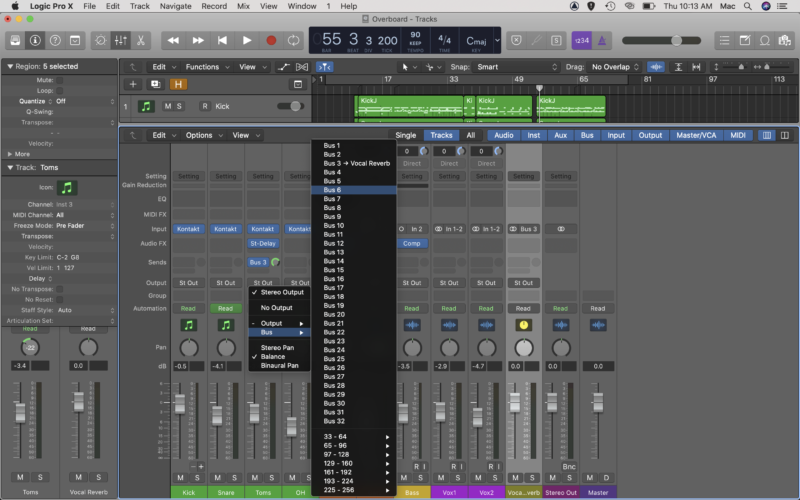
Using Sends And Busses In A Mix
As you start experimenting with different plugins and effects in your mixes, you’ll likely find that you are applying the same effect to multiple instruments.
For example, you may have several vocal tracks for which you wish to use just one reverb type. The most efficient way to do this is using Logic’s send/bus/aux track method.
Under the Audio FX section in the mixer, you’ll see a section called Sends.
Click an empty space on your desired track, and select a Bus.
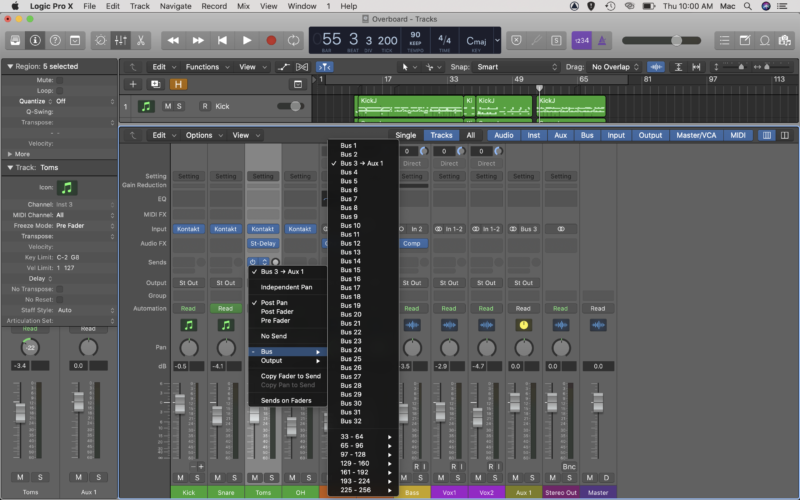
You’ll see Logic has created a new Aux track (this happens the first time you activate a bus).
If your head is spinning trying to understand the difference between sends, busses, and aux tracks, try thinking of it like this.
A send is a ticket to the bus, you can buy any track a ticket to the bus.
The bus is a path that picks up all the passengers (tracks), and takes them to the next location. The output of the bus (where everyone gets off) is the aux track. Whatever effect is applied to the aux track, is applied to all of the tracks that got on the bus.
Now, here’s where the analogy starts to fall apart a little. When using a send, it is only a clone or copy of the audio signal that gets sent down the bus.

The send level controls how much of the signal gets sent down the bus.
This is important to know as you may not want to apply the same level of effect to every track. For example you may wish to send more of the backing vocals than the lead vocals, to give them more depth and sit them behind the lead vocal.
This is a great technique for mixing as it allows you to control the individual effect levels via the send levels, and also the overall effect level via the output fader on the aux track.
It is also much friendlier to your CPU, as it employs only one instance of an effect rather than several, making your sessions run faster!
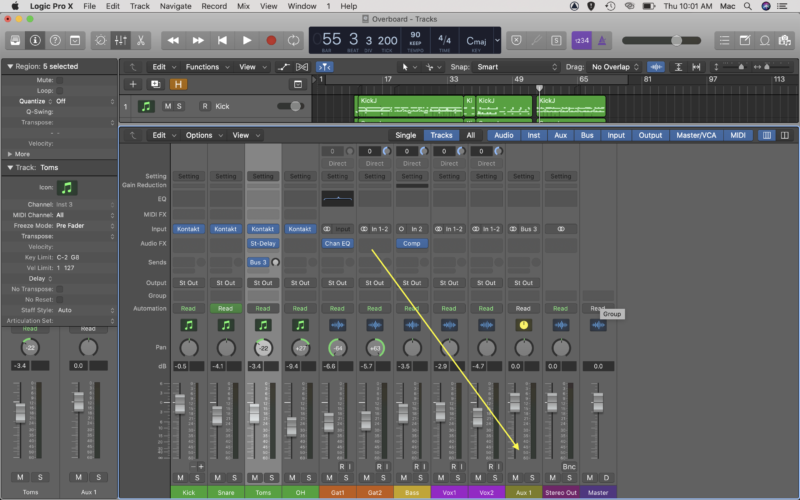
Using Busses To Group Instruments
There’s another way to use busses in your mix, which is often used to apply effects to a group of instruments.
A common example of this is the drum bus. After you’ve applied EQ, compression and other mix techniques to the individual instruments, you might want to work on the drum kit as a whole. Let’s say you want to apply a little compression to help glue the kit together.
Rather than using the Send function, this time we are going to change Output of the drum tracks. Whereas using a Send puts a clone on the bus, changing the Output puts the track itself on the bus.
Set the output of all of the drum tracks to the same Bus (you’ll want to use a stereo bus), and Logic will create a new aux track with all of the drums grouped. You can now apply effects to the entire drum kit together!
Pro Tips For Mixing In Logic Pro X (+ Mistakes To Avoid)
Stop Mixing At High Volumes
One of the most common mistakes made when mixing is setting your output volume too loud.
It can be tempting to turn up those speakers and hear your mix pump, but here’s the thing. Loud sources always sound better, with more dynamics, impact and punchiness.
So, mixing at loud volumes often results in mixes that lack depth and impact when listened to one other systems. The opposite is also true for mixing at too low volumes, though this is a less common issue (we all love turning it up!).
You should aim for a volume around 80-85 dB SPL (you can measure this with a SPL meter app on your phone). That doesn’t mean you can’t turn the volume up sometimes, you just need to remember to turn it back down!
Loud sounds are also fatiguing on the ear, which means what you actually hear changes as you mix. This happens more rapidly when mixing loud, and often means that after a couple of hours you start making decisions that are based on fatigued ears.
Remember that time your mix sounded awesome, until you woke up in the morning? Now you know why!
Start Using Reference Tracks
It’s always a good idea to select 2-3 reference tracks before you start mixing. This gives you a bit of a goal to work towards, and something to keep referring back to to make sure you’re still on the right track.
When you spend hours in a mix, you start to become accustomed to the way it sounds, and you lose objectivity. Using reference tracks enables you to keep your palette fresh. It’s kind of like smelling coffee beans in between wine tastings.
Stop Mixing In Solo So Much
Another common trap to fall into is applying effects to instruments in solo. By all means, you should definitely be soloing tracks to hear them in isolation, but when applying effects like reverb and EQ, what matters most is how they sound in the mix.
So, the best way to judge this is by listening to the instrument in the mix. Un-solo the track and try EQing while listening back to the whole mix, it will help you to glue everything together and result in a more cohesive production.
Start Listening On Different Systems
One of the hardest things to achieve in a mix is what is known as mix translation. That is to say, how your mix translates when played back on different systems.
This is why many professional studios have 2 or 3 sets of monitors, as well as headphones.
You may not have access to this luxury, but you very likely have multiple sounds systems. Aside from your studio monitors, try listening on a set of headphones, in your car, or on your home theatre system.
Pro tip – think about where your audience is actually going to listen to your song.
It may not seem very ‘pro’, but you should definitely listen back to your mixes through cheap consumer earphones or even through a phone speaker itself, to see how it translates onto systems that people use in the real world.