If you like to play in Logic Pro X, one of the most important things you can do is know how to autotune!
Are your vocal performances coming out a little pitchy? Struggling to hit that high note? Maybe you captured the ultimate performance with loads of soul and feeling, but it’s not quite fitting in the mix due to some slight pitch issues.
Or, maybe you just want to be the next T-Pain, and apply some crazy pitch effects to your vocal recordings.
Whatever the case, learning how to auto-tune in Logic Pro X is not only easy, but will become an invaluable tool in perfecting your vocal recordings, and taking your production to the next level!
Let’s continue these logic pro tutorials with an expose on Auto-tune!
What Is Auto-tune?
Technically speaking, Auto-Tune is a piece of software created by Antares, but the effect has become so popularised in mainstream music that the name has kind of stuck. Typically, when producers, artists or listeners use the term auto tune, what they are talking about is pitch correction.
This step is best performed after you have added some plugins to your other tracks, and have started getting the song whipped into shape!
Pitch correction is a program or plugin used to correct off notes in vocals. Depending on the software, this can be done automatically or manually. You’ll learn about some different options for using in auto tune in Logic soon.
It can also be used as a creative effect, such is the case in a lot of modern hip-hop and RnB music, often dubbed the “T-Pain effect”.
After you get the auto-tune nailed, you will be ready to go on and mix your tracks in Logic Pro X!
Alright. Let’s get started…
When And Why To Use Auto-tune
This might seem obvious, but there are actually a few reasons you might want to use auto tune.
To Fix An Out Of Tune Vocal Recording
Probably the most common use for auto-tune is to correct any off notes in a vocal performance. It may seem like cheating to some, but actually this is an incredibly common technique.
Just about every singer you hear on record these days (especially in pop music) has some form of pitch correction applied, and we’ve become so adapted to hearing perfectly sung melodies that it can even sound strange hearing an unprocessed vocalist!
To Create A Specific Vocal Effect
Popular in modern hip-hop and RnB, heavily autotuned vocals have become a regular feature used by rappers and vocalists in these genres.
Popularised by T-Pain in the early 2000s, the sound is often referred to as the “T-Pain Effect”, so much so that iZotope has released a pitch correction tool that is literally called The T-Pain Effect.
The goal here is to apply auto tune to a vocal performance that is far out of pitch (or even monotonous), with the parameters at such extreme settings that the effects of the pitch correction plug-in are exceedingly obvious. You’ll learn just how to do this very soon as well.
To Create A Vocal Harmony
A little known use for pitch correction is to take the original vocal recording (which may already have had auto tune applied), and create a vocal harmony by changing the pitch of each note sung.
This achieves an effect that is not anywhere near as natural as a sung harmony, but natural isn’t always what we are going for!
Use Auto Tune To Level Up Your Music Production Skills
Given the wide variety of situations that pitch correction can be applied to, you can see why it’s an extremely vital skill to master.
Not only will you be able to fix bung notes (or seemingly unsalvageable performances) to deliver a higher quality end result, but you’ll also be able to apply the effect more creatively to diversify the sound of your audio productions, and bang out tunes that sound just like your favourite artists!
Does Logic Pro X Have Pitch Correction?
This is why we love Logic Pro X, and why you should too: the suite of audio processing tools that come with the program as standard cover all the bases, and they are extremely effective. (That means yes, yes it does).
There are actually a couple of different tools in Logic Pro that you can use for vocal pitch correction, depending on your desired outcome.
How Do You Autotune Vocals In Logic?
- Pitch Correction Tool – An intuitive and simple way to bring vocals in-tune
- Flex Pitch – A slightly more manual approach that gives you the ability to fine-tune a performance
- External plug-ins (such as The T-Pain Effect, or Antares Auto-Tune)
We’re going to focus on using the first two options in Logic Pro X, and how you can get using auto-tune to create pro level tracks.
Pitch Correction Plug-In
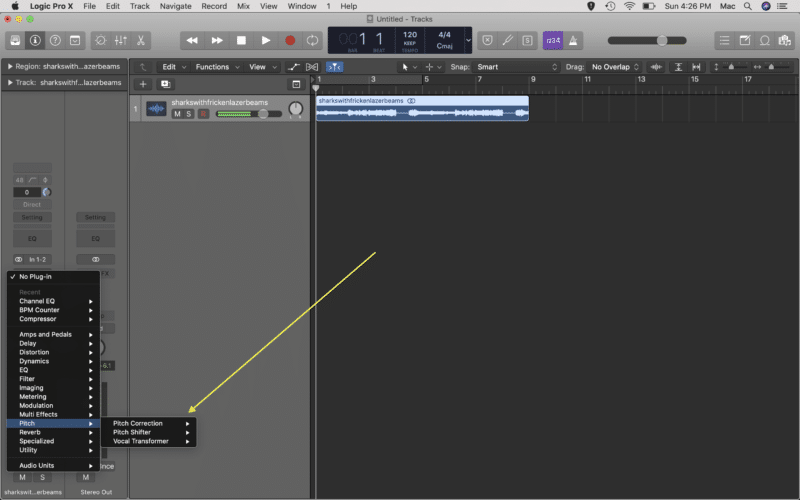
Step 1:
On the desired audio track, head over to the left hand side and click on a free Audio FX slot. You’ll find Logic’s Pitch Correction plug-in under ‘Pitch’ – funny that.
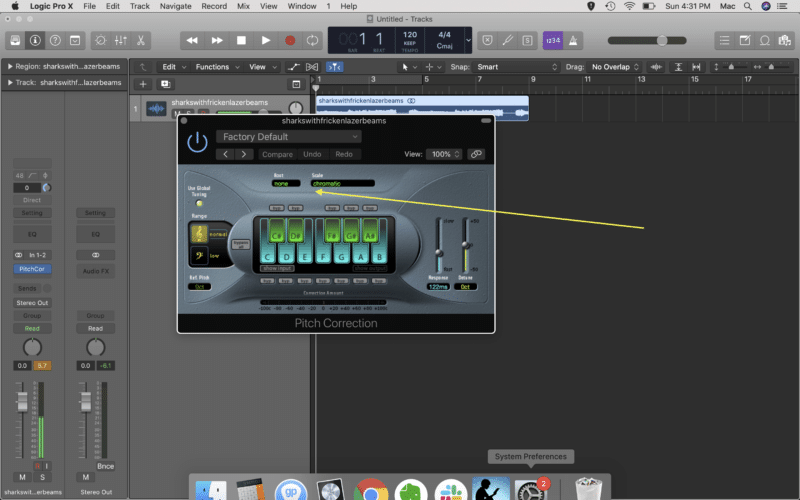
Step 2:
The plug-in GUI is admittedly a little dated, and kind of looks like something out of Star Trek: The Next Generation, but it does the trick. Rather well in fact.
The first thing you’ll want to do is the key/scale by using the Root and Scale drop down menus.
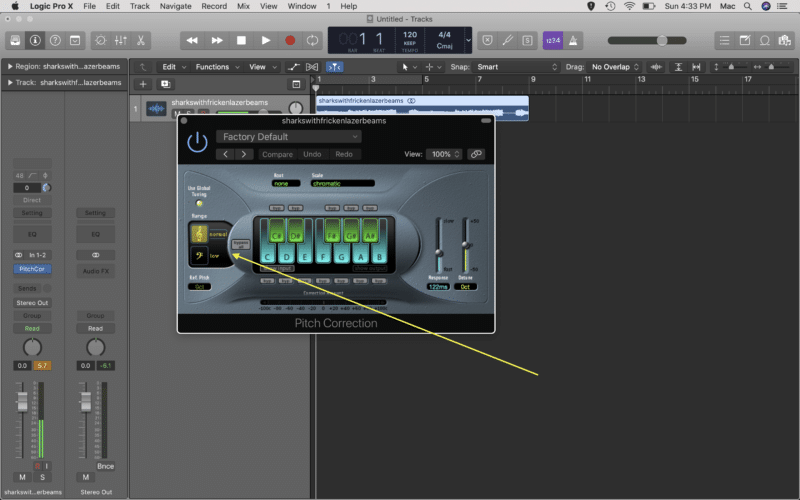
Step 3:
You’ll then want to select Normal or Low depending on the range of the sources. As a general rule, select Normal for female vocals and Low for male vocals.
But have a play around with the two options and see what sounds best to you!
Step 4:
Now play the track back, and use the Response and Detune sliders to achieve the perfect auto tune effect.
Response is a time based control, the lower the time, the faster the plug-in will react to incorrect pitches, and therefore the more noticeable the effect will be. Too fast, and the effect will be a robotic vocal sound.
Too slow, and Logic may miss some fleeting out of tune notes. Season to taste.
Detune should be adjusted if the track is consistently below or above the the centre of the bottom display. Again, adjust til you find the sweet spot.
Flex Pitch
Flex Pitch is a tool in Logic Pro X that allows you to adjust the pitch of a vocal performance note by note. That means you can select individual off notes to correct, rather than applying an effect over an entire track. This is a great idea if you are trying to get a more natural tone overall.
Step 1:
You’ll want to start by hitting the flex button in the edit window (Command+F).

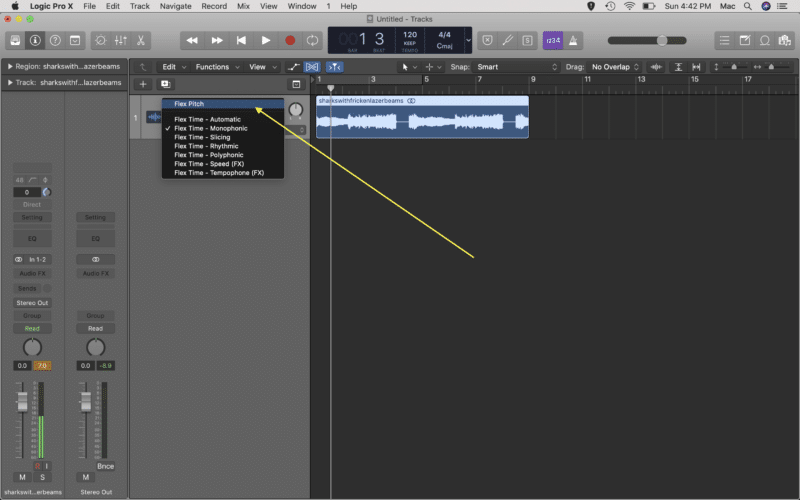
Step 2:
From the drop down menu, select Flex Pitch. It might take a couple of seconds to initialize.
Step 3:
Zoom in on the vocal track, and you’ll see that Logic Pro has added some little blue boxes to the audio recording. These denote the pitch of each note.
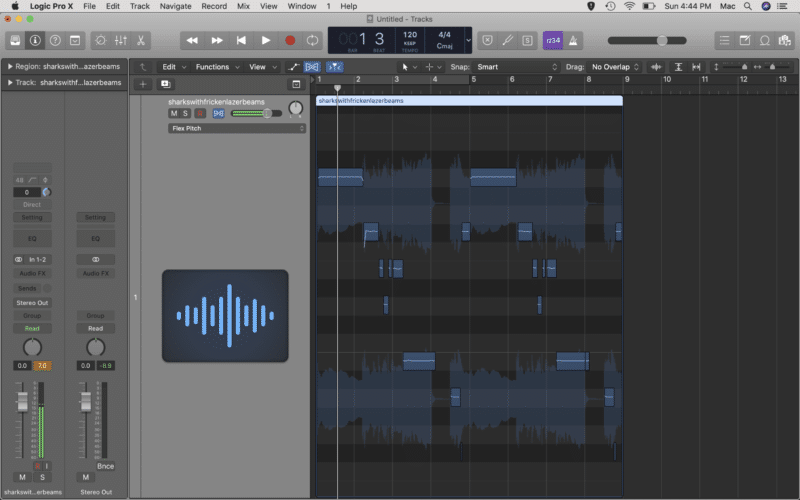
Step 4:
From here, you can literally drag each of the blue boxes in your audio region to the desired pitch!
How Do I Record Auto Tune In Logic Pro X?
The Pitch Correction plug-in in Logic Pro can be used in realtime, if you have a need to auto-tune vocals on the way in.
Unfortunately the Flex Pitch function is a more manual approach, so if you like using correction on the way in, and Logic’s in built tool isn’t doing the trick, try some of these third-party plugins and see if they get you where you want to be.
- Antares Auto-Tune
- iZotope The T-Pain Effect
- Waves Tune
- Celemony Melodyne
Conclusion
So, now you’ve learned how to use Logic’s Pitch Correction tool to automatically alter a vocal performance, and the Flex Pitch function for a more manual, fine-tuned approach.
Now it’s up to you, get experimenting and start auto-tuning some vocal tracks!