Want to know how to sample in Logic Pro X? Have you been using Logic Pro X for a while now, tried out a few plugins, and find that your tracks just don’t hit like those of your favorite producers?
Or are you a recent convert from a different DAW and looking to explore Apple’s comprehensive music production software?
Maybe you’re new to audio production all together! Wherever you stand and whatever your experience, knowing how to sample in Logic Pro X is an incredibly important tool in your producer’s arsenal.
If you dream of creating modern sound tracks, from chart topping EDM bangers, to laid back hip-hop beats to drop a vocal track over, you need to master the art of sampling.
So fire up your Mac, open up Logic Pro X, and let’s get started.
How Do You Sample In Logic Pro?
Tempo – Let’s Set Some Things Straight
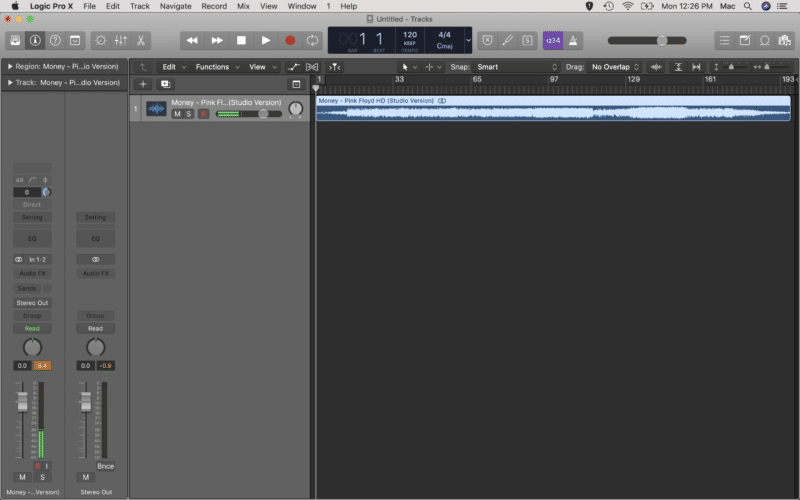
Start by opening up a fresh session and creating an audio track. You’ll want to add some music to that track to sample from, whether that’s part of a track, a vocal hook, or a drum break. We’re using Pink Floyd’s Money for its instantly recognizable intro.
The easiest way to do this is to drag the file into the DAW from Finder. Alternatively, you can use File>Import>Audio File or the shortcut Shift+Command+I.
Before we get slicing and dicing, let’s make sure we’ve got Logic Pro X set to the right tempo using a really cool and intuitive tool for this called BPM Counter.
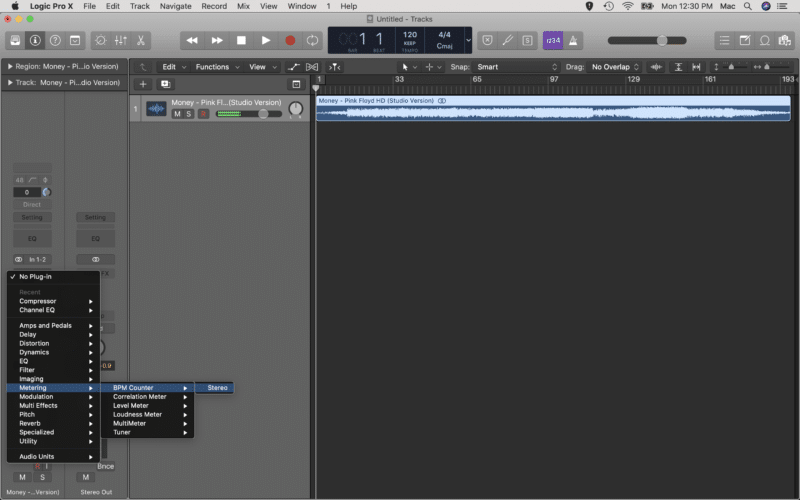
You can find it under Audio FX>Metering>BPM Counter. Add it to the audio track and hit play, the plugin will do the rest!
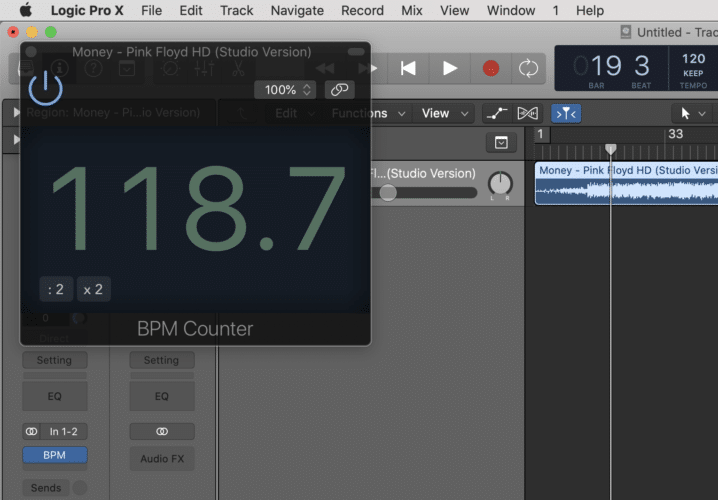
If you’re using an older track (like ours), you may find that the tempo fluctuates throughout the song as it’s less likely it was recorded to a click track.
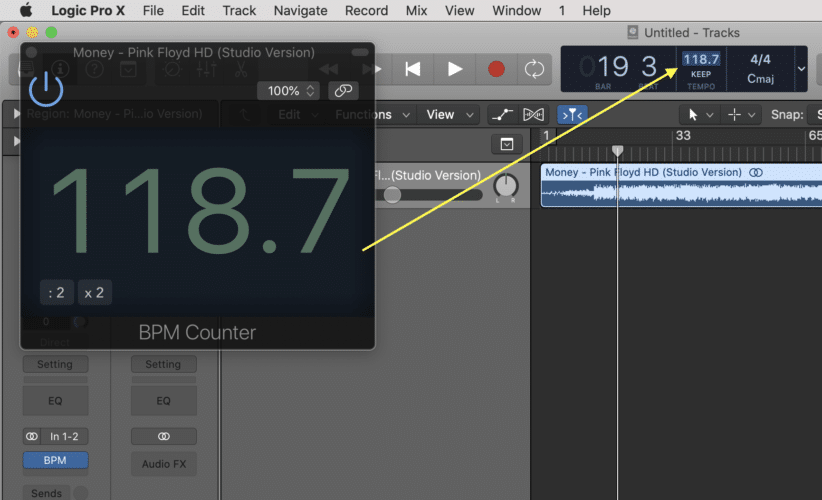
The best thing to do is to use BPM Counter to find the tempo as close to the desired sample as possible. Double click on the Tempo in the metering section at the top of the screen and change it accordingly.
How Do You Chop A Sample In Logic Pro X?
Editing – Don’t Run With Scissors!
Now that we’ve got the software set to the right tempo, we can get hacking and edit some samples! Take your time here and ensure your edits are clean and accurate – it pays off down the track. There’s a few ways we can cut this:
Option 1: Scissors Tool
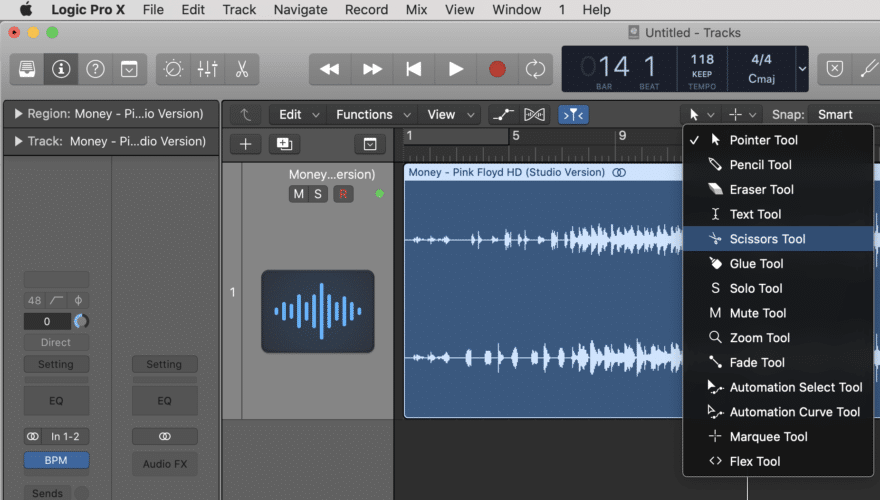
The simplest of Logic’s editing tools is the Scissors Tool. This one’s pretty straightforward. Simply zoom in on the region, move your cursor over to the where you want to make a cut, and click! Simple, but not very accurate…
Option 2: Drag Start And End Points
A common way to approach editing audio for samples is to use Logic’s Pointer Tool to drag the start and end points of a region into line. Because you’ve set the tempo correctly, you can use the beat and bar markers as a starting point for your edits.
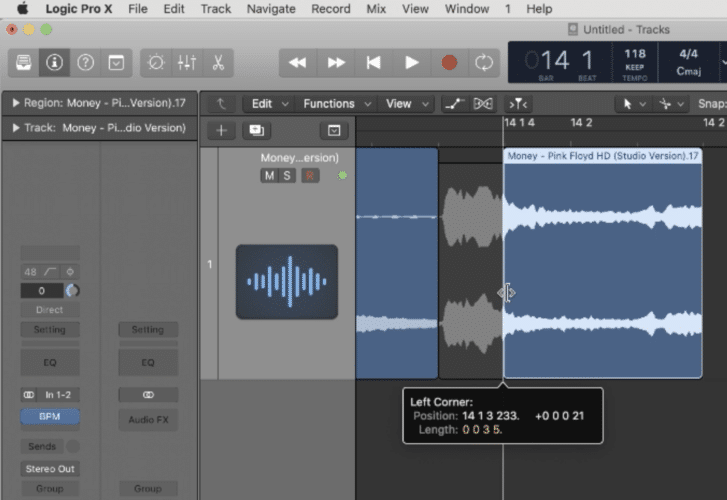
Option 3: Trim Region Start to Next Transient
One of the best things about Logic Pro X is the number of useful tools it has built in. One that’s super helpful in creating well edited samples is the “Trim Region Start to Next Transient” command (Ctrl+Shift+]).
This jumps the edit point to the nearest transient in the region, meaning your sample starts on a hit.
Hit the command repeatedly until you’ve found the start point of your sample (for example, the beginning of a bar). You can then use the Pointer Tool to drag the end of the region to the desired sample length.
Tempo Changes – Speed It Up To Slow It Down
Found a sample you like, but it doesn’t fit your project’s tempo? Maybe you’ve found a sweet drum break that you want to slow down by a few BPM. In Logic Pro X, it’s too easy!
Select the region, hit the Flex button (or Command+F), and change the Flex Time mode to Slicing.
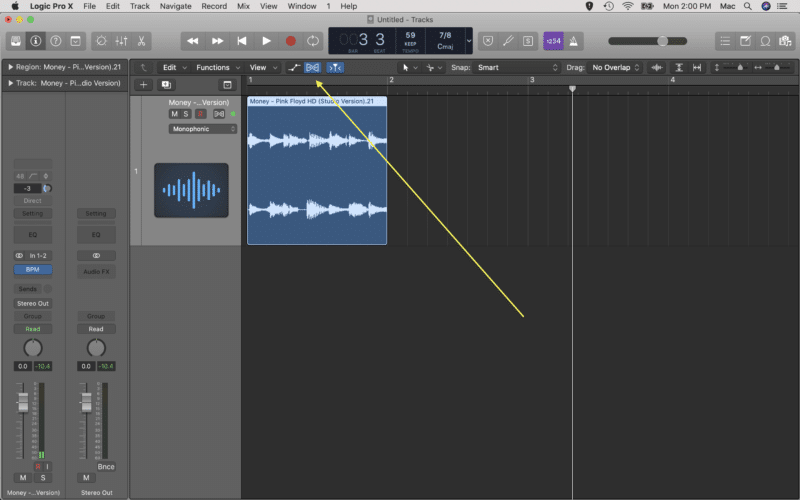
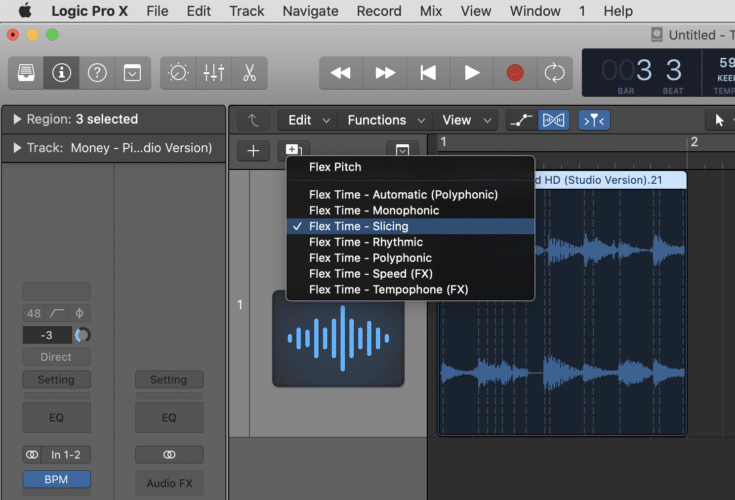
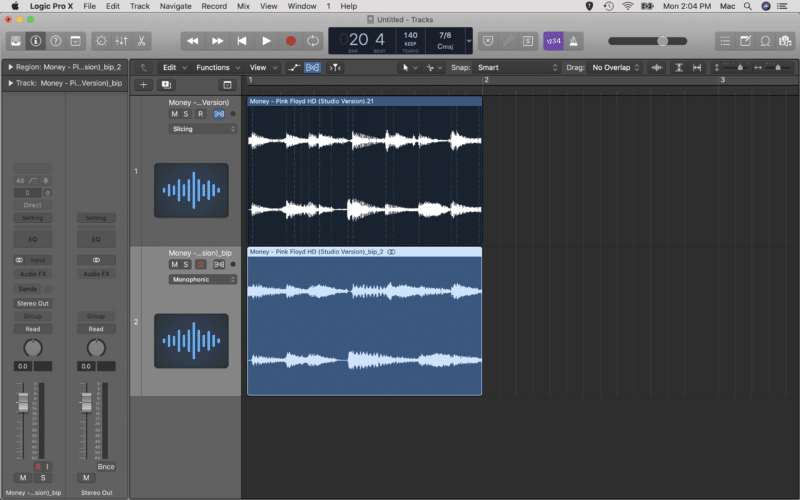
From here, you can change the tempo as you see fit, and the sample will play back in perfect time. Once you’re happy, use Logic’s Bounce In Place function (Control+B) to create a new audio file in your chosen tempo.
Is There A Sampler In Logic Pro X?
Yes! Logic’s EXS24 Sampler is a comprehensive plugin with many sample based instrument presets at your disposal from factory, but it can also be used to create a custom instrument from the samples you’ve just chopped. That’s what we’re going to do here.
The EXS24 is a fantastic way to play your samples like a keyboard. Maybe you’ve edited a bunch of vocal samples and you want to play them as an instrument, or perhaps you’ve taken a 16 bar drum beat and cut it up into individual bars.
Whatever your purpose, the EXS24 will quickly become your best friend once you hear how it improves your music.
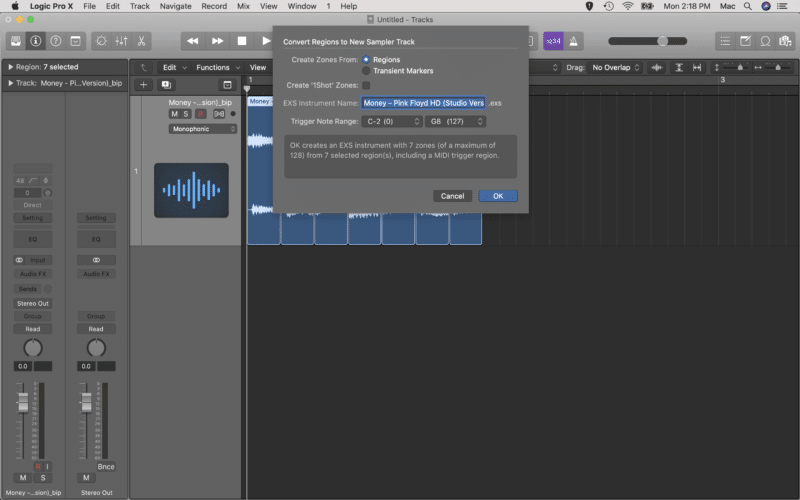
In our example, we’ve chopped a single 7/8 bar into 7 individual samples, which we are going to use to create our sampler instrument.
This couldn’t be easier. Select all the regions you want to add to the EXS24 sampler, Control+Click one of them and select “Convert Regions to New Sampler Track” from the drop down menu (Control+E for you keyboard shortcut fanatics).
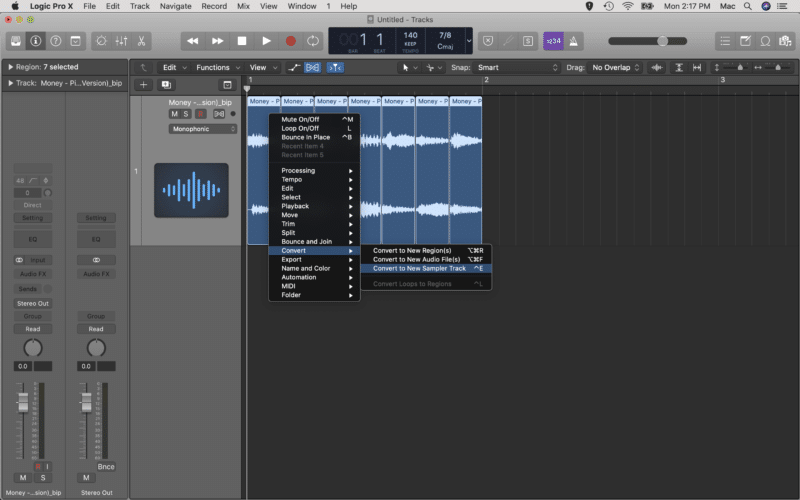
Make sure you choose ‘Create Zones from Regions’ – this should be the default.
Playing the EXS24 Sampler
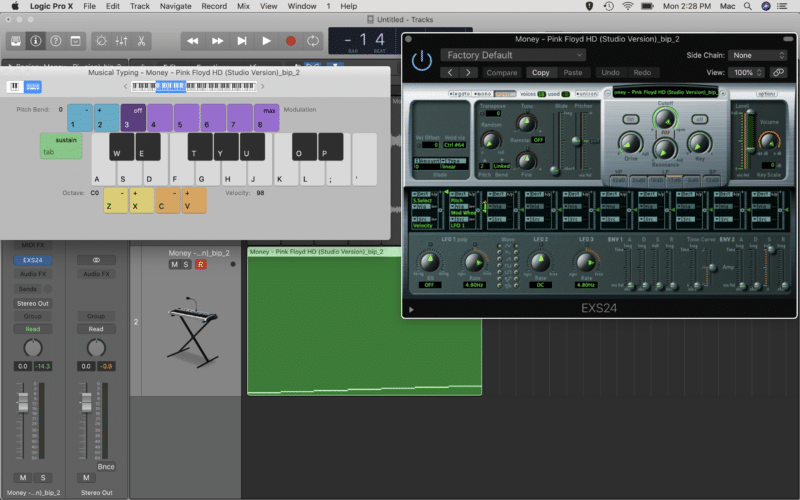
You’ll see Logic has created an ESX24 sampler instrument track, which you can play as you would any other instrument in the DAW.
There is a sweet keyboard function built in which allows you to use your computer’s keys to play the instrument. Alternatively, plug in your favourite MIDI keyboard and make some music!
If you find that the samples are overlapping each other while playing, try setting the EXS24 to Mono mode.
You may find, as you play around with the EXS24, that some of the sampling sounds a little off. Perhaps it feels like the music chops and changes too aggressively. If that’s the case, you may need to edit the samples again.
You’ll need to have Advanced Editing turned on for this, so if you haven’t already, head to Preferences>Advanced Tools and check the box.
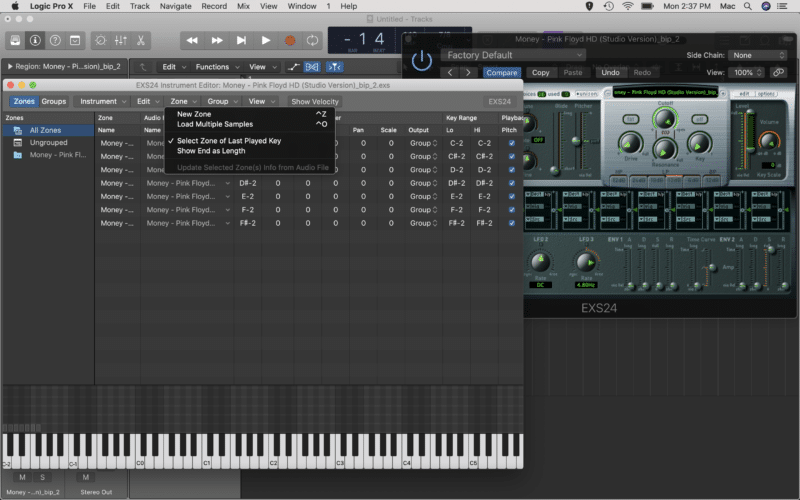
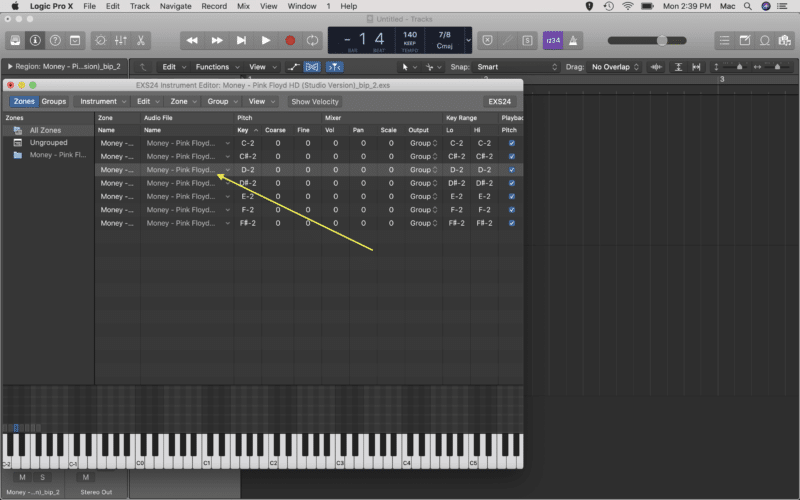
Open up the EXS24 sampler… and in the top right hand corner of the GUI, click the edit button to open the Instrument Editor. Ensure “Select Zone of the Last Played Key” is selected under the Zone drop down menu.
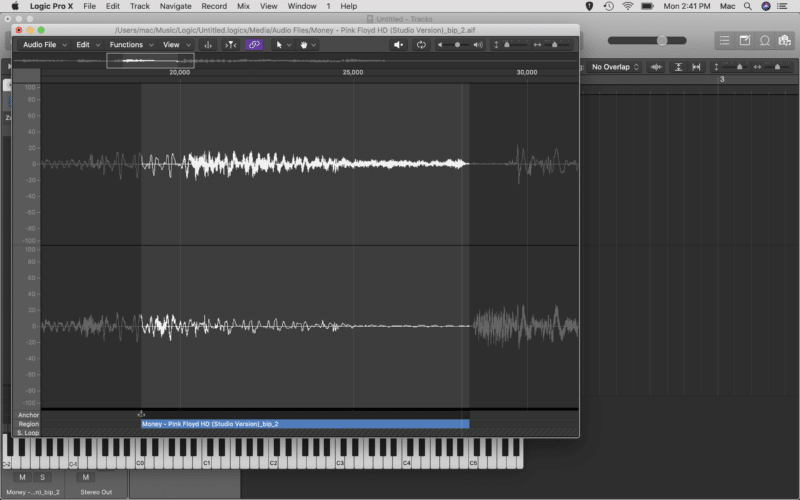
Now play the key on your keyboard whose sound is off and that you wish to edit – this will select the sample assigned to it. Double click on the sound you want to edit in the Audio File/Name column to bring up the waveform editor.
From here, simply adjust the boundaries of the blue Region rectangle at the bottom of the window. The new sound will be automatically loaded into the EXS24 sampler.
A Sampling Or A Smorgasbord – Where To Find The Best FREE Samples
Now that you know how to use Logic’s EXS24 sampler to level up your music production, you might be keen to create your own instruments using pre edited samples. This is a popular and easy way of sampling, and adding a new and interesting layer to your productions.
Here’s a few of our favourite royalty free places to get FREE samples:
- https://freesound.org/
- https://sampleswap.org/
- https://www.samplemagic.com/product-listing/13/free-downloads/
- https://samplefocus.com/
Simply download from any of the above sites, load them into the EXS24 sampler and get sampling!
Conclusion
By now you should be well on your way to creating your first track using samples, and pumping out tracks that keep up with your favourite producers and beat-makers. Here are a few final tips before we let you dive in!
- Got a record player and an audio interface? Try sampling some vinyl.
- Try plugging a mic into your computer and recording some vocal ad-libs, then edit and throw them into an EXS24 instrument. You can play around with effects either before or after clicking the “Convert Regions to New Sampler Track” button for some crazy results.
- If you are trying to create a sampler instrument that plays back chromatically (like a piano), you’ll want to arrange the regions by pitch before creating the EXS24 instrument.
- Working on an album? Sample one of your own completed tracks in a later song. See if anyone can pick up on it!?
Happy sampling!

