You have podcast episodes recorded, but are you making money from them?
A website is the best place to host your show notes and monetize them. Your own website gives you more control over how they look and what ads appear on them.
Having your own podcast blog also allows you to add affiliate links for products or services that relate to your content.
And, podcasters are ahead of the curve compared to most bloggers.
Why?
Because you already have a content for blog posts that make money!
Keep reading to learn how to set up a podcast blog so that you can make more money with less effort!
Step 1: Find Podcast Blog Topic Ideas That Earn An Income
You’re probably missing out on opportunities for income because you don’t have an easy way of showing off all the great content from your podcast episodes.
Your listeners are looking for information about what they heard, but it’s scattered across different places online and hard to find again later.
Here’s the thing.
Have you ever shared a “how to” on your podcast? Even if it was only for a three to five minute conversation on one of your episodes?
- How You brew IPA From Your Garage
- How You Improved Your Work From Home Space
- How You Have Great Board Game Nights
- How You Mend Your Children’s Clothing
Or, “the best ________”
- My Favorite Guitar Pedals
- Best Sunglasses For Wide Heads
- 5 Best Pieces Of Equipment For Brewing IPA
- Best Ninja Blender For Large Families
You might be wondering why these questions are important. What does this have to do with my podcast?
Well, people want answers for these questions
- What were those sunglasses?
- Which Ninja model?
- What standing desk?
and when they can find those answers on your website, two things happen:
- You make money by giving people what they want and
- You connect with the new potential listeners for your Podcast
How do these posts make money?
They do it thanks to affiliate marketing.
Let’s use our ‘brewing IPA from your garage’ example to explain the concept.
When you tell people what equipment you use for brewing, you instill a desire in many in your audience to purchase those tools.
The specific carboys, bottle cappers, sterilization solutions, etc. that you use.
You add a particular type of link (known as an affiliate link) in your post, so people can click straight to your recommended product and buy it.
When they do, you earn a commission on that sale!
In addition to having a clean place for your listeners to find these “show notes” on your website, guess who else can find them?
The searchers on Google!
This will help you in two ways:
- Make money off strangers that click your links
- These strangers from Google are likely to be interested in your podcast as well
Attract new listeners to your show and make more money?
Yep.
That’s just the tip of the iceberg of the powers you will be able to unlock with your own website for your podcast.
So, are you ready to get out of your J.O.B.?!?!?
Here’s the easiest (and best) way to get your podcast website up and running today, now!:
Step 2: Launch A Podcast Website That’ll Make Money
There are tons of website management software options out there, but almost all are overpriced and not friendly for Google.
The best option for making money is WordPress.
Why?
It’s incredibly easy-to-use and cost-friendly. Not to mention it powers 38.8% of the entire web!
And, as you will see below there is an enormous amount of customizations you can do for free to WordPress to make your site uniquely you as well as an enormous amount of ways to monetize a WordPress website.
And…
Google loves WordPress!
So how do you get your very own WordPress site?
1. Get Reliable But Affordable Hosting
The first thing you need to do is find a company that’ll host your website and install WordPress for you at no additional fee.
If you’re not familiar with blog hosting, it’s basically the exact same as podcast hosting. Except the “blog hosting” holds all your words, links, images and everything else you put on your site.
The best bang for the buck WordPress hosting is A2 Hosting because they are affordable and they install the entire WordPress framework and a few security upgrades to basic WordPress that make your site more fast and secure.
And they offer a 30-day money back guarantee if you need to cancel your website or anything in the first month.
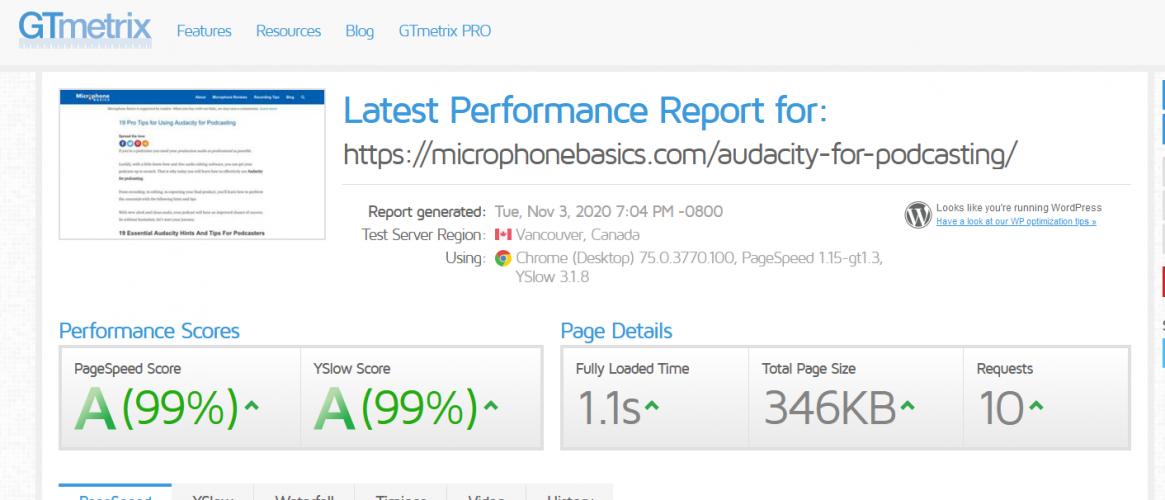
Also, A2 has super fast website loading speeds!
Look:
A+’s and all green arrows, what you need!
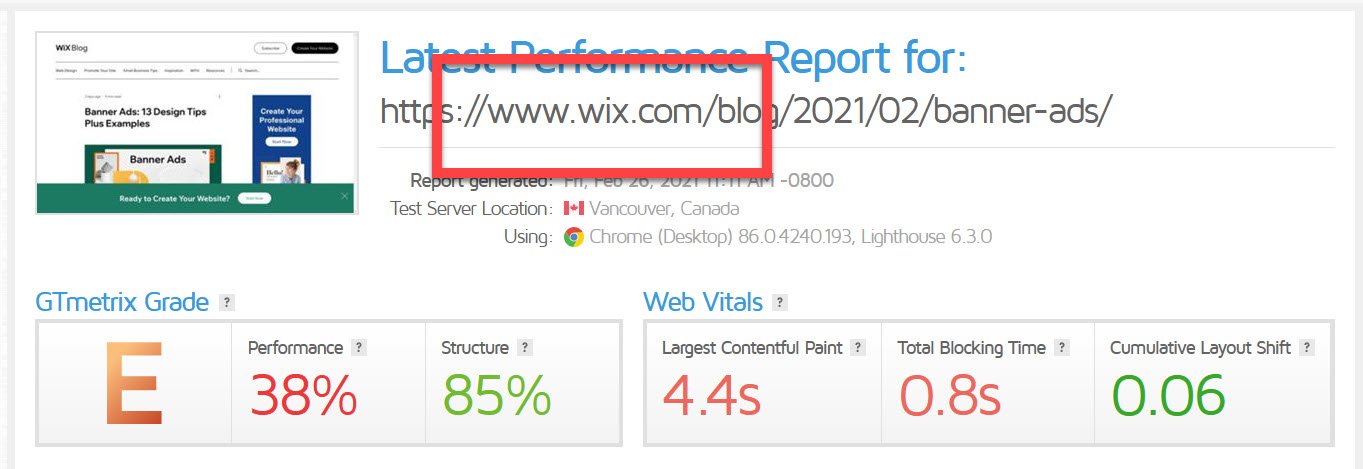
Compare that to another popular website builder you’ve probably heard about whose plans start at $14 per month:
Ready to grow your podcast reach and make more money?
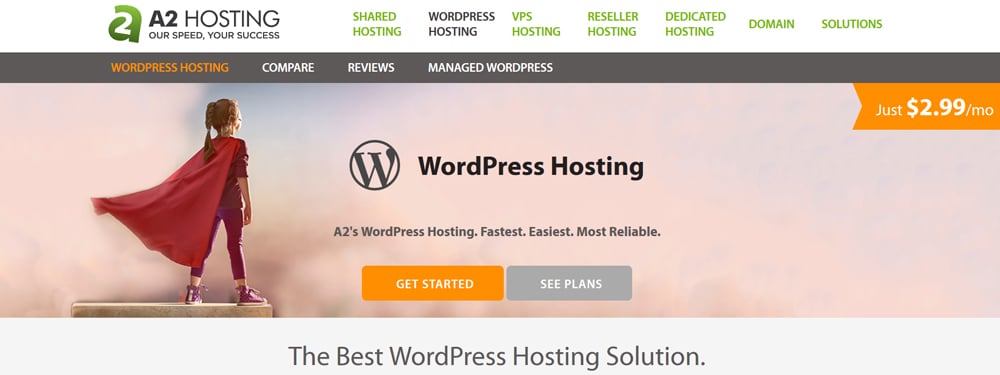
Start by clicking on this link.
You’ll land on a page that looks something like this:
Now click on the orange ‘Get Started’ button.
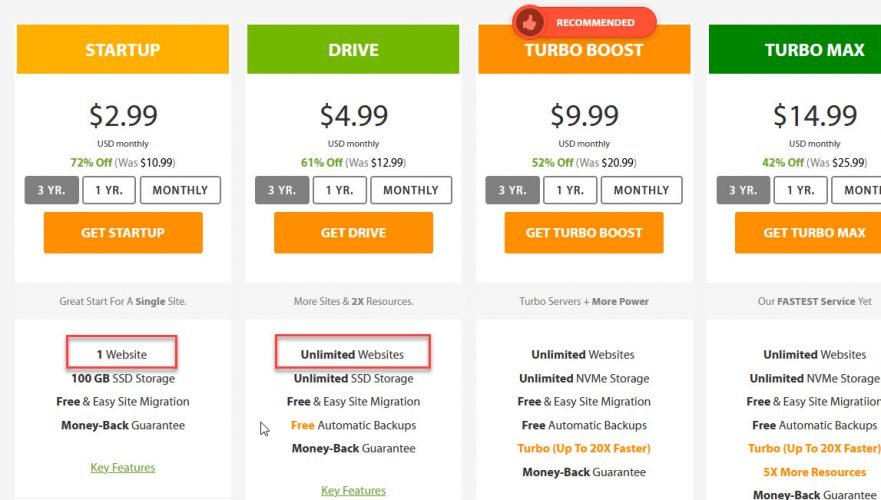
Next pick a plan.
Choose Get Startup, the cheapest option if you’re going to create one website.
If you’re going to potentially add a second in the next month or two, choose Drive.
Now it’s time to:
2. Choose A Domain Name For Your New Site
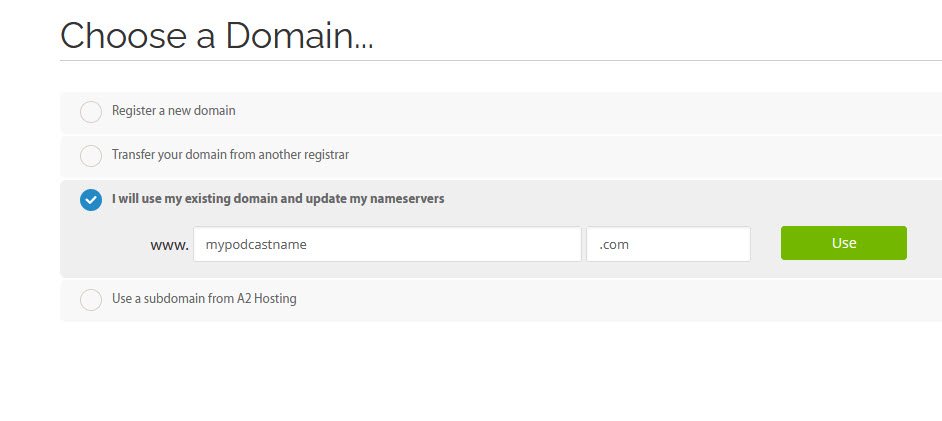
Since this is for your podcast website pick the ‘Register a new domain’ option and put in the name of your podcast as your new domain name.
Your domain name is your internet address like, https://microphonebasics.com/ is our domain name.
If you already have your .com purchased, you can click the “I will use my existing domain name and update my nameservers” option, then click use.
What’s next?
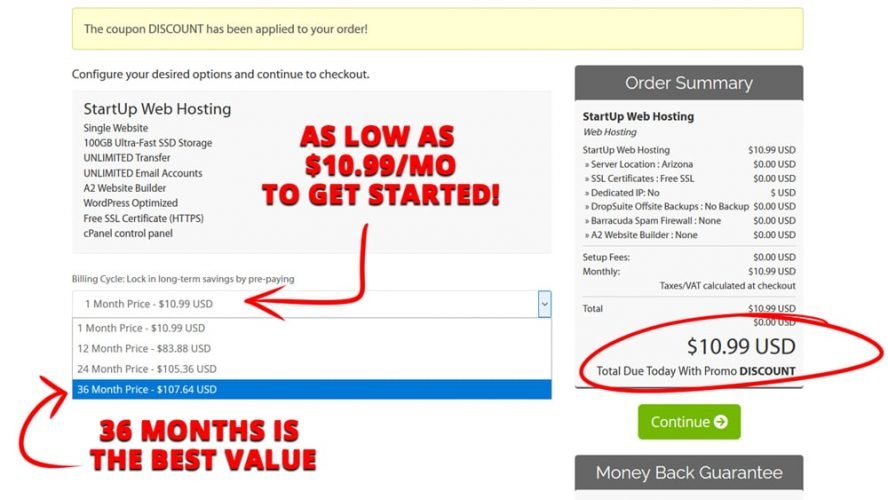
Choose your hosting package with A2.
You have four payment options available – pay monthly or pay in advance for one, two, or three years.
We recommend you skip out on the two-year package as the three-year one is just a couple of dollars more.
Side note:
I’m sure you know podcast success is not overnight, we can’t encourage you enough to pull the trigger on the three-year option. Why? Because it’s a super simple way to say: I’m dedicating myself 110% to this project!
P.S. You’ll be happy to hear that A2 Hosting offers free refunds within 30 days (we doubt you’ll need it, but it’s great peace of mind 😊).
Tip:
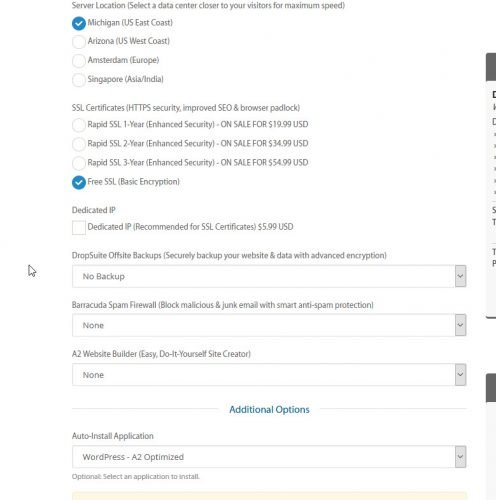
Once you’ve picked a package, you’ll be presented with a couple more options. Here’s what you should select and pass on:
- Pick a server location close to where the majority of your listeners are.
- Go with Free SSL (Basic Encryption)
- Ignore the dedicated IP box.
- Pass on the offsite backup
- Ignore the Spam Firewall, A2 Website Builder, and Cloudflare options – you don’t need them.
- Under ‘additional options.’ choose “WordPress – A2 Optimized”
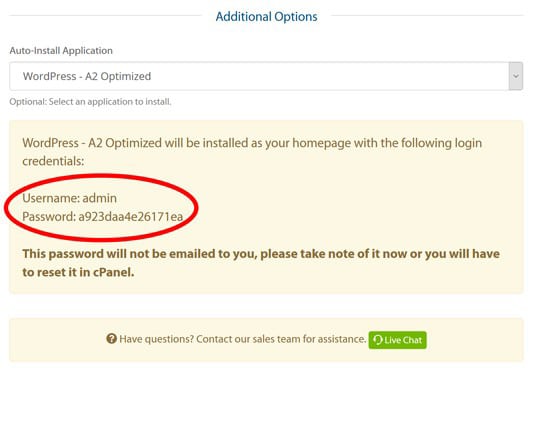
IMPORTANT!
Note down your WordPress login details at this stage as you won’t see them again!
And that’s it, you’re ready to checkout!
After you finish the process, you need to wait a few minutes for A2 to sort out the backend…
LEAVE THIS LOOPING WINDOW THING OPEN, their setting up security stuff, your server, and more.
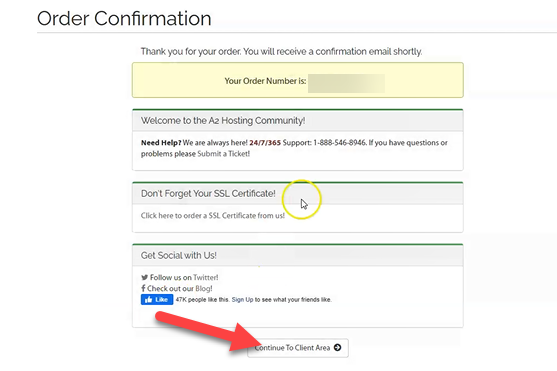
Take a break for a few waiting until you see this screen.
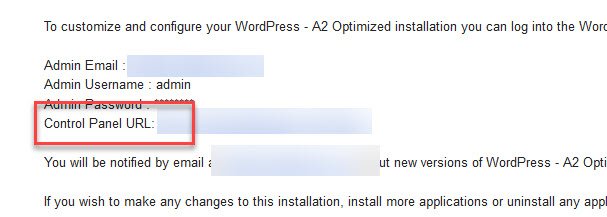
You can also open your email in a new tab, you’re looking for this email confirmation as well.
Once that’s done, your podcast blog will be LIVE on the net!
Congratulations! You own your very own blog!
Now we can jump to:
Step 3: Make Your Website Rock
WordPress is an incredibly flexible and customizable platform. That’s why so many people love it, and it powers so many different sites!
In this section, you’ll learn how to make a fantastic blog without having to waste weeks and weeks of your life to figure out how!
First, let’s learn how to:
Set Up Your Podcast Blog For Success
I know you’re dying to make your blog look slick, but before worrying about your blog’s design, we need to cover the basics and give your site a solid foundation.
This is fundamental for a great user experience and making it Google-friendly!
We now need to login to the WordPress dashboard so you can make edits to your site.
Go to your inbox and open the softaculous email then click on the Control Panel URL link.
Enter the admin and password you saved earlier then:
You’ll be taken to the WordPress dashboard – this is the back end of your website where we’ll be working whenever we want to make changes to our site.
Here’s the first thing to do.
Install Key Plugins
WordPress doesn’t come pre-installed with all the functionality you need…
It would be impossible for the developers to guess all the different end-user requirements!
These are the plugins (extra pieces of software) you need for a podcast website.
Starting with your basic SEO needs with Yoast SEO (the free version; the paid one isn’t worth it).
Here’s how to install it.
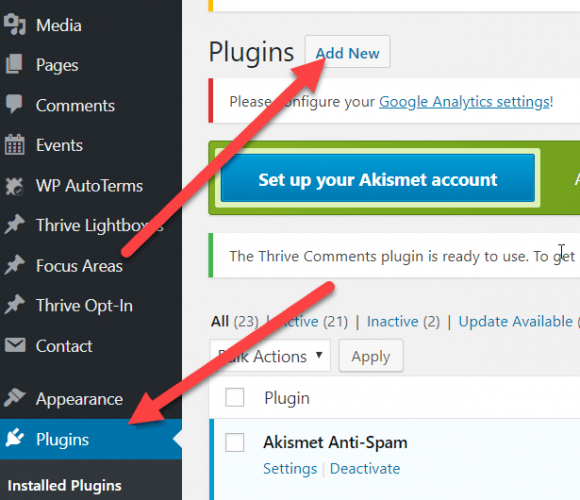
First, Look at the side menu bar on your WordPress dashboard; you’ll see a ‘Plugins’ option that you need to click on. On the new page that loads, look for an ‘Add New’ button and click on it.
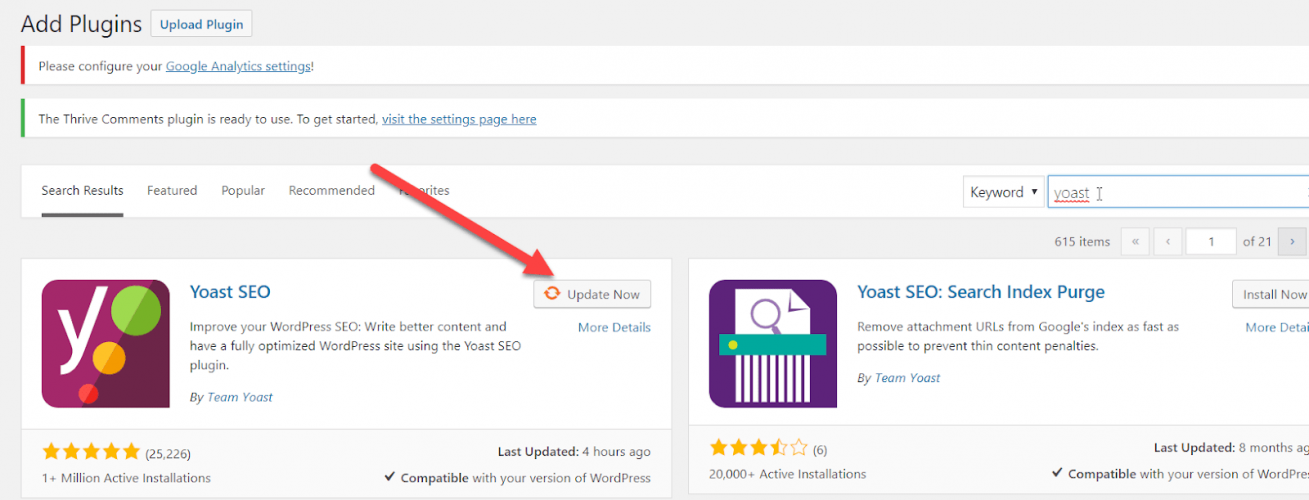
Now look for a search bar on the right-hand side of the page. Found it? Great!
Type in the name of the recommended plugin. Enter “Yoast.”
Once you see that that plugin shows up, click on the ‘Install Now’ button and then again on the same button when it says ‘Activate.’
All done – next repeat the process with these additional plugins, and you’ll be set!
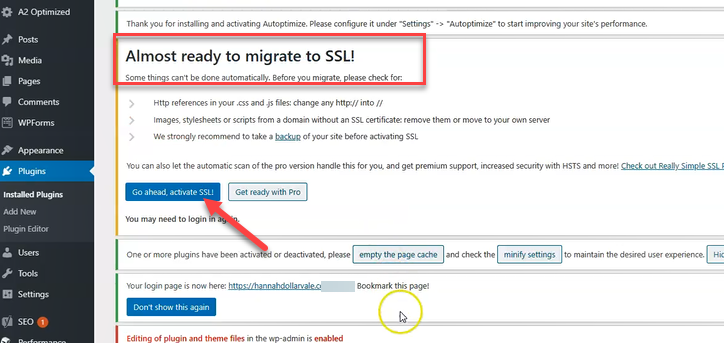
Add a critical type of internet security tech to your site by installing Really Simple SSL.
Once that plugin is activated, click ‘Go ahead, activate SSL,’ button and the plugin will take care of the rest!
- Download Site Kit by Google to access all of Google’s web tools directly in WordPress.
- Protect your site from hackers and intruders with Wordfence.
- Install anti-spam bee to block comment spammers and bot comments
- Give an extra speed boost to your website for free with Autoptimize
Autoptimize’s default settings are solid, here’s a post that shows all the details of optimizing that plugin if you want to nerd out on it.
Got em?
Here’s a few additional settings you need to adapt.
Fine-Tune The Settings
Another important option you see on the dashboard side menu is the settings button.
This is where you modify your blog’s essential overriding features.
This is what you need to update now:
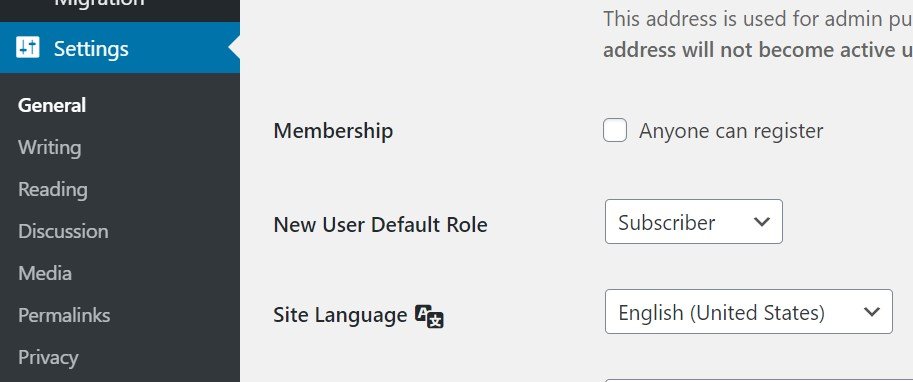
- Change your site’s title and tagline in the ‘General’ sub-tab – this is what Google will call your website, so it needs to be just right!</li
- In the same sub-tag, check to make sure that your WordPress URL and Site URL are correct and both displaying https:// rather than http://.
- Head over to the ‘Permalinks’ sub-tab and change the default URL structure to ‘Post name.’ This will give your posts’ URL a much cleaner look that’s easier to understand and remember.
And you’re done with the settings. Let’s move on:
Build Your Site’s Structure with Pages
‘Pages’ are really similar to ‘Posts’; they even have the same editor!
They’re only different in the function they serve – they are all the main navigational web pages on your site. Stuff like the homepage, the about us page, the contact us page, and so forth.
And unlike posts, you only need to create these once!
So we suggest you map out what pages you need (check out similar sites for ideas) and then build them!
And, once they’re done, you’ll only need to focus on your posts!
Sorting Your Site’s Appearance
The last section you need to customize is the ‘Appearance’ tab.
You can find the link on the side menu, right above ‘Plugins.’
Hover over it to reveal all the different options. As you grow your website and pick a new theme (we’ll talk about this soon), you might see new things pop up here, so keep an eye out for them.
But for now, you only need to worry about the ‘Menus’ and ‘Widgets’ sub-tabs. Here you’ll be able to create and modify:
- The main menu
- The footer menu (if you have one)
- Sidebars
- Widgets (small extra bits of functionality, like a search bar or social media buttons)
And you’re done with setting up your new podcast blog! Awesome work!
So now we can get to the fun part… How do you get people to go ‘Wow’ when they land on your podcast blog?
Design Your Podcast Website With Themes
That’s right – you won’t need to hire an expensive web designer to make your blog look good!
Nowadays, you can achieve brilliant results with the simple addition of a theme (think of it as clothing for your website).
At this point, your site is using one of WordPress’s default themes. Let’s be honest here and say they don’t look great!
That’s why you need to pick a new theme to make yourself stand out from the crowd and give your content some glamourous new clothes to shine in.
You have two options: a completely free one and a paid premium one.
The free option is a great plug-and-play option that uses pre-made templates to instantly create your site.
The premium option adds way more design customization options as well as leads and sales conversion functionality.
Going premium will cost you about $200 per year, but it’s easily worth 2-4 times that amount, and the free one is well… free.
Here’s how to set them up:
Option 1: Build a Lead Generating Custom Website
Thrive themes, what this website is built on is a market-leading piece of software that’s ideal.
Why is it so great?
Well, mainly because it isn’t just a paid theme. When you sign up for Thrive Theme Membership, you’ll get access to an unbelievable amount of optimization tools, widgets, and plugins.
These include:
- A custom page builder
- Landing pages
- Sales funnels
- Split-testing functionality (the KEY to making MORE money online)
- Email optin form builders
- Custom contact form builder
- A quiz builder
- Member support forums
- Step by step video trainings and tutorials on how to build it all
- And much more
If you want to build a custom site from scratch the more simple way, Thrive Themes is how to do it.
Also, if you want to promote consultations, courses, physical products, or digital products, Thrive is a lead generating sales converting machine.
Click here to check out the current subscription pricing for Thrive here.
If you decide to purchase a membership, Thrive will walk through all the installation and setup steps, so you don’t need our help here.
Option 2: Use a Free Theme
If money is tight, then there’s no better alternative on the market than Astra Themes!
They’re lightyears ahead of all the other free themes, and they’re also better than most paid options.
This is how you install it:
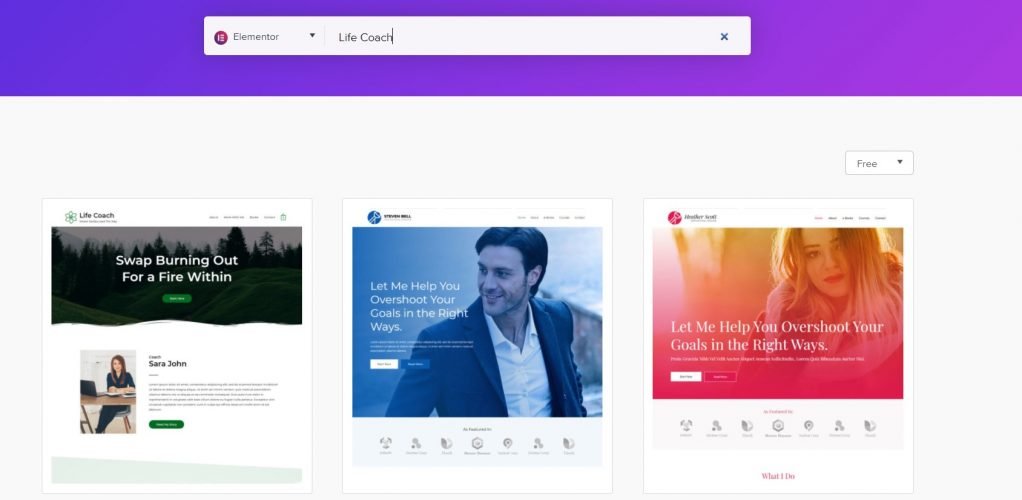
Head over to Astra’s website and find a free, ready-to-use template that you like.
Note:
Use an Elementor template, it is a pretty straightforward page builder that is also free.
We advise you to look at the life coach templates as they are perfect for podcasters.
You’ll obviously replace the stock images 🙂
Once you find a template that looks like what you want your site to look like but with your images, note down its name.
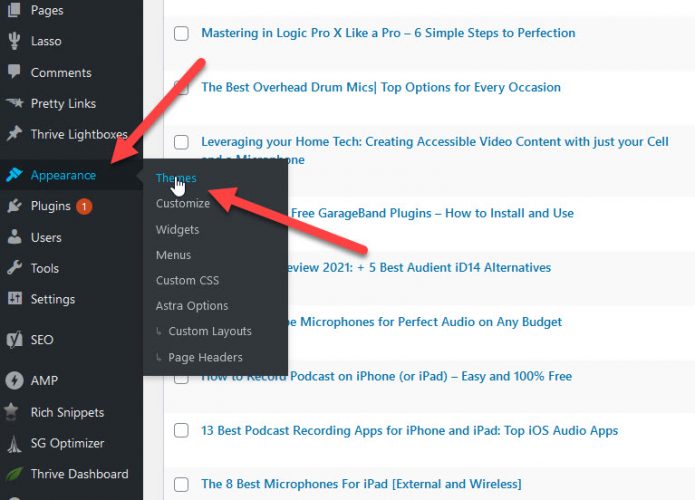
Then go back to the WordPress dashboard and open up the Appearance > Themes tab.
Click ‘Add New’ at the top of the page.
Search for ‘Astra’ using the search box.
Click ‘Install Now’ and then ‘Activate’ on the same button.
Then click on the Appearance > Starter Templates tab. Refresh the page if you don’t see it.
Find your favorite template here again (searching by its name). Click on it.
Click on ‘Import Complete Site’ in the bottom right-hand corner.
A pop-up will appear where you need to click ‘Import’ again.
And, new theme and website template is loaded!
Now replace the images and change the words using Elementor, here’s some tutorials to help you out and…
Step 4: Get Free Leads
One of the most enormous benefits of having a website is the ability to have a place people can go to sign up for your email list.
An email list is more reliable than Facebook, Instagram, etc for distributing your new episodes and other information to fans, why?
Because when you hit send from your email list, every person on your list receives that email!
With a social media post, only 5-20% or so of your followers will see it, and even less than that will open or engage with it.
You can begin an email list for 100% free with two super solid tools, ConvertKit and Aweber.
Here’s the primary differences between the two.
ConvertKit’s free plan will allow you to have 1,000 email subscribers before you have to give them a dime. Pretty incredible.
ConvertKit is also a super modern and easy to use platform after a few go’s.
Aweber’s free plan is free up to 500 email subscribers. However Aweber’s free plan comes with two features that ConvertKit does not include.
- Customer Support
- An Autoresponder
An autoresponder gives you the ability to send 1, 2, 10, or more emails automatically to subscribers after they join your list, buy something, or perform some other “event” that you want to have automatic emails begin.
An autoresponder is a valuable feature for building know, like, and trust and for making sales.
You get to say hi and welcome immediately when someone joins your list, automatically!
Awebers email system is a little “bulkier” than ConvertKit so the learning curve is a little bit longer with Aweber.
If you know you need/want an autoresponder, absolutely choose Aweber. You can sign up for Aweber’s free plan here.
If you want to try ConvertKit’s more simple system to see if you like it better, or don’t want the autoresponder but want more free email users. Click to use ConvertKit’s free account here.
Step 5: Get Traffic To Your Site and Start Making MoneyZ
We know you’re a podcaster.
This means you have an enormous leg-up on everybody else who is starting a blog.
Why?
All of your past podcasts!
You can use these to turbocharge your ability to create new content for your blog.
OMG… Do I need to transcribe dozens of podcasts? That will take me ages!
Get that thought out of your head!
Technology is here to help!
You’ll be able to quickly transcribe your podcasts with Descript. It’ll be a breeze!
Take these transcriptions and create yourself some killer blog posts using the formats we recommend earlier-on in this article (‘How To ___’ and ‘Best ___ For ___’).
We suggest you go a bit crazy.
Set yourself the goal of making multiple blog posts out of each old podcast – from our experience, you could have up to 3 posts hidden within each 30-minute episode!
Now let’s:
Make Money With Your Website
There’s a ton of ways you can go about monetizing your blog, but here are some of the ones we highly recommend:
- Adding affiliate links to your blog posts, show notes, and emails
- Creating live and pre-recorded online courses
- Writing and selling e-books
- Setting up a coaching service
- Organizing live or virtual events
- Allowing advertisements on your content
- Developing apps
But the fastest way to start making money is by becoming an affiliate marketer!
What does that mean?
It means that you earn money by recommending companies’ products and services by adding a special type of link to your content.
These are called affiliate links and, thanks to tracking cookies, they record when one of your readers clicks on them. They also assign you a pre-agreed commission when someone you’ve referred buys something!
It’s a straightforward way to earn money while being even more helpful to your audience.
But, beware, you should ONLY link to products that you’ve tested yourself and that you can happily endorse!
If you do otherwise, you risk destroying the trust you’ve worked so hard to build with all these posts…. Don’t do it!
How do you become an affiliate?
You need to look for companies with an affiliate program, and then join them.
Each one is slightly different, so your best bet is carefully reading their specific affiliate instructions before using their links. This will keep unpleasant surprises at bay!
But we suggest you take baby steps first, and start out with the easiest and largest of all affiliate programs: the Amazon Affiliate Program!
Why?
People are already using Amazon every day, so they’ll be really open to buying something you recommend from their favorite e-commerce store.
All you need to do is find the right products for your audience and include them in your super-helpful content.
On to today’s very last step:
Publish Blogs
Never forget that content is king!
But if content is king, consistency is his queen, and ‘niching down’ is his treasurer.
This is a straightforward concept.
Just take your podcast blog’s current niche and narrow your focus further.
Pick a specific sub-niche. Then if it still makes sense, do the same thing again to find a sub-sub-niche.
Why is this important?
- Narrow focus brings faster success.
- Most people don’t do it.
- Most importantly, Google says to do it!
Look:
Google recently stated that they prioritize content creators that ‘cultivate a reputation for expertise and trustworthiness in a specific area.’
Here’s a real-life example:
Let’s say you’re in the gaming niche.
It’s a vast and competitive place to be… you’re likely getting drowned out as a small player…
So you niche down and decide on the first-person shooter gaming niche.
Much better, but still a bit too vague, so you niche down again and find yourself a super sweet spot in the Call of Duty gaming world.
Perfect – it strikes the right balance between a tight focus and a broad enough audience!
Who will a Call of Duty fan trust more? A generic first-person shooter blog writing about a ton of games, or a die-hard Call of Duty blogger dedicated solely to helping people become legendary soldiers?
The answer is obvious.
Be the Call of Duty blogger, and reap the monetary rewards!
It’s the best way to prove to Google and your readers that you’re a trustworthy expert.
We know it’ll be challenging, but it’ll also be insanely rewarding!
Here’s how to start.
Create Content With Posts
Their name doesn’t lie – ‘Posts’ are the tool you’ll use to write your blog posts and articles.
This is one of the easiest-to-use sections on WordPress, and it’s what really propelled the platform to popularity in its early days.
The vast majority of your content will be in this section, and the good news is that you can effortlessly edit old content to keep it fresh!
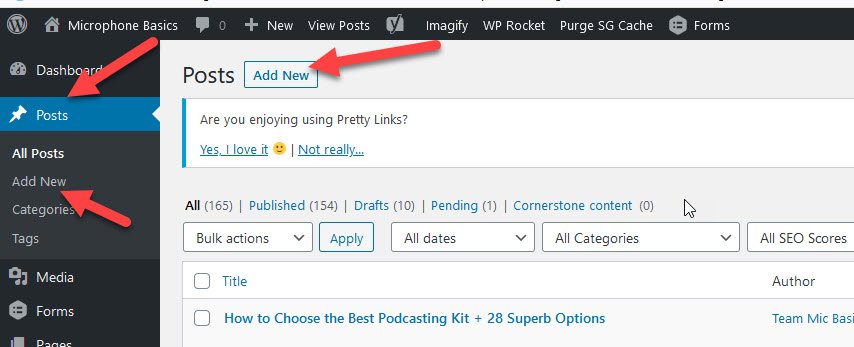
You get to the blog post section of WordPress by navigating to the ‘Posts’ section and clicking the ‘Add New’ button at the top left hand of the page.
You’ll be taken to an intuitive post-builder page where you can upload your content, images, and links!
Warning:
Never create a blog post with Elementor, Thrive, or any other page builder.
Always use the default WordPress editor.
Use page builders to build pages, and create blog posts with the WordPress post creator and editor.
This is important because if you change your theme or design a year or three from now, you’ll have to rebuild every blog post with the new builder.
Avoid that catastrophe, and use WordPress to publish blogs, and page builders to build pages!
If you get stuck or need more guidance, we suggest watching this video tutorial on the post creation process.
Concluding Thoughts
Podcast website and blog live, FIST BUMPS!
Never lose sight of the fact that your mission is to help your followers… yesterday, today, and tomorrow!
Congrats!
Podcast Blog FAQs
What’s A Podcast Blog Or A Podcast Website?
It’s a website that combines the power of blogging with podcasting.
Using both tools on a single website allows you to reach a wider audience, deliver a more engaging experience, and ultimately provide more value to your fans!
Here are some examples of the cool things you can do:
- Add audio summaries to your blog posts.
- Add show notes to your podcasts.
- Embed relevant podcasts into your posts to make them interactive.
- Use blog posts to deep dive into topics mentioned in your podcasts
- Turn your blog posts into podcast episodes, and vice versa.
What’s The Difference Between A Podcast And A Blog?
The main difference is that a podcast is an audio file designed for listening to, whilst a blog is a piece of written content intended for reading.
Can You Combine Blogging and Podcasting?
Yes, absolutely!
These two mediums can be unstoppable when they’re used together, as they complement each other perfectly. Read through this article from the top and learn how to turn your podcast into a blog!
What’s The Meaning Of The Phrase ‘Podcast Blog’?
It refers to a website that combines blogging with podcasting in a single place.
By combining these two content creation methods, a website can leverage the advantages of both to provide a very well-rounded experience to its visitors.
What’s A Podcast Blog Post?
A podcast blog post refers to a single post on a podcast blog rather than the whole website itself.
The single post could contain only written content, only audio content, or a mixture of both (the best tactic)

