Can You Really Record High-Quality Audio Outdoors?

Whether you are a podcaster, musician, vlogger, or budding journalist, you probably need to record audio outdoors from time to time. This gig is all about leaving the desk behind and exploring your freedom.
Getting away from the studio opens up the possibilities for your recording; however, it also presents new obstacles. In this article, you’ll learn tips for recording high-quality audio outdoors so that you can perfect your craft and deliver a professional final product.
Why Record Outdoors?
You might wonder why you would want to record anything outdoors when you have the utmost control in the studio. Although you can easily transform a quiet indoor space into a recording area, that’s not always the best option.
If you’re putting your interview on Vimeo or YouTube, you need some visuals. Unless you have an impeccably decorated studio, you’ll have more visual interest when you take the recording outside. Moreover, travel bloggers and other people who are always on the move must have equipment that adapts to the scenery.
But even if you don’t work with visual outputs, there are several reasons for recording an interview outside. You might feel awkward talking into a microphone while you’re at home by yourself. That stilted attitude may come across in the way that you talk. Going outside can help you feel looser, more relaxed, and more comfortable.
Taking your recording outdoors also allows you to find quiet space if that’s not available in your home. “But when I’m outside, the birds are chirping, cars are driving by, and it’s never completely silent,” you might think.
That’s ok. Did you know that you can’t completely eliminate background noise when you’re recording in your bedroom or office? Your air conditioning system and electronics make extraneous sounds even if they’re not obvious.
Depending on your final product, the background noise can create a sense of setting for your viewers or listeners. It’s important to connect with your audience. You’ll be more likely to do this if you seem like a real person in a real setting instead of a talking head in a sound studio.
The ambience of the outdoors adds depth and interest to your final product. It can also create a sense of character and make you seem more authentic.
1. Develop a Minimalist Setup

When you’re in the studio, you can keep all of your equipment hooked up. You don’t often have to fuss with wires and gadgets because it’s all in there waiting for you.
A portable recording studio requires more tinkering and fiddling. But if you’d rather spend your time recording than setting everything up, you should minimize the complexity of the setup. In other words, simplify.
As you’ll see in the remainder of this article, there are some pieces of equipment that you won’t want to live without when you’re recording outdoors. But you should make sure that you know how to use them, they require minimal setup, and they don’t bog you down.
You will probably need the following equipment to record in the field:
- Portable field mixer
- Microphones
- Wind protection
- Field recorder
- Headphones
If you’re planning to use your mobile device to record audio outdoors, you’ll need even less equipment than this. However, sometimes a field mixer is more useful than your smartphone. You’ll be able to plug multiple devices, such as headphones and microphones into it, whereas your smartphone only has one input.
The best gear to carry with you in the field if you’re using your smartphone includes:
- Microphone with adapter that allows it to connect to your phone
- Headphones with Bluetooth capability
- Recording app
One of the benefits of using an external microphone with your smartphone or ipad is that audio technology isn’t changing as quickly as video and mobile technology. Therefore, you’ll continue to get excellent quality audio from your microphone even if other technology changes.
2. Avoid Using the Built-In Microphone on Your Device

Although the mics on cameras and mobile devices have come a long way, they’re not designed for professional recording. You’ll have a hard time picking up the best sound outdoors with your iPhone mic, for example.
We did just say that you have to simplify, but this is a corner that you don’t want to cut. Invest in a good mic for outdoor recording.
The microphone on an iPhone is omnidirectional. This means that it will pick up the sounds all around the phone, even if you’re speaking directly into the microphone. If you’re driving, you’ll hear the clicker loud and clear when you signal to change lanes. If you’re outside, you’ll hear the rustling of the trees in front of you as you talk.
If the subject is more than two feet away from the smartphone, you won’t get decent audio no matter what.
Types of Interview Microphones
As you research the best microphone to buy for your outdoor interviews, you’ll come across a few types. Each has its pros and cons.
Handheld Microphones
Handheld mics seem to be ideal for interviews. You can plug them into a field recorder and get going. Plus, you can move the microphone from speaker to speaker to capture the audio. However, handheld mics pick up sound from various directions.
An omnidirectional mic captures sound from all directions. Therefore, you’ll hear a lot of background noise in the recording.
A cardioid mic is most sensitive to sound at the front and sides. It blocks sound from the rear, which can take care of some of the ambient buzz that may come from an outdoor environment. A cardioid mic can also cut down on wind noise.
Shotgun Microphones
The shotgun mic is ideal for capturing voice recordings in noisy settings. It’s a uni-directional microphone, which means that it picks up audio directly from the source and blocks ambient noise. Because a shotgun mic won’t pick up sound from the back or sides, you have to make sure that it’s properly positioned. You must also protect it from the wind, which we’ll discuss later in this article.
Lavalier Microphones
A lavalier or lapel microphone is close to the audio output source. Therefore, it will pick up less ambient noise than some other types of microphones. However, depending on the direction of the wind, you could end up with fuzzy sound if you use a lapel microphone.
The benefit of using this type of microphone is that it’s hands-free. It enables the user to move around, make hand gestures and, basically, act completely natural on camera. But you’ll have to outfit it with some accessories to make it ideal for outdoor use.
Many lavalier microphones these days are wireless and work with mobile devices. This makes them more flexible than ever. You usually get what you pay for, though. A cheap lav mic can produce worse sound quality than the headphone-and-mic combo that came with your phone.
3. Eliminate Wind Sound

One of the biggest obstacles to recording outdoors is the wind. When it blows directly into the sound ports on a microphone, it clouds any other audio. At best, wind can sound like static. At worst, it completely obliterates the speaker.
It’s virtually impossible to eliminate the sound of the wind in post-production. To avoid losing an otherwise perfect interview to the wind, take some precautions with your recording device.
Start by placing your microphone in line with the wind. Don’t allow the wind to cross over the front of the mic. Instead, point the microphone in the direction that the wind is blowing. This won’t completely solve your problems, especially because the wind can change directions. Therefore, you’ll need to follow some of the other tips in this article.
Many mics come with foam windscreens. Note that these are not usually effective at eliminating all gusty noises. However, foam coverings are ideal for preventing the sound of moving air to interfere with your recordings indoors.
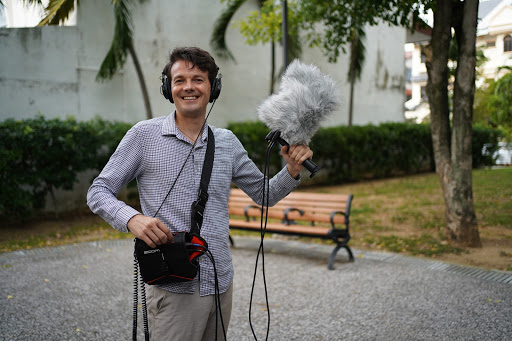
The best windscreens look like fluffy covers for your microphone. Some people refer to them as “dead cat windscreens.” You can find these for just about every type of mic, and they’re an excellent investment.
They might not cut out all of the ambient wind noise. They can also muffle the sound from your speaker or musician. Still, they’re perfect for recording outside. Most people recommend that you don’t use furry wind shields indoors, though.
If you’re using a lavalier microphone, you can always secure it to the inside of your collar using duct tape. Leave an opening at the top into which you can speak. But the duct tape will prevent air from getting into the sides of the mic. Doing this also allows you to hide your lapel microphone while achieving great audio.
You should also spend some time scoping out the best location. Surrounding yourself on at least two sides with a shelter can cut down on unpredictable wind noises. You can also use your body as a wind blocker if you don’t have walls, a tree, or a shelter nearby.
4. Record Room Tone
When you begin your recording, don’t launch right into the interview. Allow for at least 30 seconds of silence before you record anything substantial.
Doing this lets the microphone pick up the ambient noise. It’s called recording the room tone.
There are two reasons that doing this is beneficial. You can highlight it in your editing software and reduce the background noise in the final recording.
However, some ambient sound will remain. That’s a good thing. You can use it if you have to cut your voice out of the final piece. Instead of leaving a completely blank audio space, you can fill it with the background noise that you recorded at the beginning for a more seamless sound.
Many interviewers use environmental noise to their advantage. It sets the scene.
If you’re in the middle of an interview and you’re surprised by a loud noise, such as a plane flying overhead, it’s a good idea to wait for it to pass. You can always cut out the break in the interview. But you won’t usually be able to edit out the loud sound.
5. Record at the Right Distance
If you put too much distance between the speaker and the microphone, you’ll increase the chances of picking up ambient sounds instead of the focal audio. Some experts recommend placing the mic between 1 and 6 feet from the sound source.
Others say that you should place the mic as close to the subject as possible. The reasoning behind using a close-range mic is that the sound will be louder and clearer. If you’re dealing with background or wind noises, at least the primary audio will make its way through.
6. Learn to Record in the Car

The weather doesn’t always cooperate with you, but if you’re on the road, you might not have the option to go inside to record. Therefore, you might want to learn how to record high-quality audio in your car.
If you’re driving, you’re going to produce lots of background noise. The recording may capture the road noise, sound of your air conditioner, clicker signal, and windshield wipers.
Try using a lapel mic, which will capture your voice without extraneous sounds. You can also use a shotgun mic. Just keep the microphones away from glass and hard surfaces, which can produce high frequencies that sound irritating on your recording.
7. Wear Headphones
If you don’t wear headphones, you can’t catch recording problems as they’re happening. What you hear without headphones is very different than what your microphone picks up. You’ll need to have a real-time setup that captures the audio so that you can identify wind noise, ambient sounds, and other types of interference.
Doing this can save you a lot of time because you’ll end up doing less editing and post-production work. Plus, you’ll recognize problems before they become severe so that you can nip them in the bud instead of re-recording entire segments.
The most important aspect of outdoor recording is to capture clear sound from the beginning. While you can make some changes in post-production, you can’t transform terrible audio into something that will impress your audience. Use the tips in this article to improve your recordings and produce high-quality sound outdoors.
